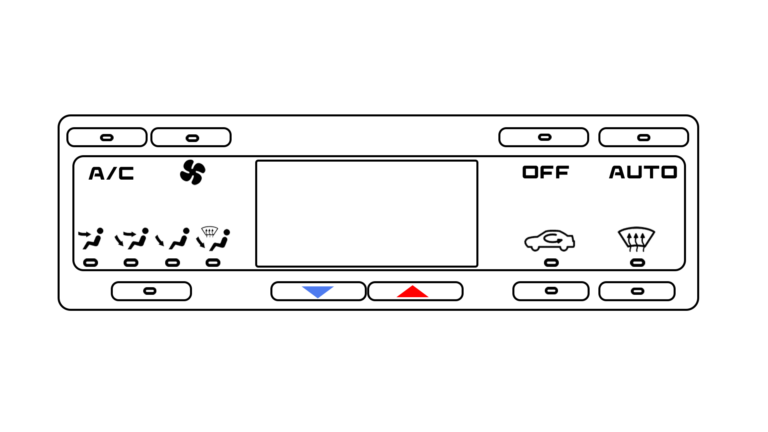
S13 Digital Climate Control Guide
The Final S13 Digital Climate Control Guide you’ll ever need.
Why this guide was made.
I could not have made this S13 Digital Climate Control Guide without the help of those who have come before me. I want to give a special shout out to NismoLK and KoukiMonster on NicoClub who really helped me find my way through. So at the end of the day I’m maybe contributing like 15% new information.
The whole reason I ended up making this s13 Digital Climate Control Guide, is that during my installation, I found a few things on the guides to be incorrect, not accurate, or simply out of date. A good example is that the clips and rod suggested by NismoLK, did not fit correctly, and weren’t holding. I’ve also created a wiring diagram that limits the amount of wires you have to splice into, to one single wire.
Also, with Zilvia having finally met its end, its only a matter of time before forums get lost completely. Or people get tired of ads, or pictures no longer showing up. So I wanted to create something that I had some control over, and hopefully help give back to the 240sx community in a small way. I hope this helps all 2 of you who are crazy enough to do this mod in the year of our lord 2026.
To get on a bit of a soapbox for a second. This is a passion project for me. And I’m kind of tired of everyone with a 3D printer making a shop and selling things. So my intention is to make all the 3D printed parts, and tutorial aspects of this completely free. And in some small way give back to those who have come before me, and taught me everything I know, either in person, or through the forums or other videos.
Please read the entire guide before making any purchases. Just so you know exactly what you need, or don’t need.
Tools Needed
- Drill
- Dremel
- Drill Bit 15/64
- Spade Bit 5/8
- Multimeter
- Phillips Screwdriver
- Small Flathead Screwdriver
- 10mm Socket and Ratchet
- Small Ratchet with Phillips Bit
- Hammer
- Terminal Crimper
- Scissors
- Utility Knife
- Tape (electrical)
- Tape (Tessa)
- Zip Ties
- Depin Tool
- Wire Stripper
S13 Digital Climate Control Video Guide
Here is the full video guide on installing the Digital Climate Control into a USDM Nissan 240sx. I’ve posted the video here so you don’t have to scroll all the way down to get to it. But I highly encourage you to read through the whole walkthrough on this webpage as well as watch the video.
DISCLAIMER: I am not a professional electrical engineer, or an engineer of any kind for that matter. Please follow at your own risk. That being said, if you know something I don’t about electrical wiring, or structural engineering, and you think you can make this better, or safer, please let me know, as my goal is to have the best information available.
1. PARTS
S13 Digital Climate Control
Obviously you will need the Digital Climate Control itself. The best way to purchase is on E-bay. But they are getting kind of pricey. That being said, there are two versions for the S13, but there is really only one difference and that is the connector on the rear of the box. The Chuki (1991-95) has a ZEXEL part number ending in 52F00, and a Kouki (1996-98) has a ZEXEL part number ending in 60F01.
Just be sure you know which version you’re purchasing, as you will have to purchase the correct connectors. Everything else should be the same.
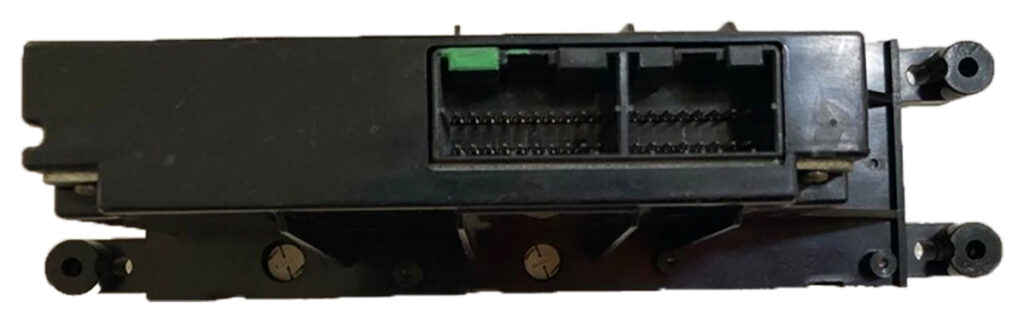
Chuki DCC Rear Connection (1991-1995)
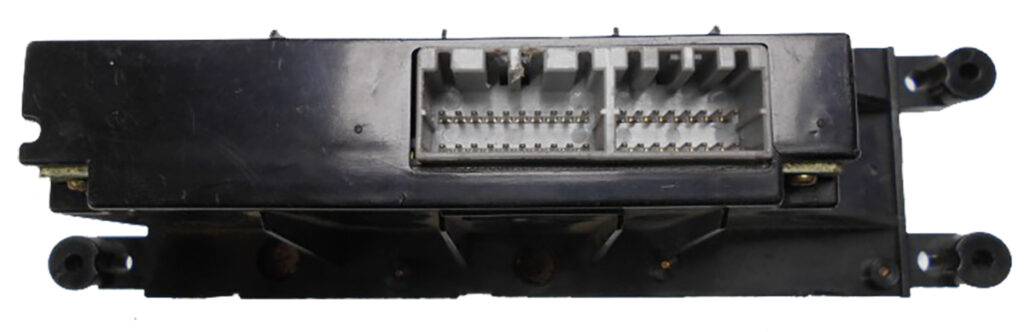
Kouki DCC Rear Connection (1996-1998)
Wiring Harness
Okay, so, elephant in the room. Making a harness seems like a huge pain in the ass, and it kind of is. You need specific crimping tools, you need all kinds of different connectors, relays, and pins. Then you need a wiring diagram, that takes a degree to actually understand. So I decided to try and simplify it, at least the diagram part. You’re still gonna have to be comfortable with crimping pins on connectors, and understanding basic wiring. But hey, you’re wanting to install a useless Climate Control Mod onto your 240sx you’ve clearly got that “special hyperfocus on 90’s JDM cars” kind of ’tism, so it won’t be an issue! I’ve also done all the research, and found the different connectors, and where to purchase them for relatively cheap. So at most its kind of like a bit of a LEGO adventure in wiring.
Electrical Connectors for the Harness
Connector | Part Number | Terminals | Link |
|---|---|---|---|
16-Pin Dash Interface^ | Yazaki 7122-7960 | 62 Connector C Type | Purchase |
16-Pin DCC (Chuki) | AMP MLC040-16s | Multilock 040 Socket | Purchase |
20-Pin DCC (Chuki) | AMP MLC040-20s | Multilock 040 Socket | Purchase |
16-Pin DCC (Kouki) | AMP MLC040MK2-16s | Multilock 040 Socket | Purchase |
20-Pin DCC (Kouki) | AMP MLC040MK2-20s | Multilock 040 Socket | Purchase |
Blend Door Motor | Yazaki 7123-7861-30 | 62 Connector C Type | Purchase |
Outside Ambient Sensor | Sumitomo RS. T1-2s-2 | RS-SKT | Purchase |
Cabin Air Sensor | Yazaki 7283-8629 | 91A-SKT1 | Purchase |
Acessory Connector (F) ** ^ | Yazaki 7123-7860 | 62 Connector C Type | Purchase |
Acessory Connector (M) ** ^ | Yazaki 7122-7860 | 62 Connector C Type | Purchase |
4-Pin Power Connector | Yazaki 7122-1640 | 58s-PIN | Purchase |
Sunload Sensor | Tyco 174056-2 | Multilock 040 Socket | Purchase |
4-Pin Relay Connector | NA
| 91MLC-SKT | Purchase
|
6-Pin Fan Control *** | NA | Large Spade | Purchase |
NA | Small Spade | Purchase |
^ The vendor, Mouser, does not include Terminals with purchase of housing connectors. So make sure you purchase the Terminals separately. The connectors ordered from Corsa-Technic, and Haidie do come with Terminals. It never hurts to purchase extras, in case you mess up a crimp.
** In my wiring design, for ease of routing, I added a connector in place of an existing one on the JDM harness that isn’t used. This connector ties the Sunload Sensor, Cabin Temp Sensor, and Outside Cabin temp sensor wires into one plug. So you can route the long wires where they need to go, and just have a plug that you can clip into, so you don’t have to cut, or pull the whole harness if you need to take the harness out for any reason.
*** I could not for the life of me find this connector. Thankfully its kind of a flat spade connector, so 3D printing a housing for it that works relatively well was simple enough. See the 3D printed parts section for more info. This will use a total of 5 Terminals. 3 of the large spade terminals, and 2 of the smaller spade terminals.
You Do also have an option of just replacing the USDM side of your harness 6-pin fan connector with this one. Its pretty much the same type of connector, annoyingly close really. However, it doesn’t quite fit with the USDM connector. It won’t clip in, and you have to modify your connector. But if you get both ends, and splice the female end to your USDM harness, you can then use the male end on your fabricated harness.
Wires
You’ll need wires to complete this job. They don’t have to be color coded to what is in the Diagram. But they should be rated for Automotive. So you want to get GXL, or TXL rated wires. I suggest getting 18AWG TXL wire for most of the wires. And like 2 feet of 12AWG TXL wire for the thicker fan connector wires. and 22AWG TXL wires for the inside cabin air sensor. These were the three sizes that seemed to match up with the sizes of the original JDM harness.
A little bit of a lesson for you. In Japan they have AVSS which is a part of the Japanese Standard JASO D611. Where as in America, the Standard is based off of SAE J1128. They are both Thin walled wires, meant for automotive. A neat little rabbit hole I fell down. At the end of the day finding decent prices, and variety on AVSS wire was not easy, and its ultimately some copper strands in insulation, so TXL it is!
You don’t have to use the links below to get your wire, I’m just including it as an option. You can ultimately use whatever wire you like, but I wanted to make something as close to the original harness as I could.
Again, refer to the wiring harness diagram to get an idea of how much wire you will actually need.
Sensors & Actuators
These are the Sensor and actuator parts you will need to purchase to make sure everything works correctly. These CAN all be purchased new, so you don’t have to try and hunt and wait to find them at a junkyard or on E-bay. Though some of them you probably should, because it will be cheaper.
Part Needed | From Where | Part Number | Link |
|---|---|---|---|
Blower Motor Resistor | 1996-99 Q45 | 27761-4BA0A | Purchase |
Maxima Blend Door Actuator * | 1996-99 Maxima | 27732-40U00 | Purchase |
Forester Blend Door Actuator | 2003-08 Forester | 72131SA000 | Purchase |
Outside Temp Sensor | 1997-06 Q45 | 27710-31U00 | Purchase
|
Cabin Air Sensor ** | 2003-14 Murano | 27720-15U00 | Purchase |
Sunload Sensor *** | 2015-19 Murano | 27721-3AA0A | Purchase |
4-Pin Relay | Nissan | 25230-79981 | Purchase |
Blend Door Bracket | NA | 27156-51E00 | Purchase |
Rod | NA | NA | Purchase |
Rod Clips | NA | NA | Purchase |
* The Blend door Actuator is very specific. It has to come from a 96-99 Maxima. It kind of shares a part number with an Infiniti I30 of similar years. However the connector is different, as is the actuating arm. This is probably the most expensive piece of the whole project if you purchase it new at $250. You should try to see if you can source one from a junkyard, or a used on on E-Bay.
** Inside Cabin Air Temp Sensor is also a bit pricey New at $55. But you can get these very cheaply and very easily at a Junkyard or on E-Bay.
*** The Sunload Sensor from a Murano is larger, so you’ll have to drill a larger hole into your defrost vent. So keep that in mind. If all else fails, you can find the smaller one in a junkyard, or on ebay. the part number is 27721-0E000. Comes from a lot of late 90’s early 2000’s Nissans.
NOTE: I prefer to use the Forester Blend door Motor. Its way cheaper. And you can replace the arm with a 3d printed arm for the correct length. It also resembles the JDM motor, if thats your thing.
Sensors from the Junkyard
If you’d like to save some money, and have some tools, you can avoid purchasing these new, and make a trip the junkyard. Its certainly cheaper, and a lot of the sensors exist on a variety of cars. Check out the list below to see where you can find them.
Part Needed | From Where |
|---|---|
Blower Motor Resistor | 1997-01 Q45, 98-99 I30, 97-03 QX4, 95-99 Maxima, 96-04 Pathfinder |
Maxima Blend Door | 1996-99 Maxima |
Forester Blend Door | 03-08 Forester |
Outside Temp Sensor* | 1997-06 Q45, 02-15 Frontier, 05-12 Pathfinder, 94-08 Maxima, and Most Nissans really |
Cabin Air Sensor | 03-14 Murano, 03-08 Altima, 00-14 Maxima, 96-04 Pathfinder |
Larger Sunload Sensor | 05-19 Murano, 02-25 Altima, 00-18 Maxima, 13-20 Pathfinder, 08-20 Rogue |
Smaller Sunload Sensor | 96-04 Pathfinder, 93-99 Maxima, 93-96 Altima |
4-Pin Relay | Just look at most Nissans in the Junkyard, and you’ll find one most likely. Could also salvage the connector if you desired. |
* The benefit of finding the outside temp sensor in a junkyard, is you can pull the metal bracket with it. This thing is on pretty much every Nissan equipped with automatic HVAC.
NOTE: There are many cars that share these sensors, so you can look up the part number in the previous table, and just see which models currently use said sensor. There are too many to list every single one, so I’m just adding the most common vehicles you’d find at a junkyard.
3D Printed Parts
Some of the parts Needed to do this conversion don’t exist elsewhere. So I had to get handy, and try to figure out how to 3D model. With mild success. Below is a list of the parts that I’ve created, to make everything work decently. I feel like 3D printing these parts is fine, as they aren’t super structural, nor will they see a ton of wear and tear.
As these parts are going to be in your car, in likely high temperatures, its best to try and print these with ASA, or ABS plastic. They are also modeled to have M4 Brass Threaded Inserts pressed in. However, you can probably get away with some bolts and nuts to secure most of it. I realize that this can add a bit of a complication, as not everyone has a 3D printer. But you can use online shops that will print things for you, and send them to you.
Lastly, I’m not a professional engineer. Some of these designs are likely going to be a bit wonky. Or may not be very well engineered. So if you can make it better, please do!
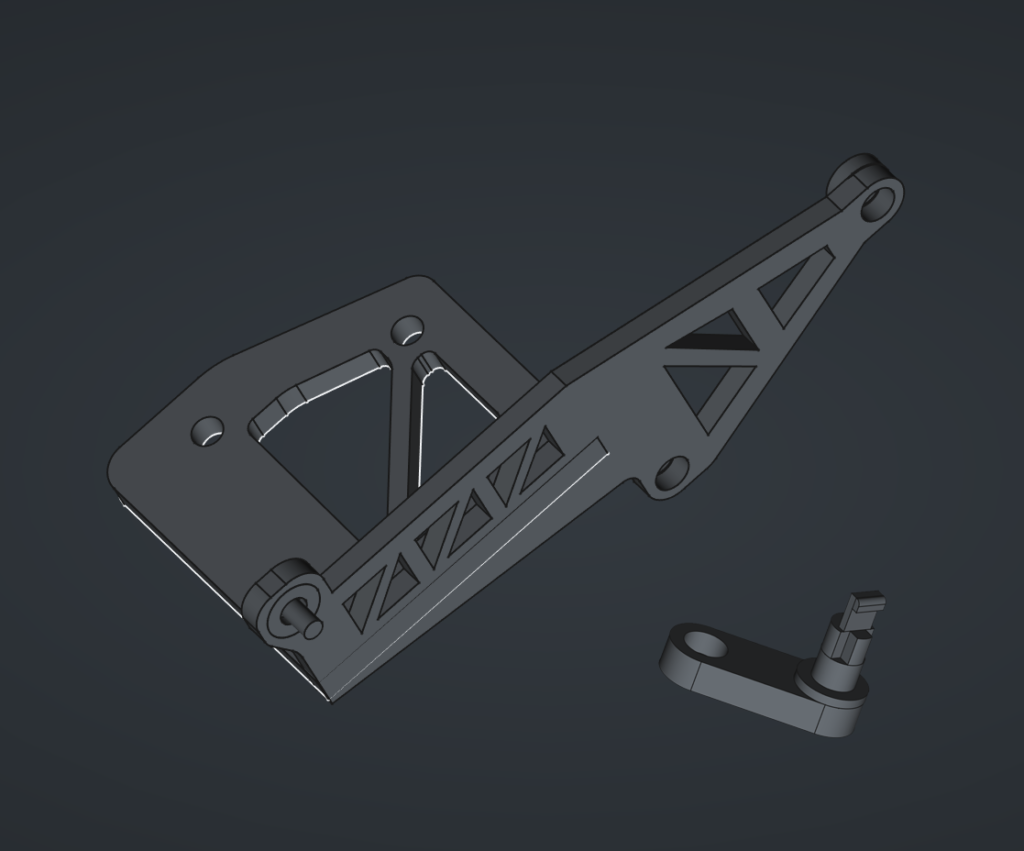
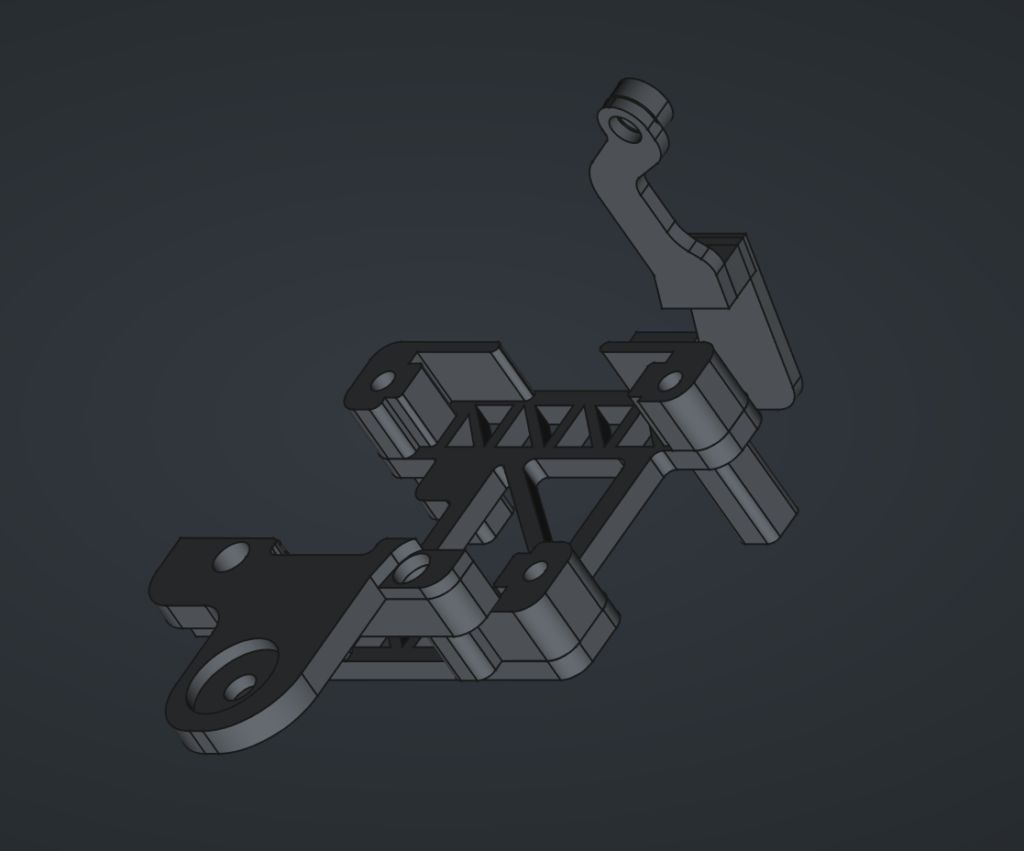
1. Forester Blend Door Actuator Bracket
The Blend Door Motor needs to be placed in a position that doesn’t interfere with any other operations of the car. This Bracket bolts up to the HVAC box with two screws, and uses a locating pin for the third hole.
The 3D print has 3 parts. The bracket itself, the locating pin, and the actuator arm that is the correct length. You can also use inserts of your choosing, or, just use a long flat screw, with a nut to attach the motor.
I recommend going with the Forester motor, as it is cheaper, smaller, and easier to install.
1.5 Maxima Blend Door Actuator Bracket
The Blend Door Motor needs to be placed in a position that doesn’t interfere with any other operations of the car. Also the Maxima Blend door is a bit bulky, and is difficult to place where the OEM one should go. So to solve this, I made a bracket that allows you to place it low in the center console cavity, and bolts in with a 10mm Flange Nut, and a Screw that goes into the HVAC box.
This 3D print has 4 parts to it. The Base Bracket itself. Stand off Legs of various sizes for your own needs. The front Bracket which goes onto the stud. And the rear Bracket which connects to the HVAC Box.
2. Aspirator
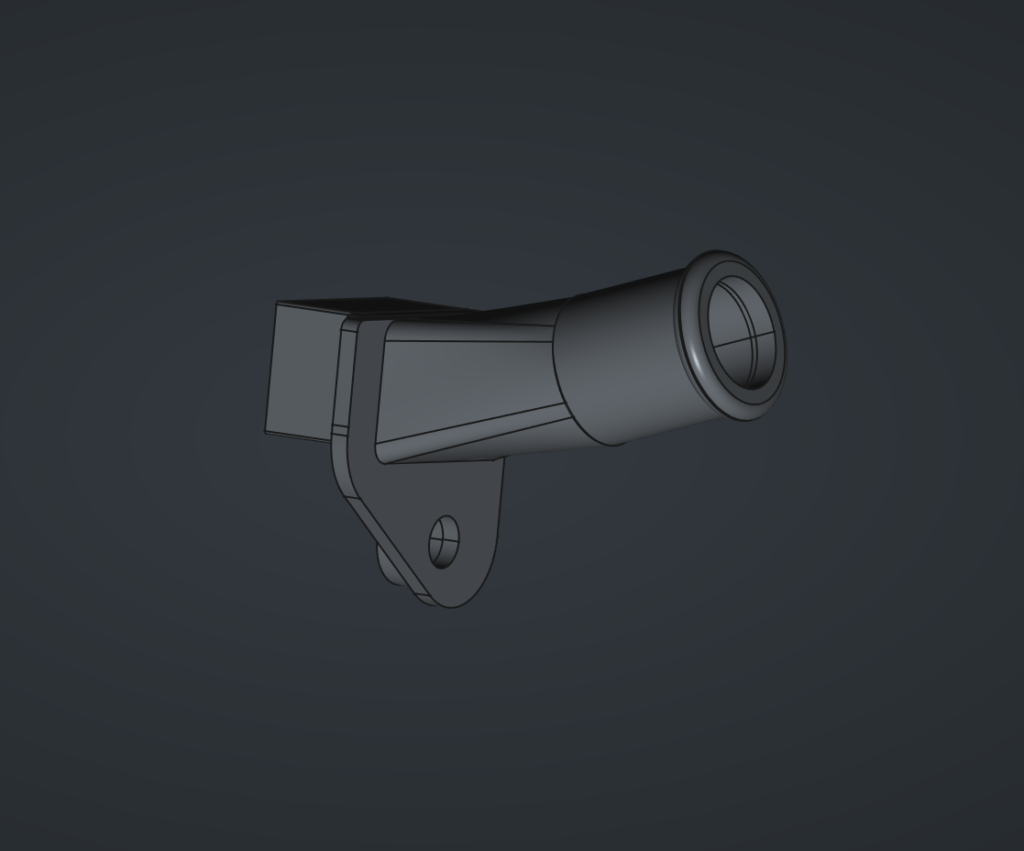
The Ambient Air Temp Sensor needs to draw air in from the cabin, so that it can adjust the temperature to reach the desired setting. This however is difficult because the aspirator was made for RHD cars, and thus, the cut out is reversed, and it doesn’t fit. Beyond that this aspirator is meant to use the Venturi principle to create suction, and pulls air into the sensor, as opposed to pushing it out.
This aspirator Hose is just a single port that goes from the HVAC box, and moves the actual Venturi creating device further away where there is more room. And allows you to run a tube to the left side of the lower Dash cover above the drivers knees.
There are three aspects to this. The Aspirator connector which is shown here. The Venturi device itself (part 3), which is just copied from the mid 90’s Maxima/I30 Aspirator. Which means you can just get that part at a junk yard if you don’t want to print it.
3. Secondary Aspirator
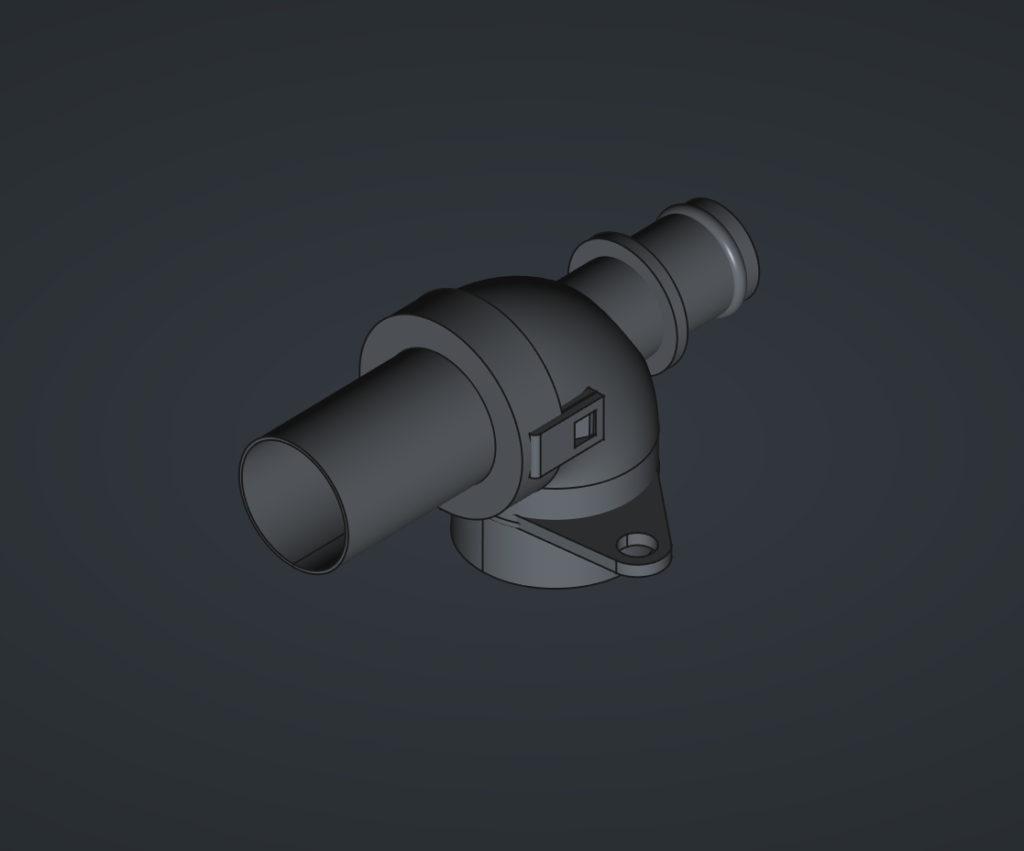
The Ambient Air Temp Sensor needs to draw air in from the cabin, so that it can adjust the temperature to reach the desired setting. This however is difficult because the aspirator was made for RHD cars, and thus, the cut out is reversed, and it doesn’t fit. Beyond that this aspirator is meant to use the Venturi principle to create suction, and pulls air into the sensor, as opposed to pushing it out.
This aspirator Hose is just a single port that goes from the HVAC box, and moves the actual Venturi creating device further away where there is more room. And allows you to run a tube to the left side of the lower Dash cover above the drivers knees.
There are three aspects to this. The Aspirator connector which is shown. The Venturi Adapter (not shown). And the Venturi device itself (not shown), which is just copied from the mid 90’s Maxima/I30 Aspirator. Which means you can just get that part at a junk yard if you need it.
4. Ambient Air Temp Bracket and Grill
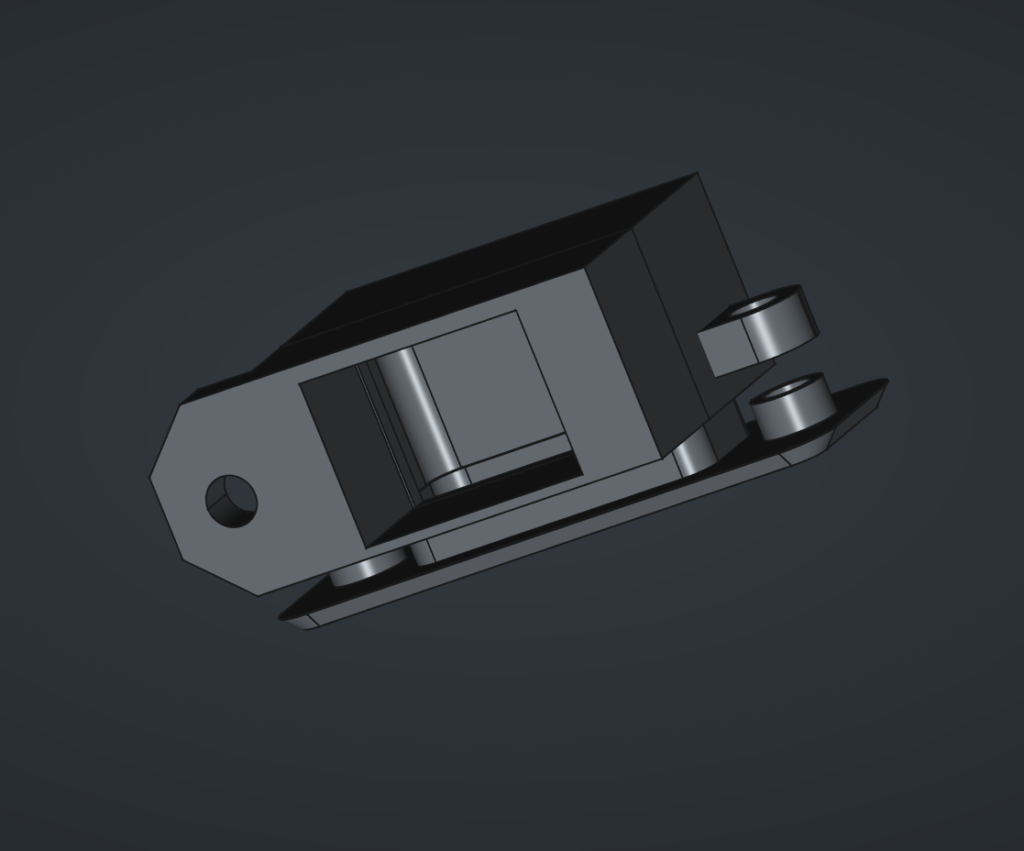
With all the parts above, you should now have suction coming from a hose. That hose needs to attach to the Ambient Air Temperature Sensor. But that sensor needs to pull in air from the cabin to get the correct measurement. Of course, our USDM cars do not have a place for this to actually go. So we have to create one.
The easiest, and most out of the way place that made sense to me, was on the Lower Dash Panel on the left side. So you have to cut out a rectangle and two holes to fit the grill. And then from behind the panel, attach the bracket to the grill, sandwhiching it. Then you can attach the sensor to the bracket, and connect the hoses, and you have a discreet, but functional Cabin Temp Sensor.
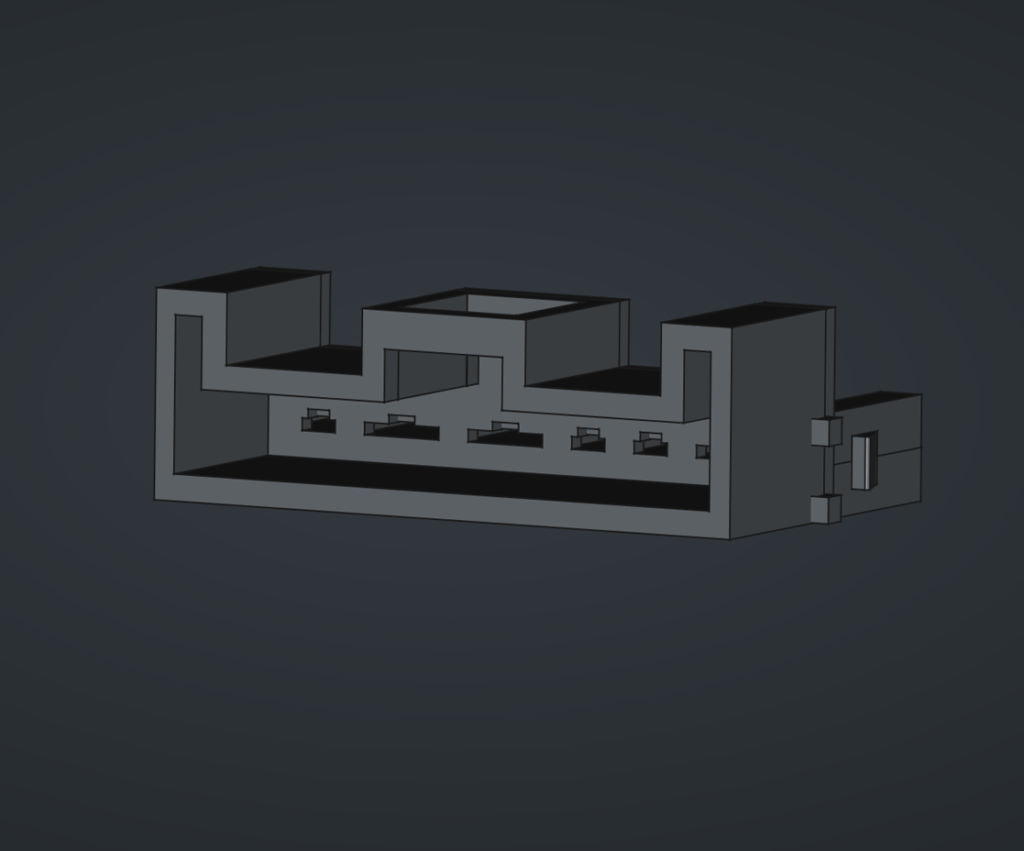
5. Fan controller electrical connector
I tried. I tried a lot to find this connector. And that is no small thing, considering I’ve spent hours upon hours searching online for connectors. This one does not exist. Even having contacted Corsa-Tech, to which they say they don’t know what it is. Alas, it cannot be found.
Fear not. For I, in my limited skills, have created a Connector in FreeCAD, that will work. It snaps in like an OEM plug. And should hold firmly enough. You will need to purchase Terminals. Just crimp them to the wires. And insert them into the back, and affix the locking plate.
Miscellaneous
You’ll need a few other things to complete this install, that aren’t specific enough to have included in previous categories
- 3ft Tubing/Hose
- Rubber Byutal
- Two Nissan Body Screws. The same kind that you took out of the HVAC Control.
- Tiny Self Tapping Screw for the Aspirator
2. WIRING
Wiring Diagram
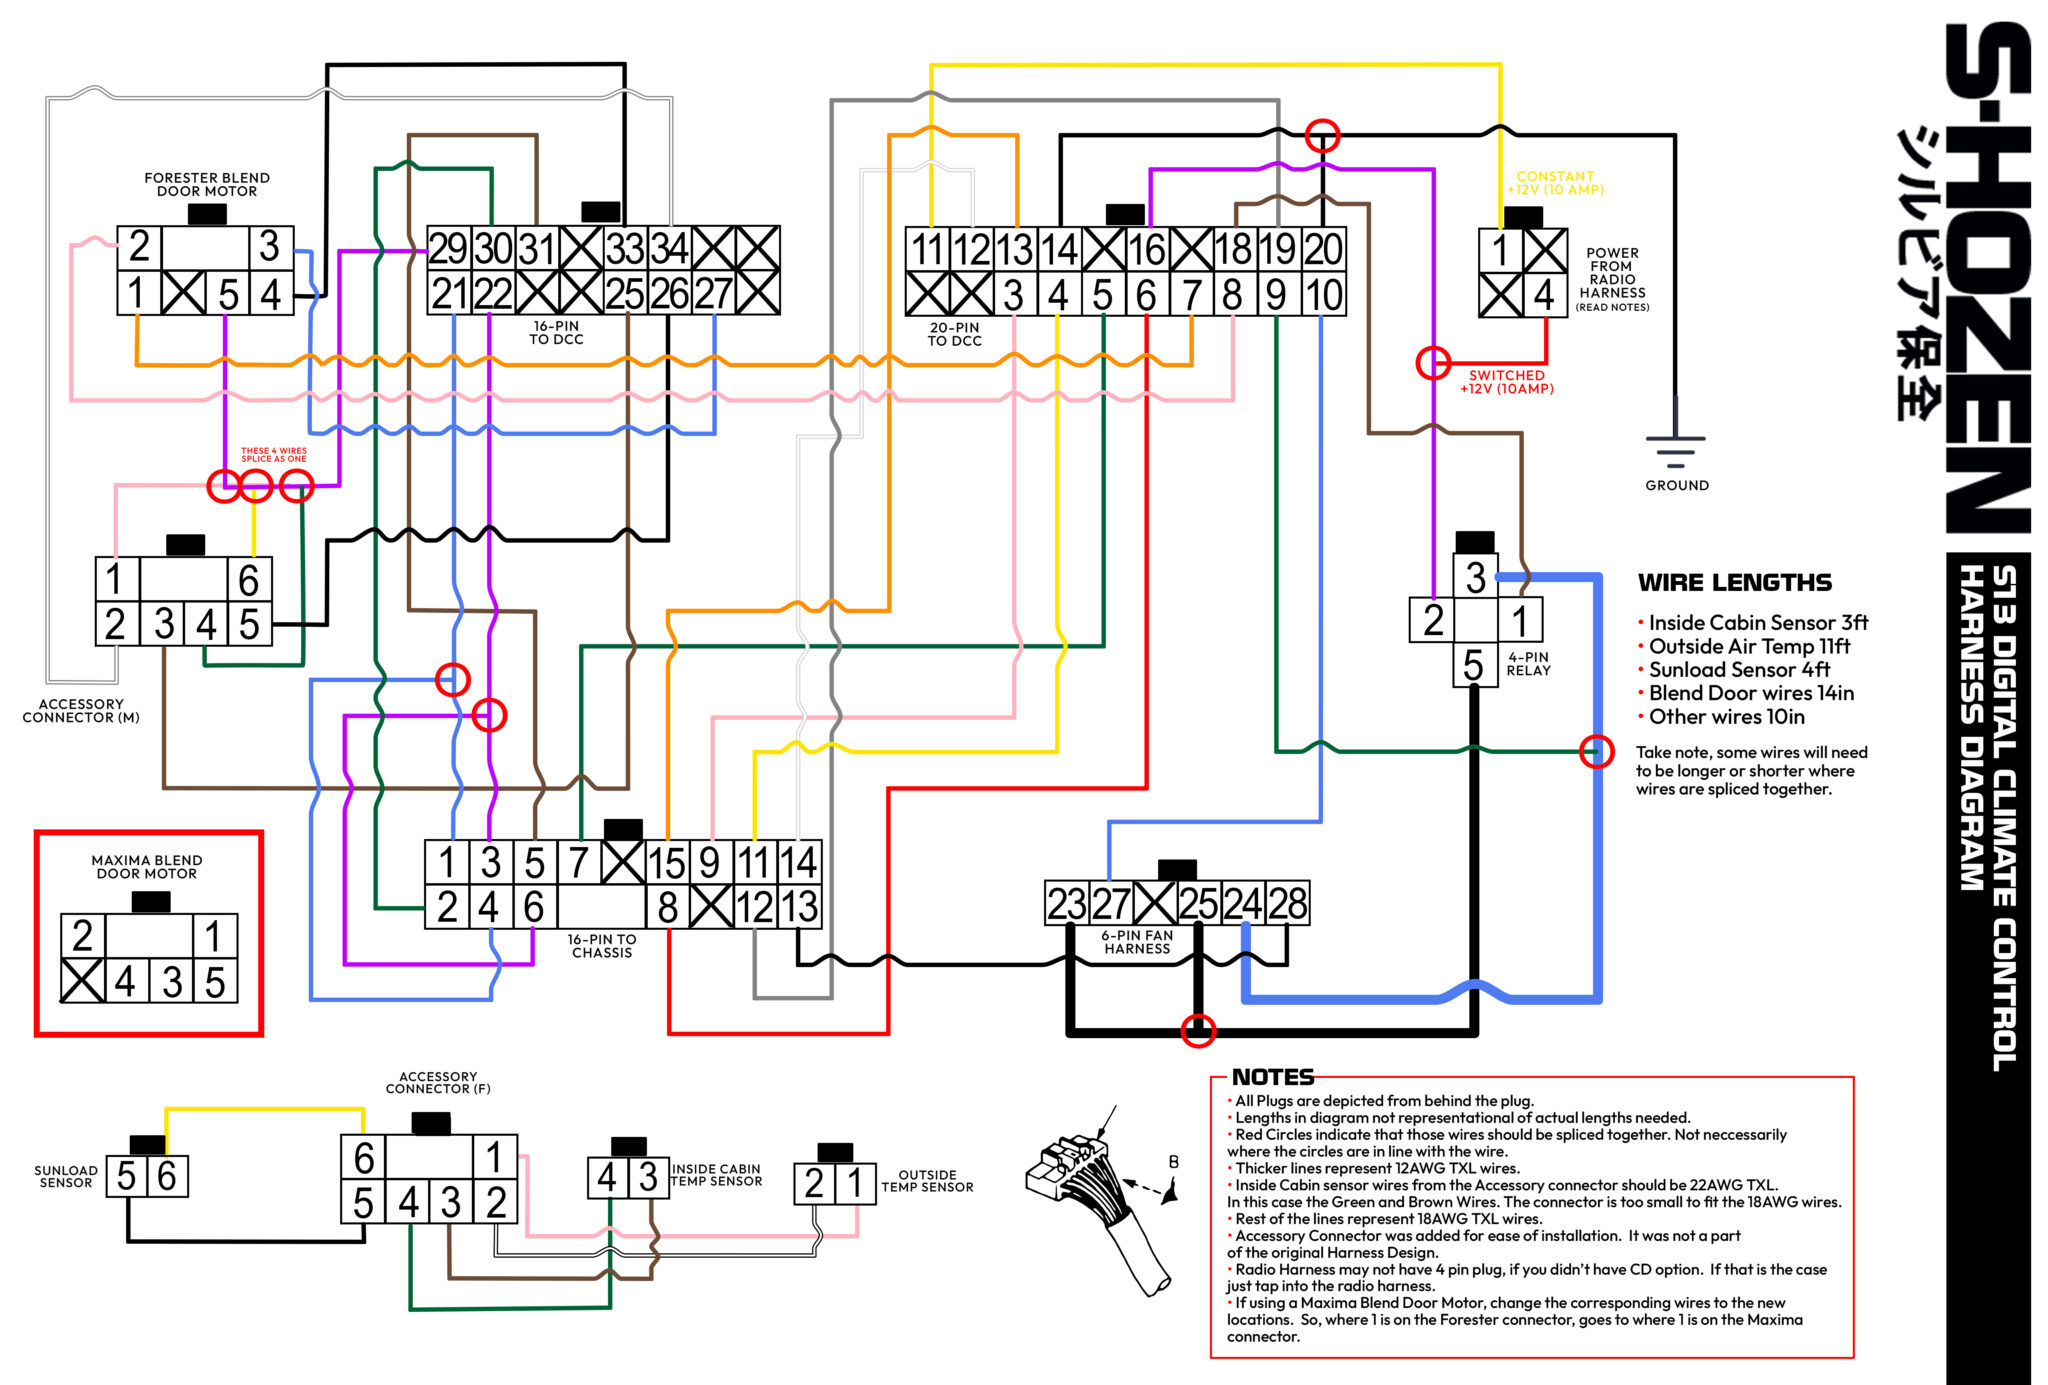
Below is my attempt at a wiring diagram. I’m no engineer, or electrician. So bare with me. But I’ve adjusted from the JDM harness so that it is as plug and play as possible. You should have a 4-pin plug on the radio harness that you can plug into for +12v Constant, and +12v Ignition at 10amps. Which is what the FSM requires for those wires. The only wire that isn’t plugged in anywhere as of right now, is the Ground wire. Which can just be attached to the body. If you don’t have the 4-pin connecter, you will have to splice those wires into the radio harness wires, which should be Black/Red for constant, and Blue for Ignition.
Wire lengths should be around 10 inches in length. Save for the Ground Wire, +12v Ignition, and +12v Constant, which need to be longer to reach the Radio harness and ground comfortably 20 inches should be fine. But, you can do pretty much whatever you want.
The wire for the blend door connector should be 24 inches.
And off the Accessory Connector, The inside Temperature Sensor should be 3ft long. The outside Ambient Air Temp Sensor should be about 12 feet long, to reach the front of the car outside. And then the Sunload Sensor which goes to the vent at the top should be about 4ft long.
Notes
• All Plugs are depicted from behind the plug.
• Lengths in diagram not representational of actual lengths needed.
• Red Circles indicate that those wires should be spliced together. Not neccessarily where the circles are in line with the wire.
• Thicker lines represent 12AWG TXL wires.
• Wires to the Inside Cabin Air Temp Sensor should be 22AWG TXL wires. This is because the connectors are small, and need a thinner wire.
• Rest of the lines represent 18AWG TXL wires.
• Accessory Connector was added for ease of installation. It was not a part of the original Harness Design.
• If using a Maxima Blend Door Motor, change the corresponding wires to the new locations. So, where 1 is on the Forester connector, goes to where 1 is on the Maxima connector.
Wiring Harness Video Guide
Here is a video guide on how to make a harness using the wiring diagram provided. I did not create a breakdown of how to make the harness here on the website, as it would just be too lengthy. So I did most if it in video format, with supporting information on this webpage.
Wires Needed
This is a list of all the wires you’ll need to cut, and at what lengths. If you’ve purchased all the connectors new, outside of the 16-pin, which you have to purchase separately, they should all come with the correct terminals. Just follow the wiring diagram, and use the appropriate terminals for where the wire connects. If in doubt, just watch the video guide!
The wires listed below are color coded according to the wire diagram. But you don’t absolutely need to follow this, obv iously. Its just easier from a visual standpoint.
18 AWG Wires
- Blue: 24” x 1
- Blue: 10” x 2
- Blue: 6” x 1
- Purple: 24” x 1
- Purple: 10” x 2
- Purple: 6” x 1
- Green: 10” x 2
- Green: 6” x 1
- Orange: 24” x 1
- Orange 10” x 1
- Pink: 12′ x 1
- Pink: 24” x 1
- Pink: 10” x 1
- Pink: 6” x 1
- Blue: 24” x 1
- Blue: 10” x 2
- Blue: 6” x 1
- Purple: 24” x 1
- Purple: 10” x 2
- Purple: 6” x 1
- Green: 10” x 2
- Green: 6” x 1
- Orange: 24” x 1
- Orange 10” x 1
- Pink: 12′ x 1
- Pink: 24” x 1
- Pink: 10” x 1
- Pink: 6” x 1
- Grey: 10” x 1
- Brown: 10” x 3
- White: 12′ x 1
- White: 10” x 2
- Yellow: 4′ x 1
- Yellow: 24“ x 1
- Yellow: 10” x 1
- Yellow: 6” x 1
- Red: 20“ x 1
- Red: 10” x 1
- Black: 4′ x 1
- Black: 24” x 2
- Black: 10” x 2
- Black 6” x 1
- Grey: 10” x 1
- Brown: 10” x 3
- White: 12′ x 1
- White: 10” x 2
- Yellow: 4′ x 1
- Yellow: 24“ x 1
- Yellow: 10” x 1
- Yellow: 6” x 1
- Red: 20“ x 1
- Red: 10” x 1
- Black: 4′ x 1
- Black: 24” x 2
- Black: 10” x 2
- Black 6” x 1
12 AWG Wires
- Black: 10″ x 1
- Black: 6″ x 1
- Blue: 10″ x 1
22 AWG Wires
- Green: 3′ x 1
- Brown: 3′ x 1
Digital Climate Control Unit Pinout
I’d take this section with a grain of salt. This is mostly me just tracing back the wires from where the DCC plugs into the USDM harness, and what those wires go to. I am not 100% certain what they all do. But this at least gives you a general idea of what does what, at least based on what they connect to on the USDM Harness.
So below we have a diagram from the JDM Version, translated into english. This is ultimately the pinout from the Unit itself, and below that I have a table depicting where those wires connect to on the USDM harness.
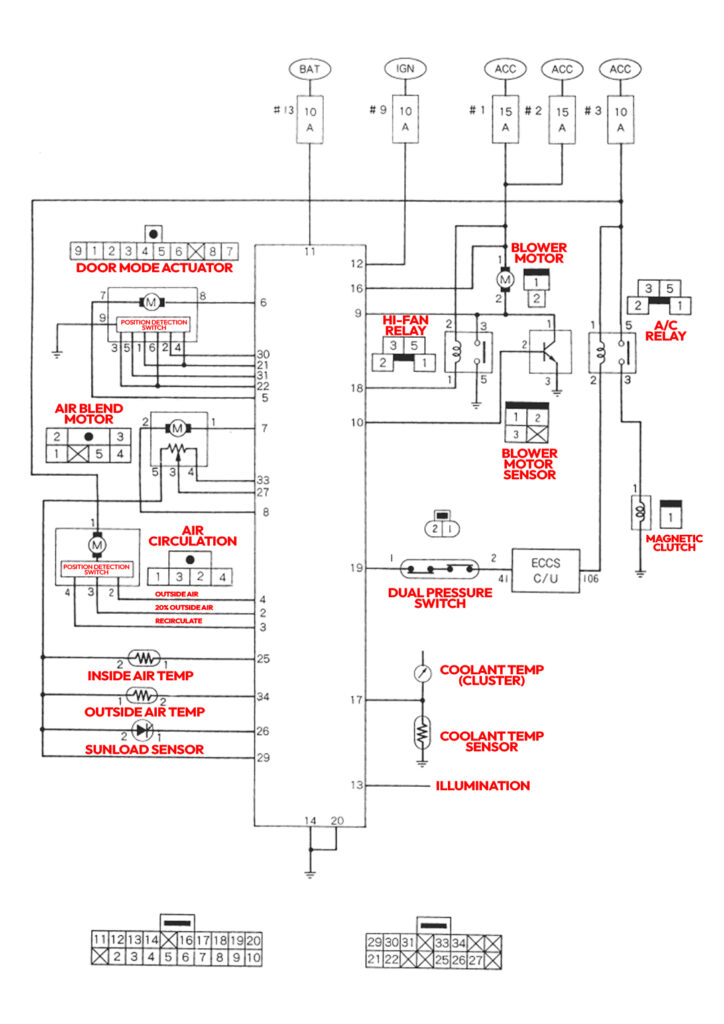
ACC = Accessory Connector BD = Blend Door Connector F = Fan connector P = Power Connector R = Relay
DCC Pin Number | Goes to | Function | USDM Wire Color |
|---|---|---|---|
1 | NA | NA | NA |
2 | NA | Air Circulation %20 (not hooked up on USDM) | NA |
3
| 9 | Recirulate | G/B |
4 | 11 | Outside Air | G/Y |
5 | 7 | Door Mode Motor – | G |
6 | 8 | Door Mode Motor + | G/Y |
7 | BD-1 | Motor – | NA |
8 | BD-2 | Motor + | NA |
9 | F-24 R-3 | Resistor L/W + Blower L/W via F-24 | L/W |
10 | F-27 | Resistor L/B | L/B |
11 | P-1 | +12v Constant | NA |
12 | 14 | Switched +12v pulled from 12v to Recirc Motor | L/OR |
13 | 15 | Illumination | R/L |
14 | Merge/20 | Ground | NA |
15 | NA | NA | NA |
16 | R-2 P-4 | Switched +12v 10amp to DCC,, also turns on High Fan Relay | NA |
17 | Coolant Temp | Is not hooked up in my diagram | NA |
18 | R-1 | Completes Relay Circuit to turn Blower Motor On | NA |
19 | 12 | To A/C System Dual Pressure Switch | LG |
20 | Merge 14 | Ground | NA |
21 | 1 + 4 | Door Mode | L + L/R |
22 | 3+6 | Door Mode | L/W + L/OR |
23 | NA | NA | NA |
24 | NA | NA | NA |
25 | ACC-5 | Inside Cabin Temp Sensor | NA |
26 | ACC-6 | Sunload Sensor | NA |
27 | BD-3 | PBR Potentia Balance Register | NA |
28 | NA | NA | NA |
29 | BD-5, ACC-1+4+6 | To Sensors which all merge into 1 of BlendDoor | NA |
30 | 2 | Door Mode | L/B |
31 | 5 | Door Mode | L/Y |
32 | NA | NA | NA |
33 | BD-4 | PBR Potentia Balance Register | NA |
34 | ACC-4 | Outside Temp Sensor | NA |
35 | NA
| NA
| NA
|
36 | NA
| NA
| NA
|
DCC – 16
On the JDM Diagram, this connects to 12v positive, but connects to the Blower Motor 12v which goes to 2 15amp fuses. The 2 15 amp fuses are for the blower motor. So This Instead takes the 16 plug, and connects it to the Radio harness switched 12v, which is a 10 amp fused circuit. This same wire also completes the circuit of the Relay for the Blower Motor to turn it on, and sends the power from the two 15 amp fuses to the Blower Motor. Just wanted to clarify the decision to deviate from the Original Wiring Diagram.
DCC – 17
This is the coolant temp sensor. Basically when hooked up, and its cold outside, the fan will not blow as high, till the car warms up, so its not blowing cold air on full blast when you first start the car. Not so much an issue if you live in a hot place that doesn’t get too cold. The other reason I don’t have this hooked up, is its the one wire that doesn’t have a connection open. So you would have to tap into the Gauge Cluster’s Temp Gauge, and run that one wire directly to the 17 pin.
Fan Connector
Fan Pin Number | Goes to | USDM Wire Color |
|---|---|---|
23 | Goes to Blower Relay, which is Switched Ground, Also Grounds Door Mode | P |
27 | Goes to Resistor | L/B |
26
| The Q45 Resistor does not have a pin loacted here. No cut needed | L/Y |
25 | Resistor L/R this grounds through the Blower Motor Relay, which is a Switched Ground | L/R |
24 | Resistor L/W + Blower Motor L/W | L/W |
28 | To A/C System Dual Pressure Switch | LG/R |
Relay Connector
Relay Pin | Goes to | Purpose |
|---|---|---|
1 | DCC-18 | Goes to DCC assuming its closing the circuit, allowing the relay to turn on. |
2 | DCC-16 + P-4 | Switched +12v (10amp) Connects to 1 to turn relay on |
3 | F-24 + DCC-9 | Blower Motor Resistor L/W |
5 | F23+ F25 | When on, provides ground by going through the Blower Reelay. This also connects with the Blower Resister, via L/R, and I assume is the ground for that system |
3. DISASSEMBLY
Once you have all the appropriate sensors, rods, brackets, and everything else required above, we can begin actually installing it into your 240sx.
General Rule of Thumb. Be cautious. A lot of this stuff is old 35 year old plastic. Be gentle and don’t pull too hard. You’ll need a 10mm Socket, and a Phillips Head Screwdriver to disassemble the interior of the car.
Tools Needed
- Phillips Screwdriver
- 10mm Socket and Ratchet
1. Gain access to the Climate Control Unit.
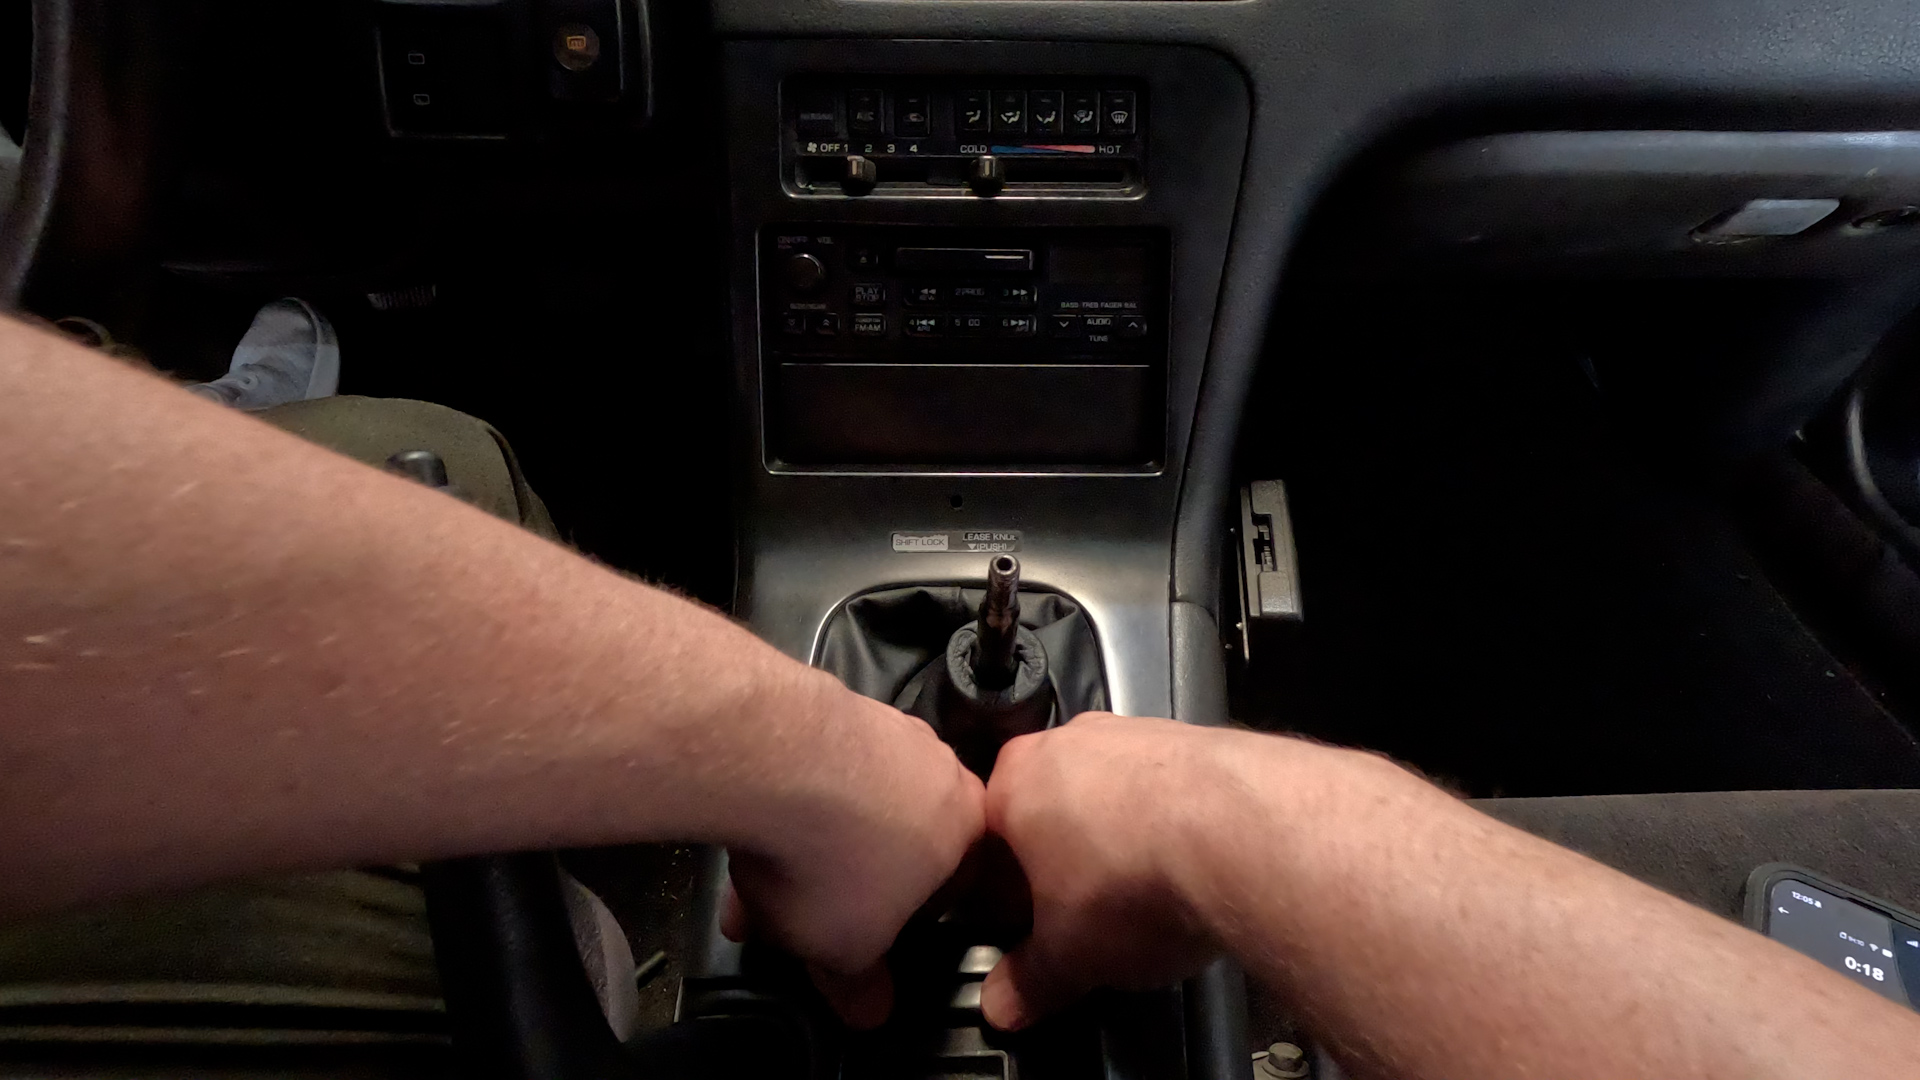
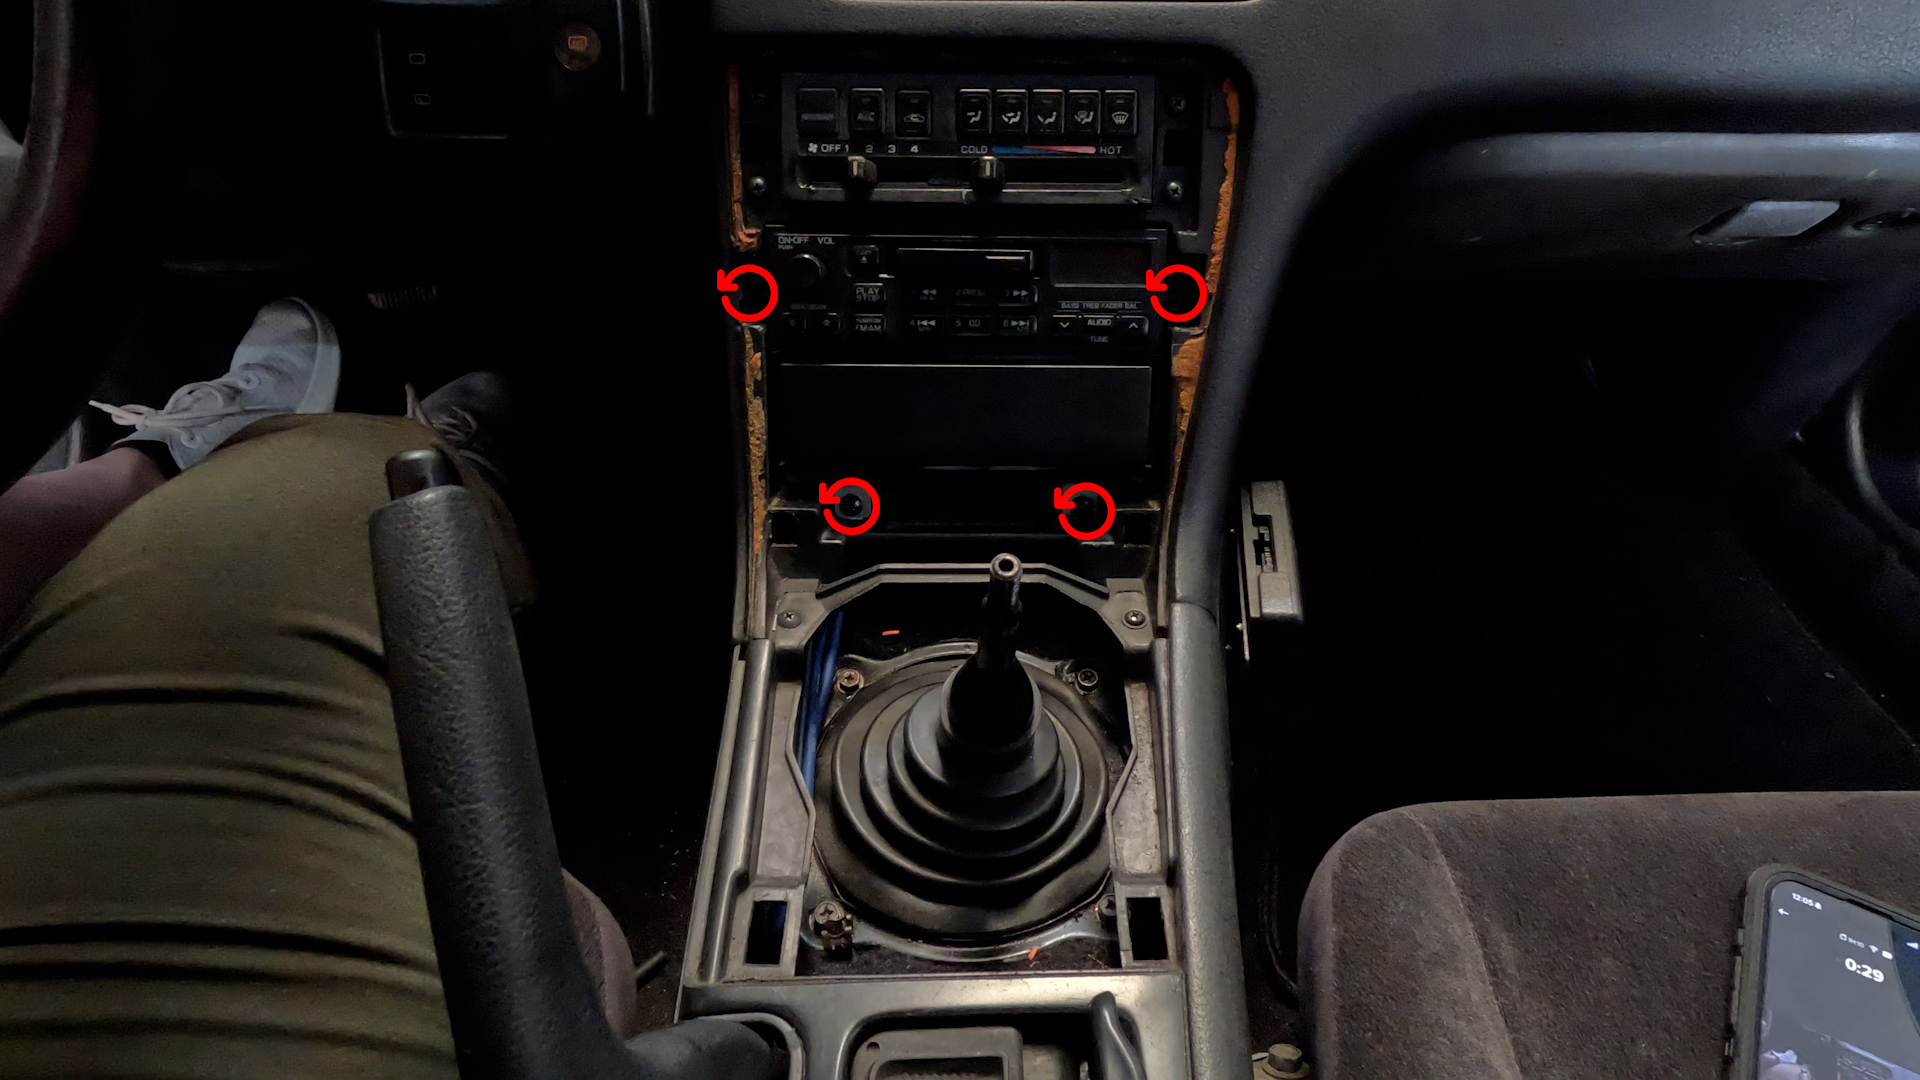
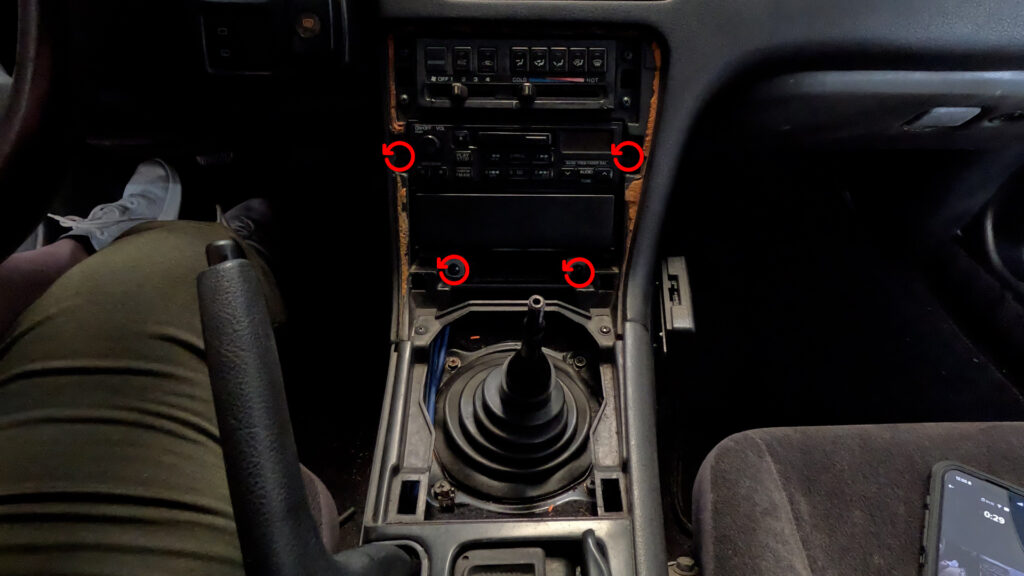
- Remove the Shift Knob by turning it Counter-Clockwise til it comes off.
- Remove Center Console Cover by reaching under the ring of the Shift Boot, and pull up. And gently work your way around til the piece is fully removed.
- Remove Radio Bracket with the 4 philips head screws. Pull radio out, and disconnect the wires and Antenna.
2. Remove Glove Box and frame.
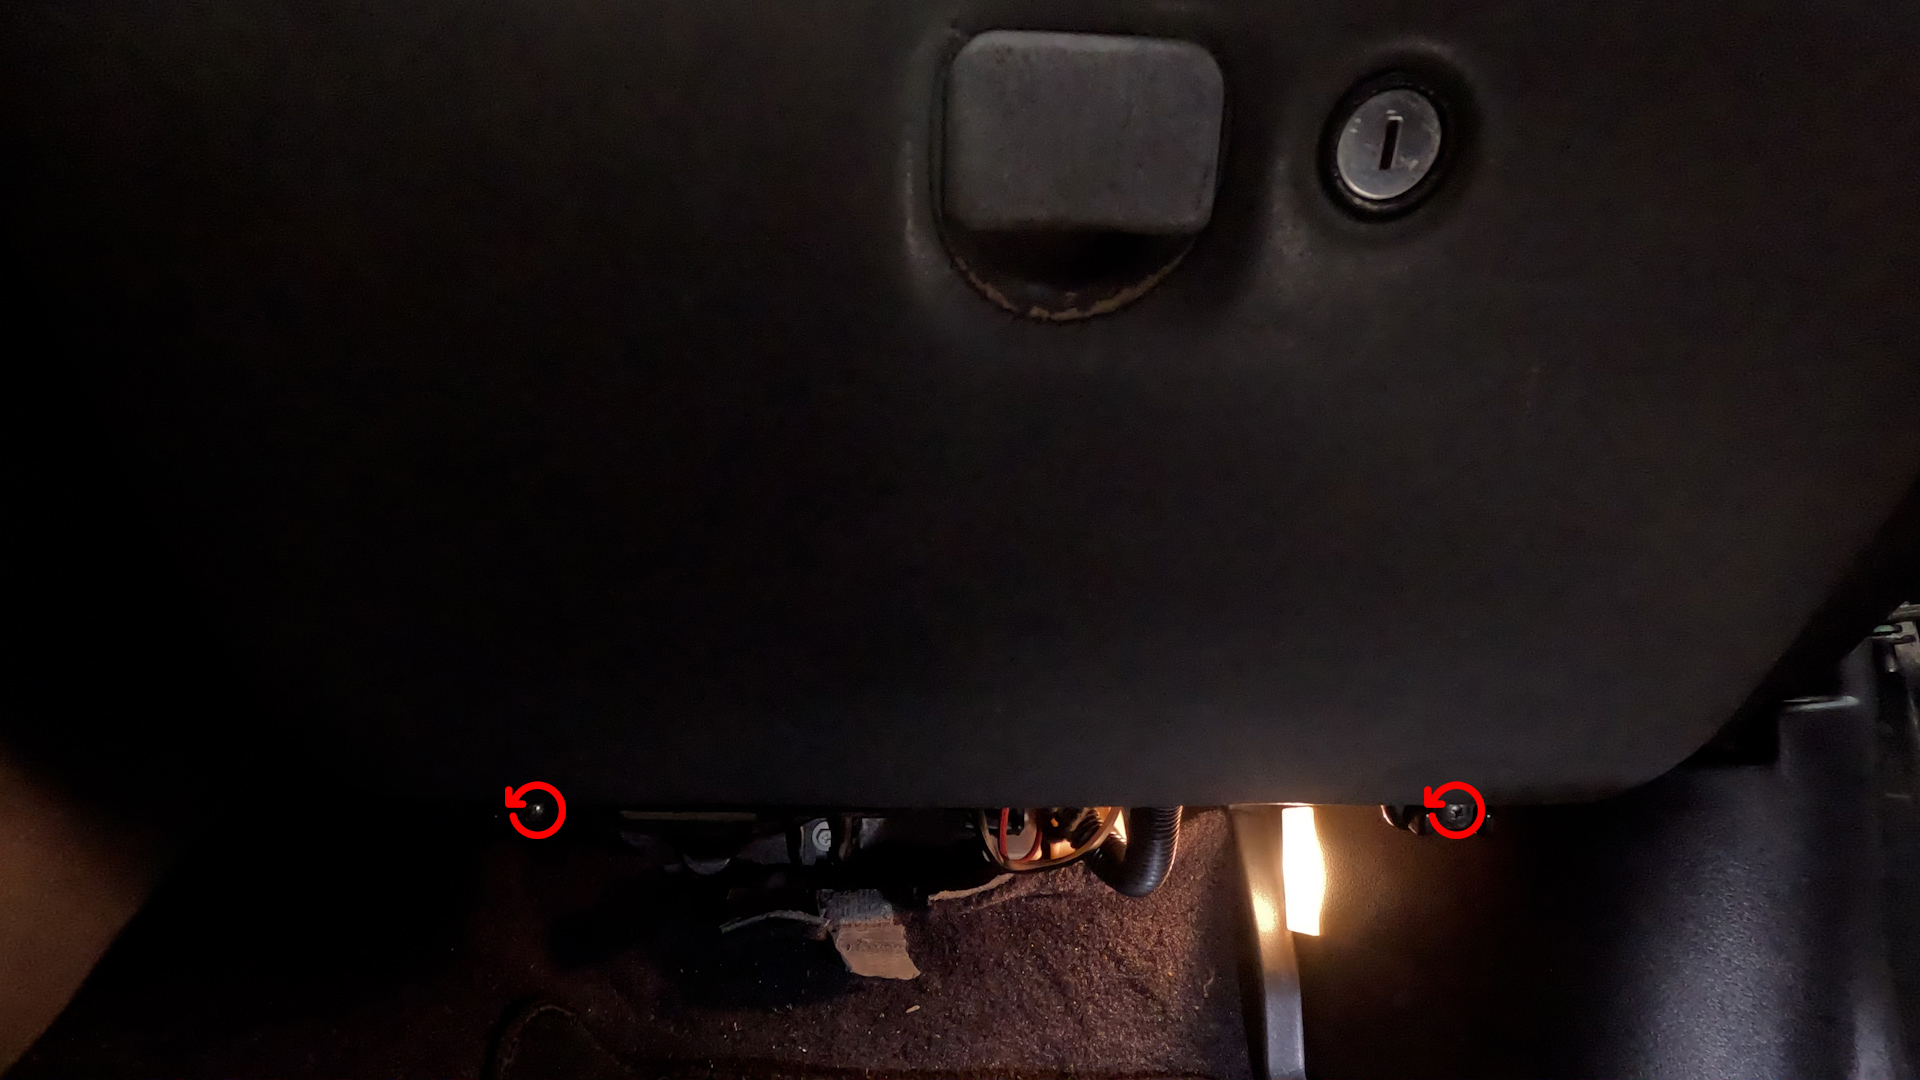
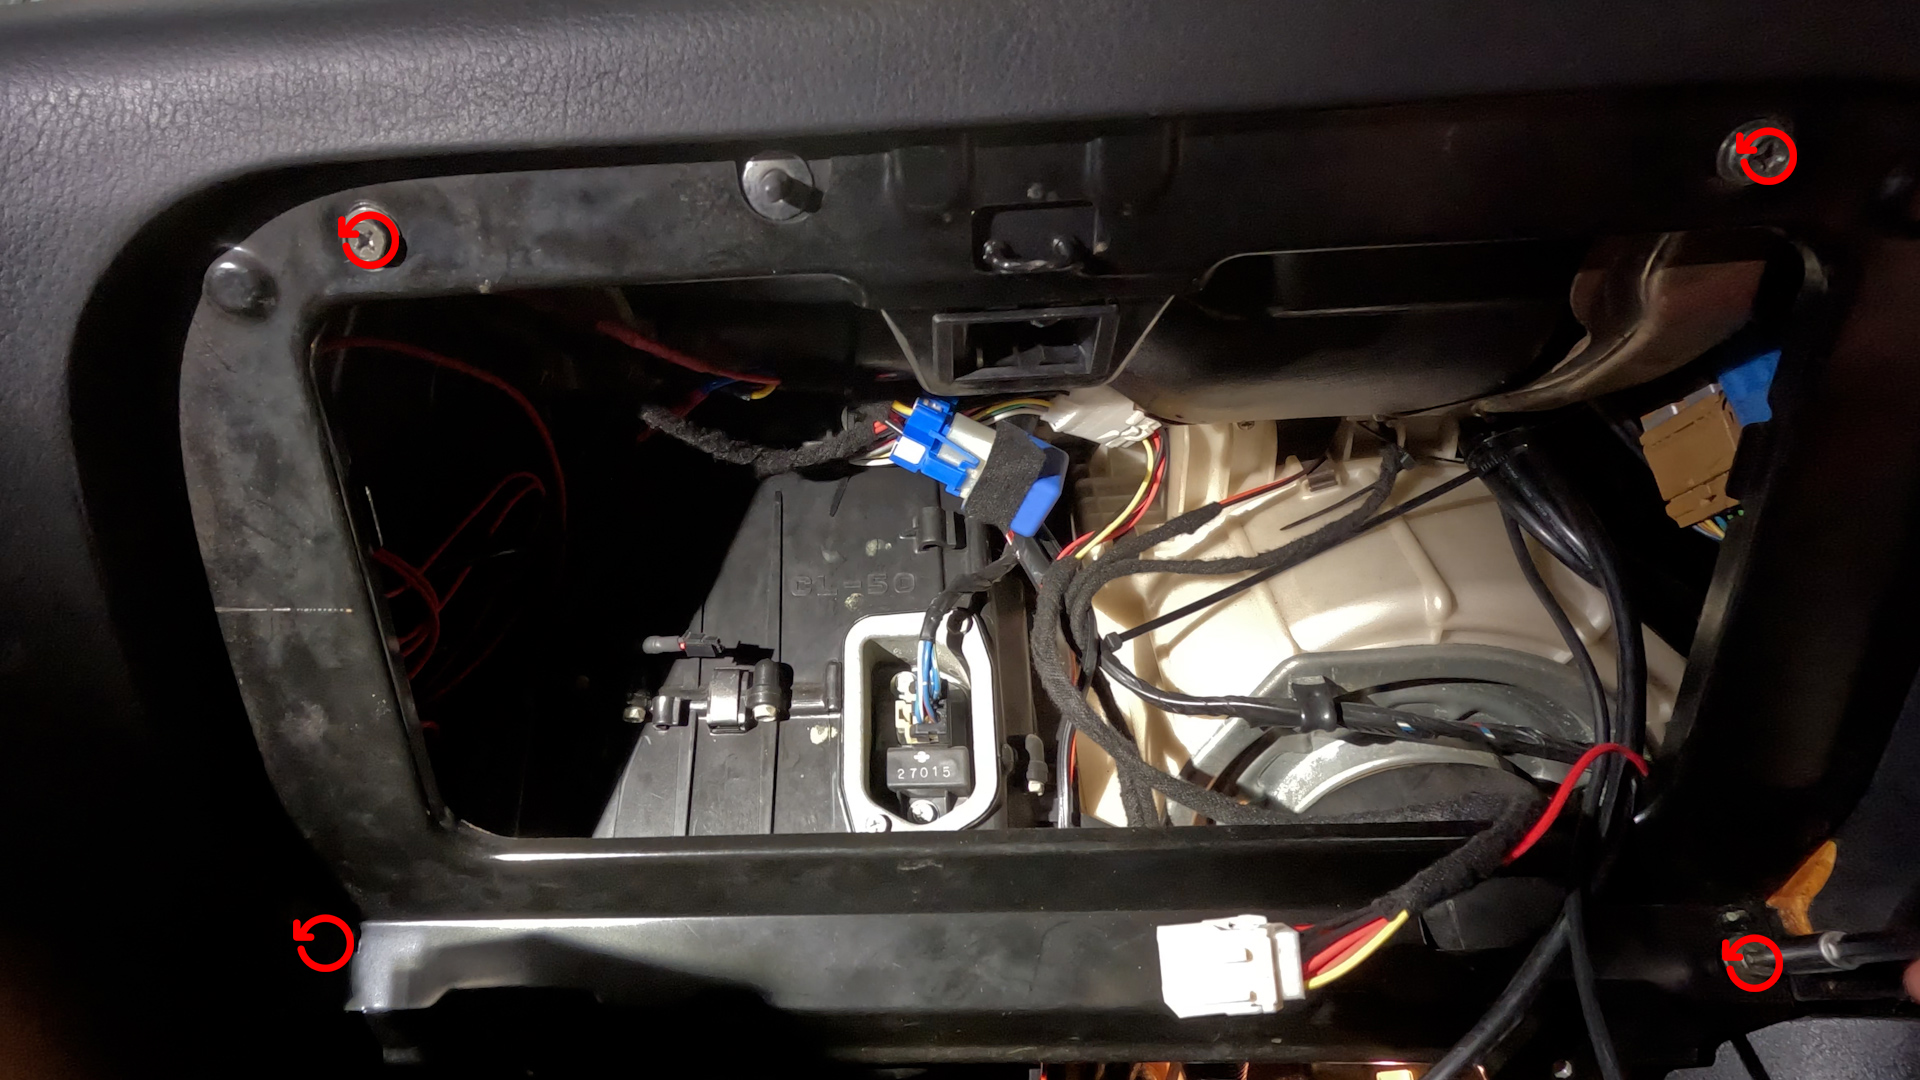
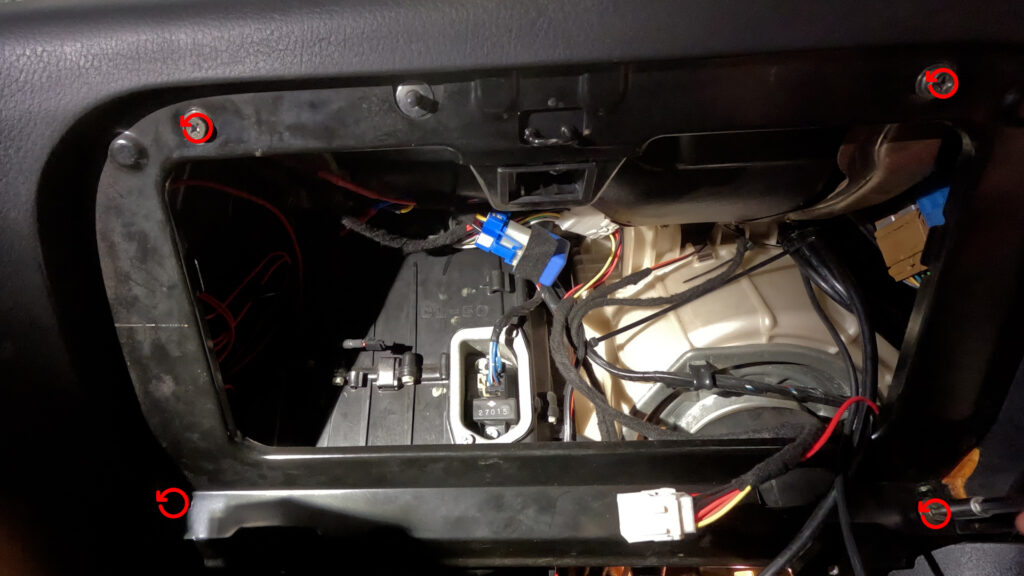
- Remove the Glove Box by removing the 2 philips head screws below the glove box. Then turn the box a bit to get the two studs to come out of the frame. Set aside.
- Then remove the Mounting Plate for the Glovebox. Its four screws, and the plate should just pull out.
3. Remove Blower Resistor
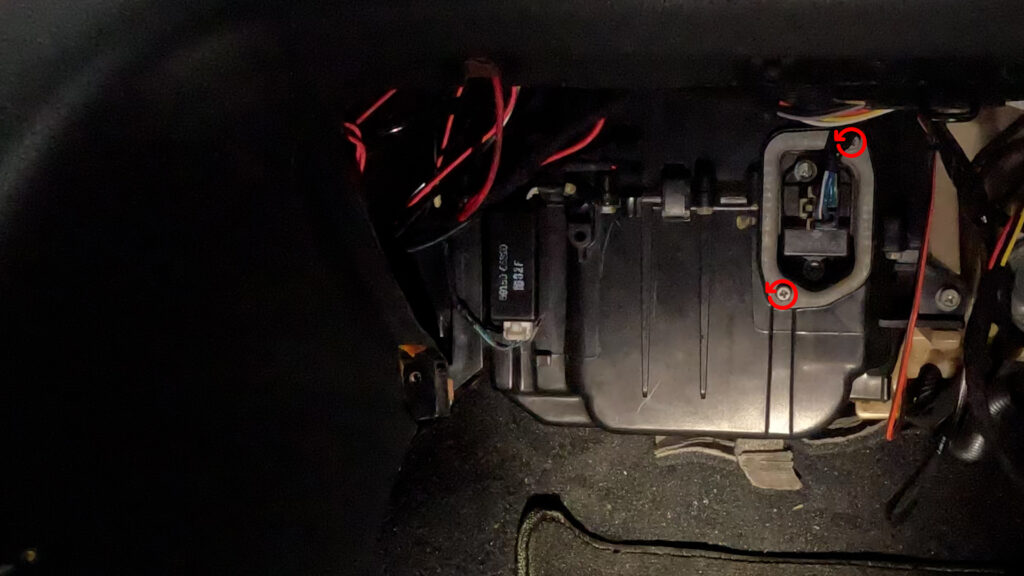
- Remove the Blower Motor Resistor by first unplugging it, then remove the two screws. Don’t loose these.
4. Remove Sil Plate
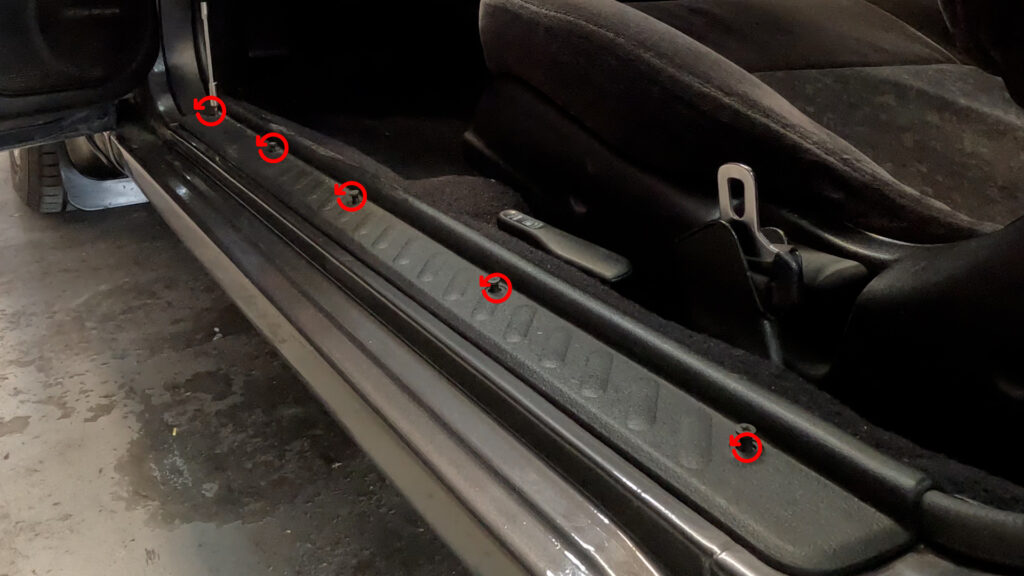
- Unscrew the plastic clips, til the screw comes out a bit. Then you can just gently lift the sil plate up, an dit should come right out.
5. Remove Kick Panel
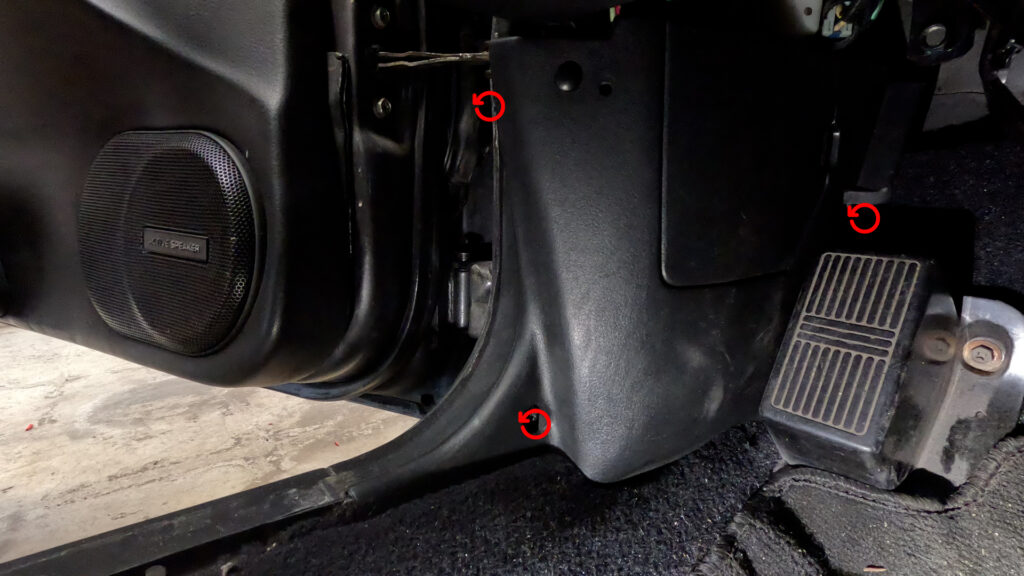
- Remove the screw in the lower left section. In the door jam, there may be a plastic clip. And then behind the dead pedal there is another bolt/screw. Remove all Three, and pull the kick panel straight back.
6. Remove Under Dash Panel
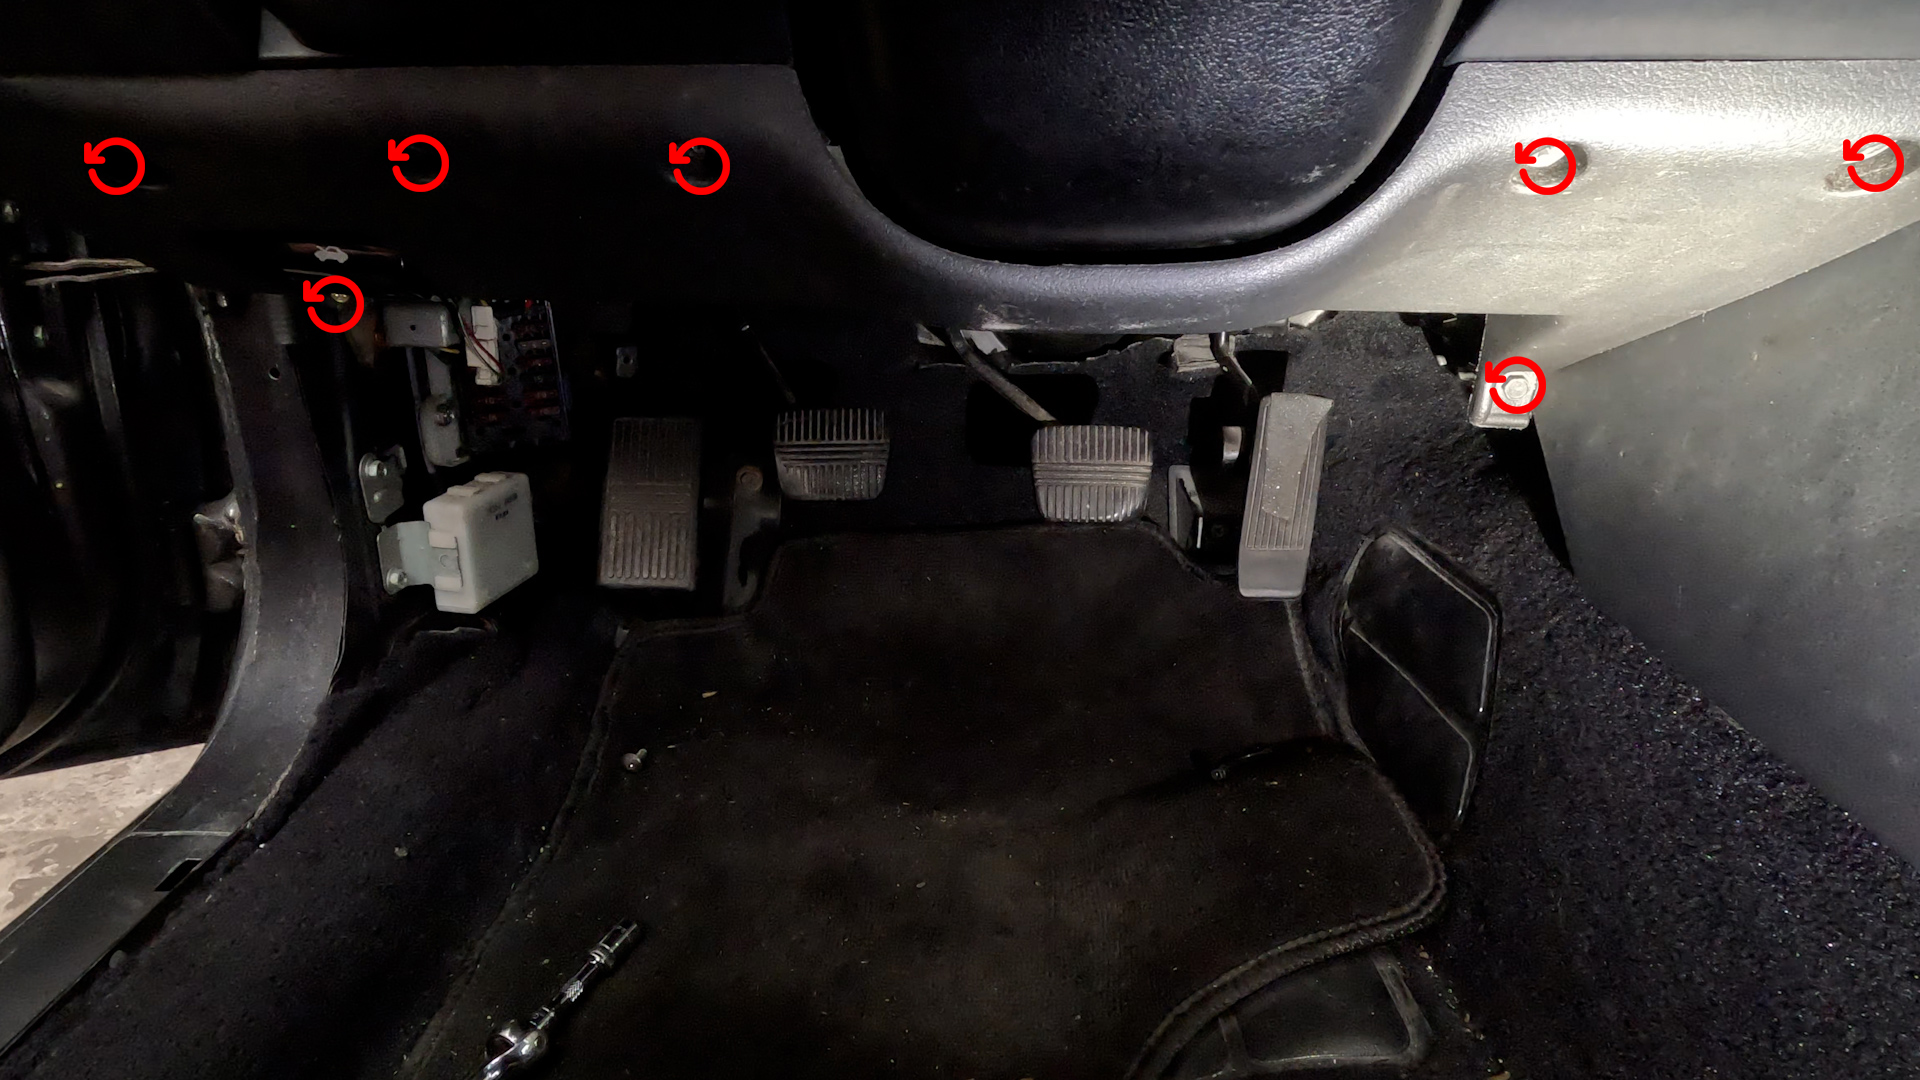
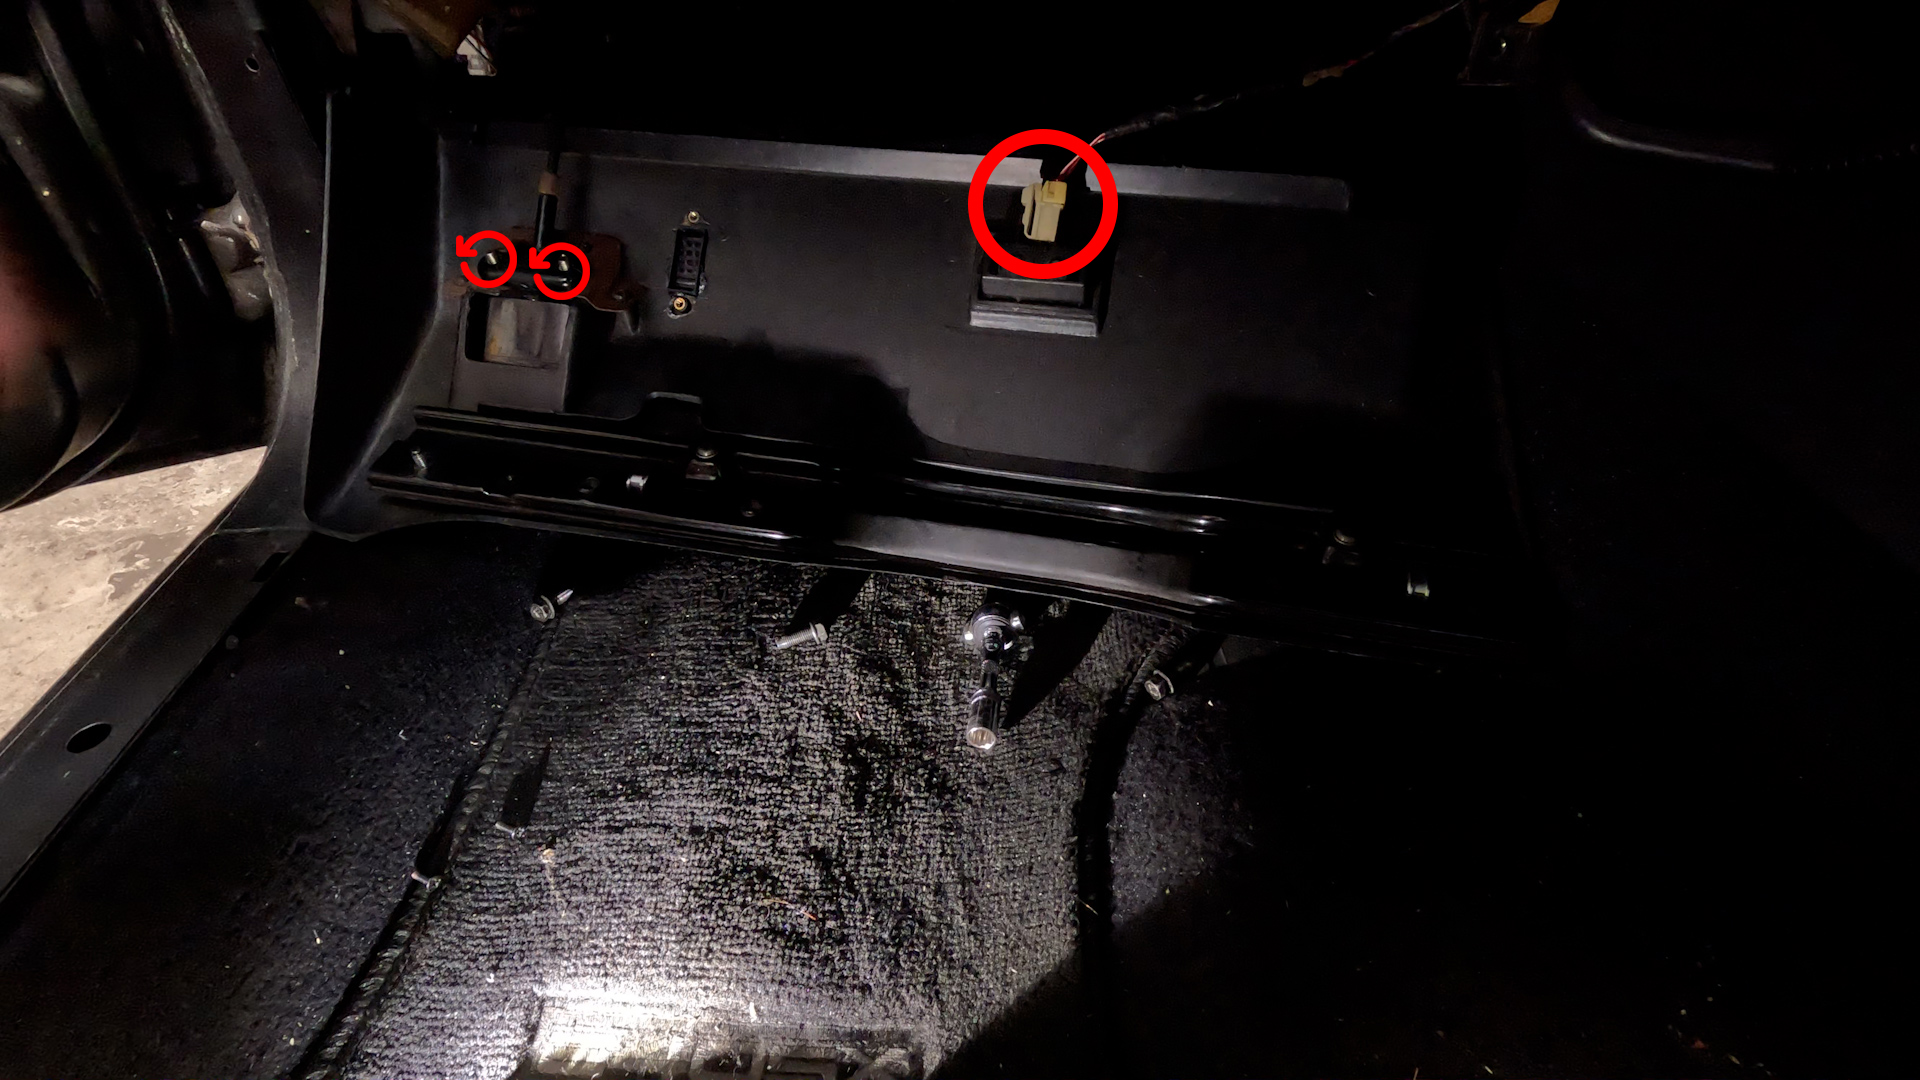
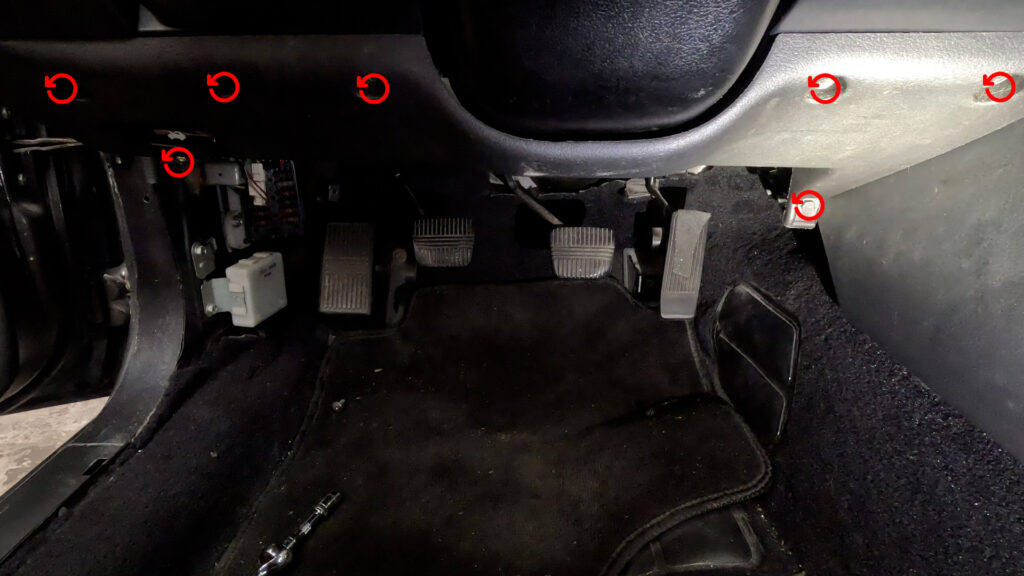
- Remove the 7 10mm bolts as shown in the picture. This will lower the Panel. Once its free, you need to unplug the Floor Light, and unbolt two more 10mm bolts holding in the Hood Release Handle. You have to go in from underneath to get them. You could technically do this first
7. Remove Floor Vent
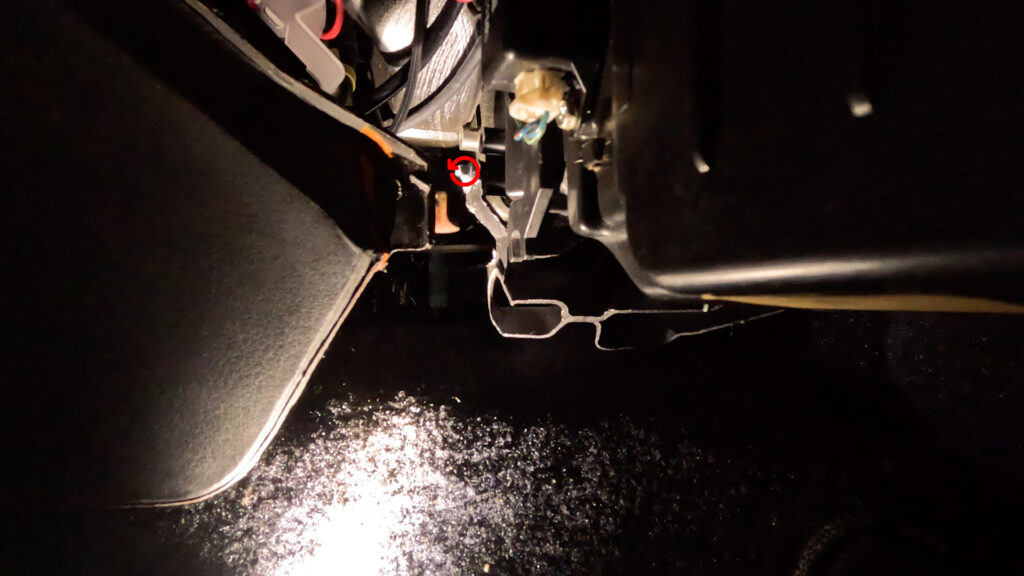
- Remove the Floor Vent. So go in to the Passenger floor side, and looking under the dash, you’ll see the floor vent. Remove this screw by using a Wrench, or a very small ratchet, or screwdriver. Once the screw is free. You can just grab the vent and pull outwards. and it should pop free.
8. Remove Door Mode Bracket and Wire
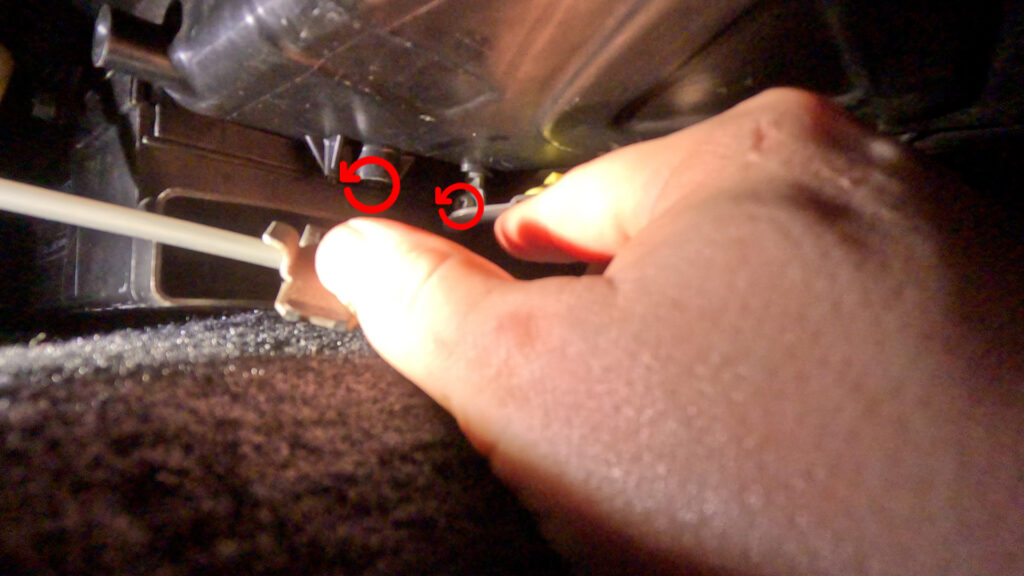
- Here you’ll see the Bracket connected to a cable running up to the Manual Climate Control Unit By a 10mm Bolt. Then at the end of the wire is another bracket held in by a Phillips screw. You’ll have to contort a bit, but you can come in from the front where the radio was, and get a screwdriver all the way back there. Once the bolt and screw are removed, the whole assembly should come out.
9. Remove Manual Climate Control Unit
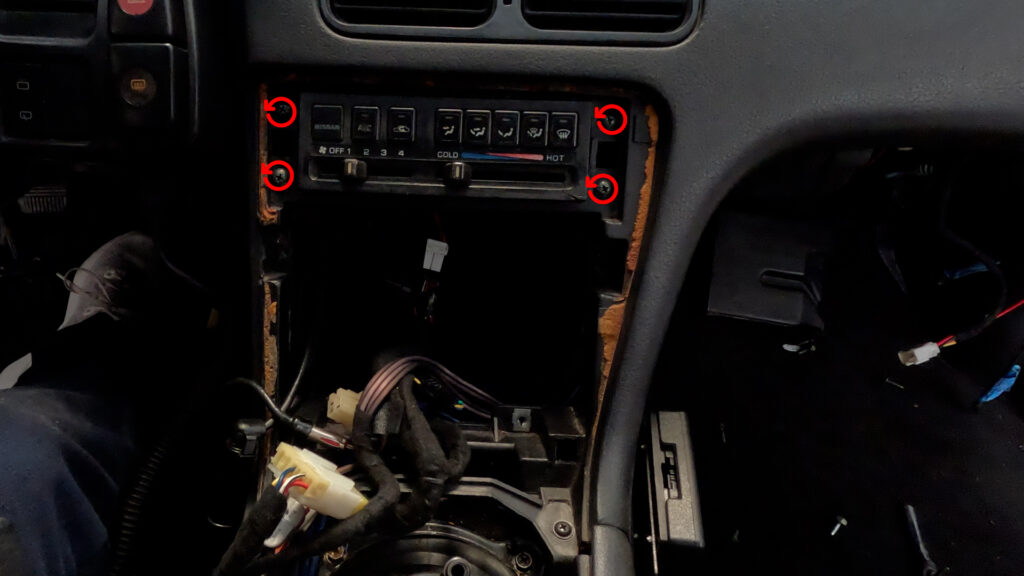
- Remove the Climate Control Unit’s 4 Phillips head screws. Push the unit in, and then down, and pull out through the opening where the Radio was. Then unplug the two connectors. The 6-pin, and the 16-pin, and pull the climate control out. The push wire is long, and catches on wires. so don’t yank it out.
10. Remove Lower HVAC Box.
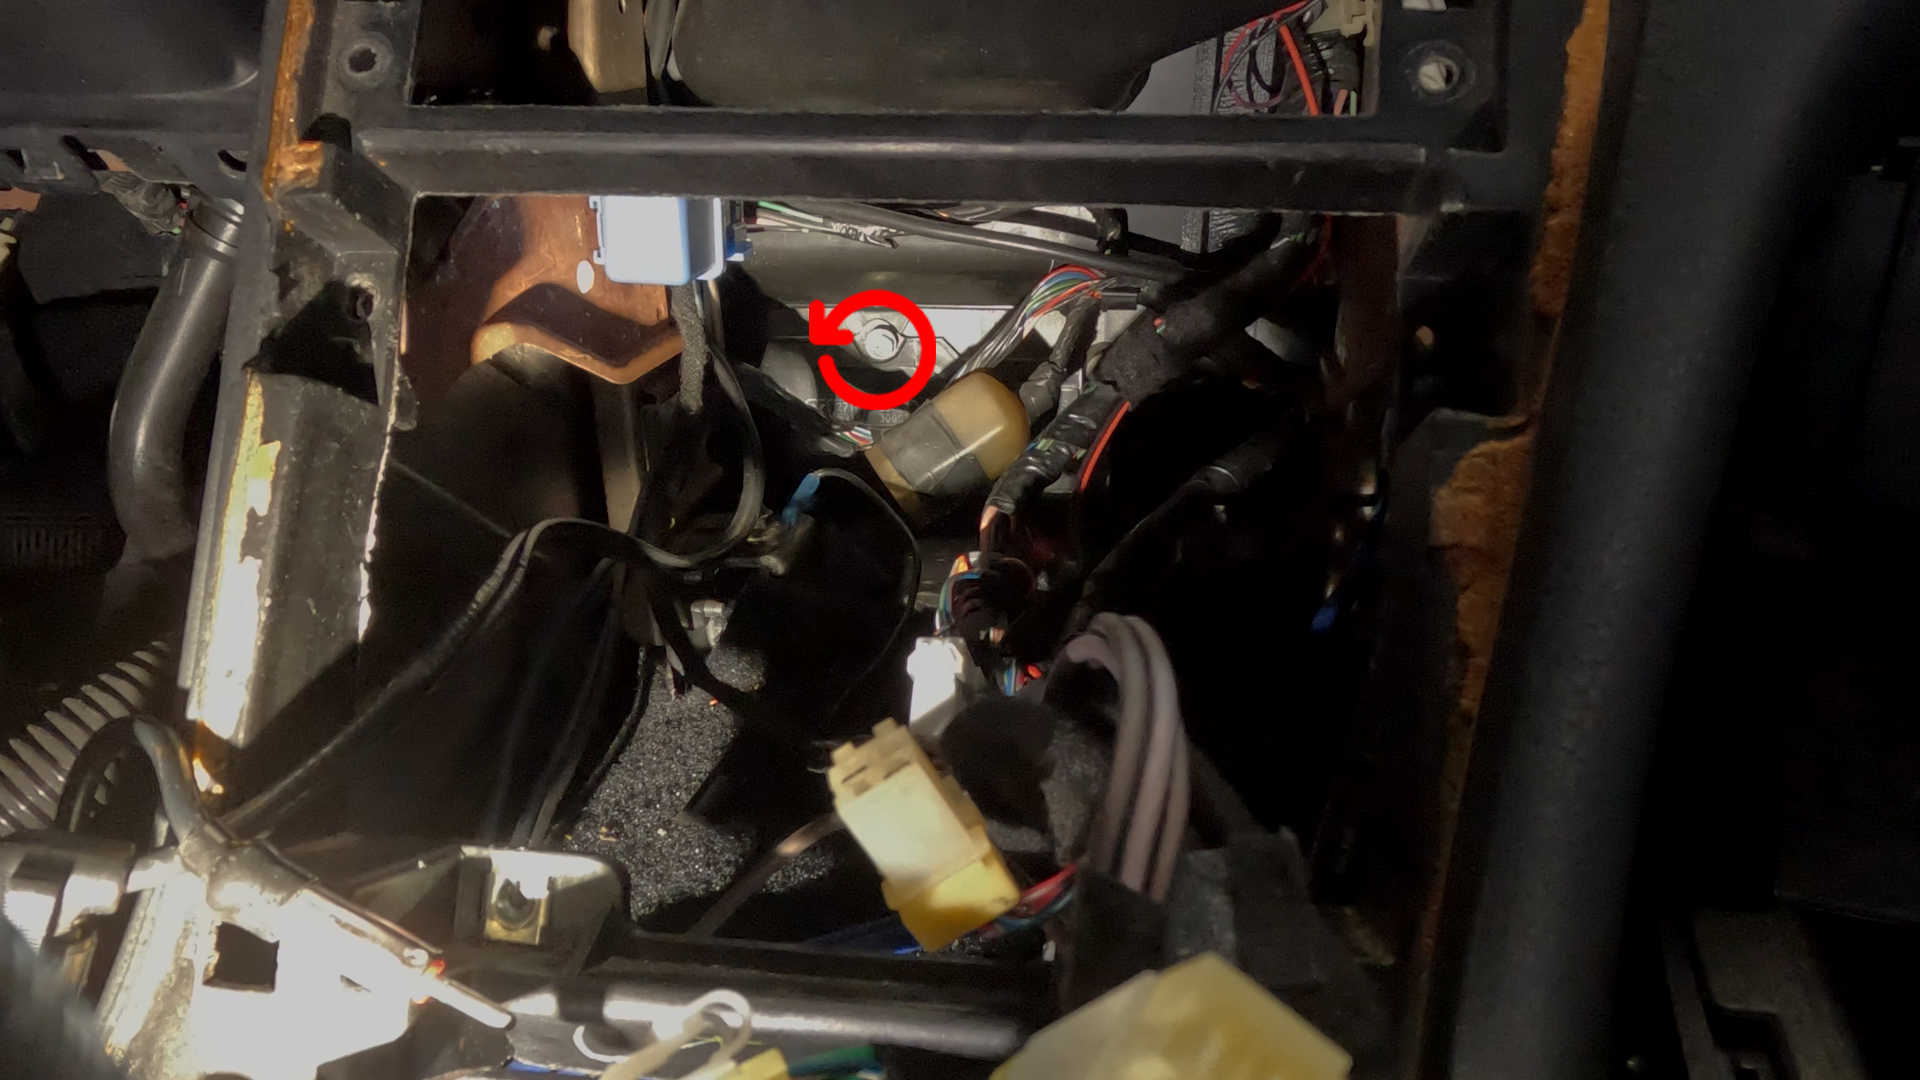
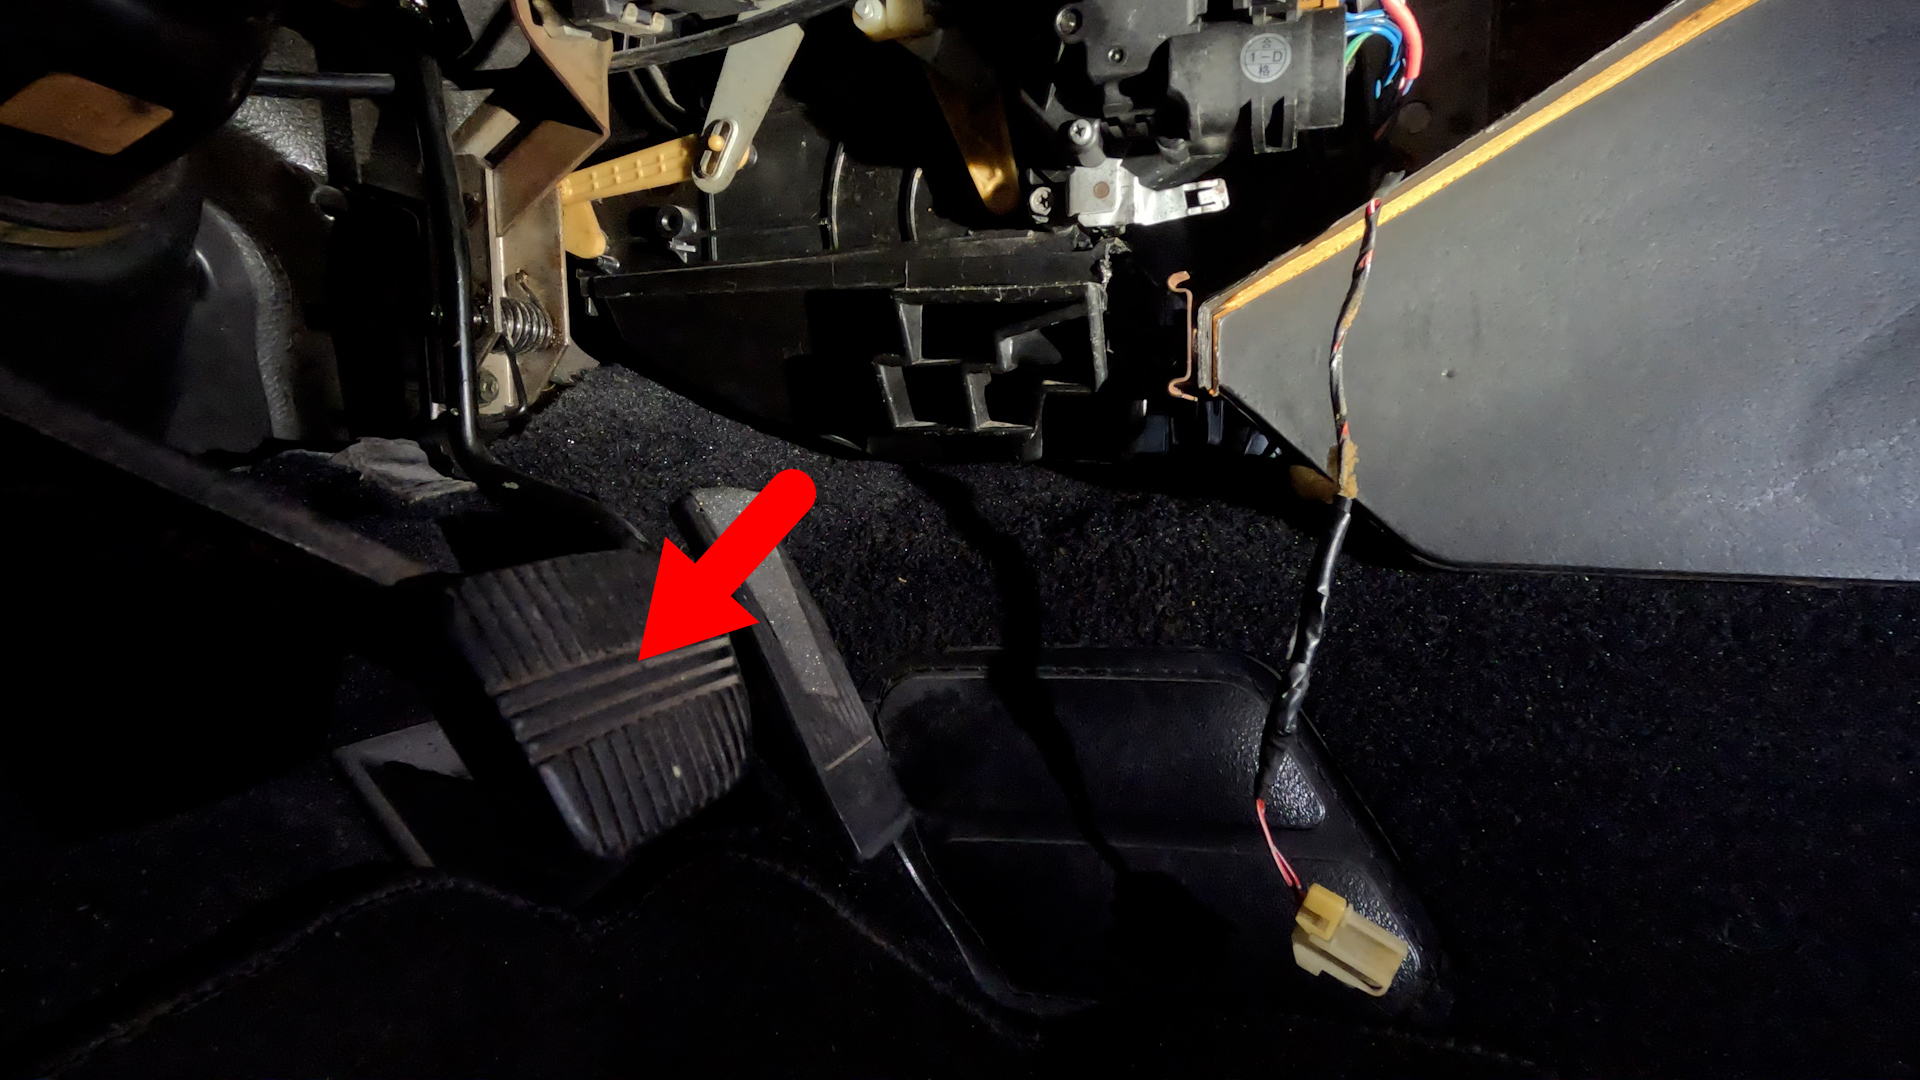
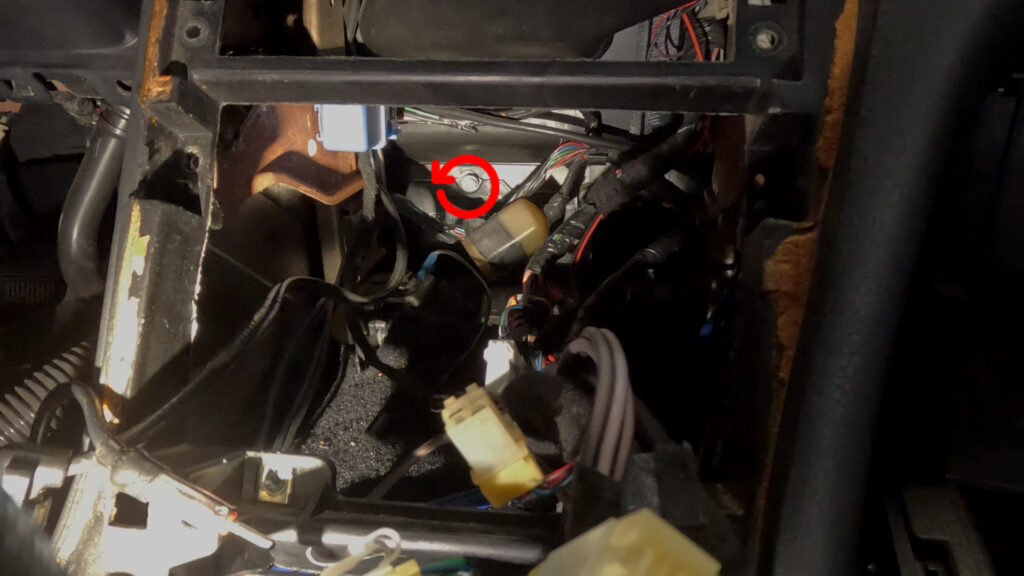
- There is one screw on the top center of the lower box. Look through the Cavity all the way to the back, you should see a single screw. Unscrew that, and pull the lower portion down, and it should pop free. Then go to the Drivers Side foot well, and pull down one last time, then slide the box out through the opening. It is a tight fit, so you may have to squeeze it a bit to get it out.
11. Remove Metal Brackets
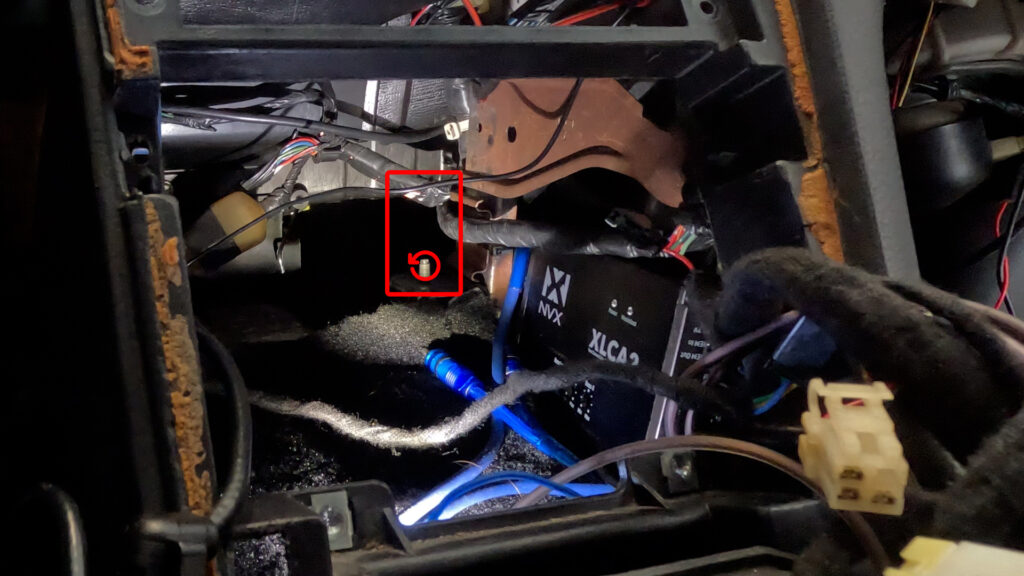
- Remove the two Metal Brackets in the back of the Cavity. They’re held in by one 10mm Flange Nut on each side. Make sure you keep thse nuts. I’ve already removed mine. Hence the Red Rectangle, showing where the right one would be. There is one to the left as well. Ignore the Box and wires. Thats not important. Nothing to see there.
4. PREPARATION
1. HVAC Box and Aspirator Preparation
1. Cut Hole in Lower HVAC Box
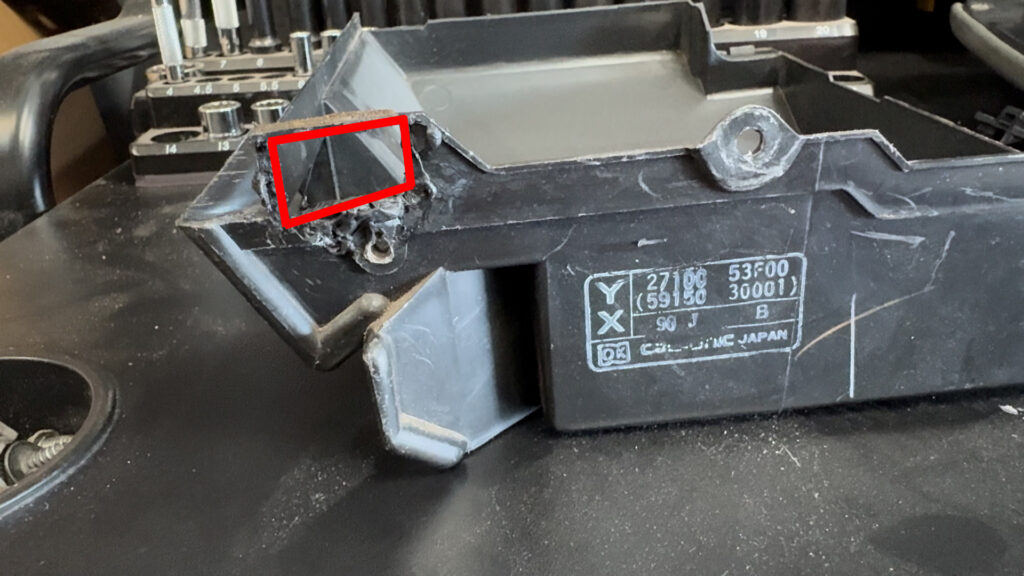
- I already cut mine out before I thought to make this tutorial. So…Deal with it. But basically, there is an indent in the plastic that you should cut along. And then take the Aspirator, and make sure it fits. But don’t install it. There is also a hole for a screw, that you can add by just screwing through the plastic to secure the Aspirator.
2. Aspirator Hose
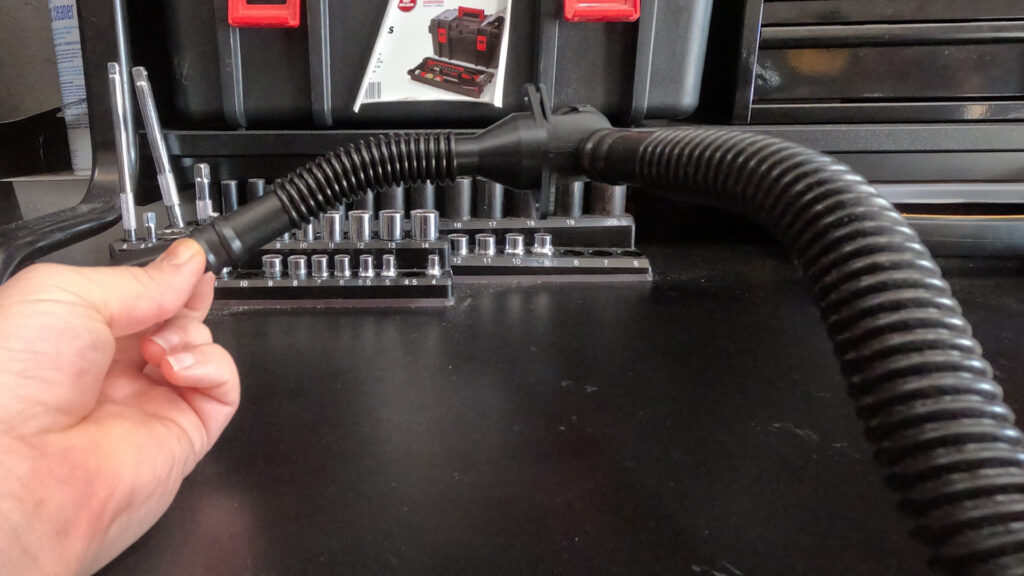
- Okay, SO, apparently you don’t absolutely need this part. But I’m a completionist. What this does, is takes the air that is going to blow OUT of the HVAC box we just cut, and turn it into suction. It does this by pushing air out, and past the open end of the tube face that you see in the picture. This then draws air out from the tube in the back, creating suction. The other end of this is connected to the interior Cabin Temp Sensor. Which draws air from the cabin across the sensor to get an accurate reading, to feed into the DCC.
- I have 3D modeled the aspirator If you’d like to print it yourself. But you can get one off a mid 90’s Maxima, or I30.
- So you’ll take the USDM Aspirator, and with around 5 inches of hose, connect it to the Secondary Aspirator Adapter.
- Then you’ll connect the Secondary Aspirator, connecting it to the adapter with small nuts and bolts. OR threaded inserts.
- Then connect about 2 feet of hose from the end of the secondary aspirator. This will go to the Inside Cabin Temp Sensor.
- Note: The JDM version has this function built into the aspirator that connects to the HVAC. However, its a very tight fit there with everything. So I decided to do it this way to move things to where there is more room.
3. Cut Hole in Lower Driver Panel
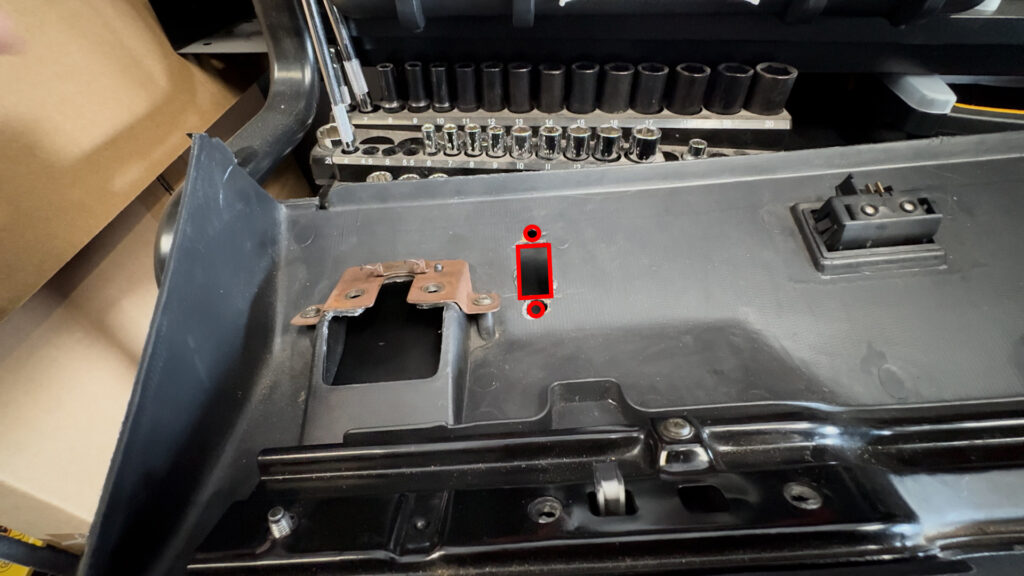
- Cut a rectangle, and two holes to fit the grill, and mounting point of the Cabin Air Temp Sensor. The 3D Print file should have a template included. And you can place this wherever really. I chose to place it here.
4. Insert Grill and Mount Bracket
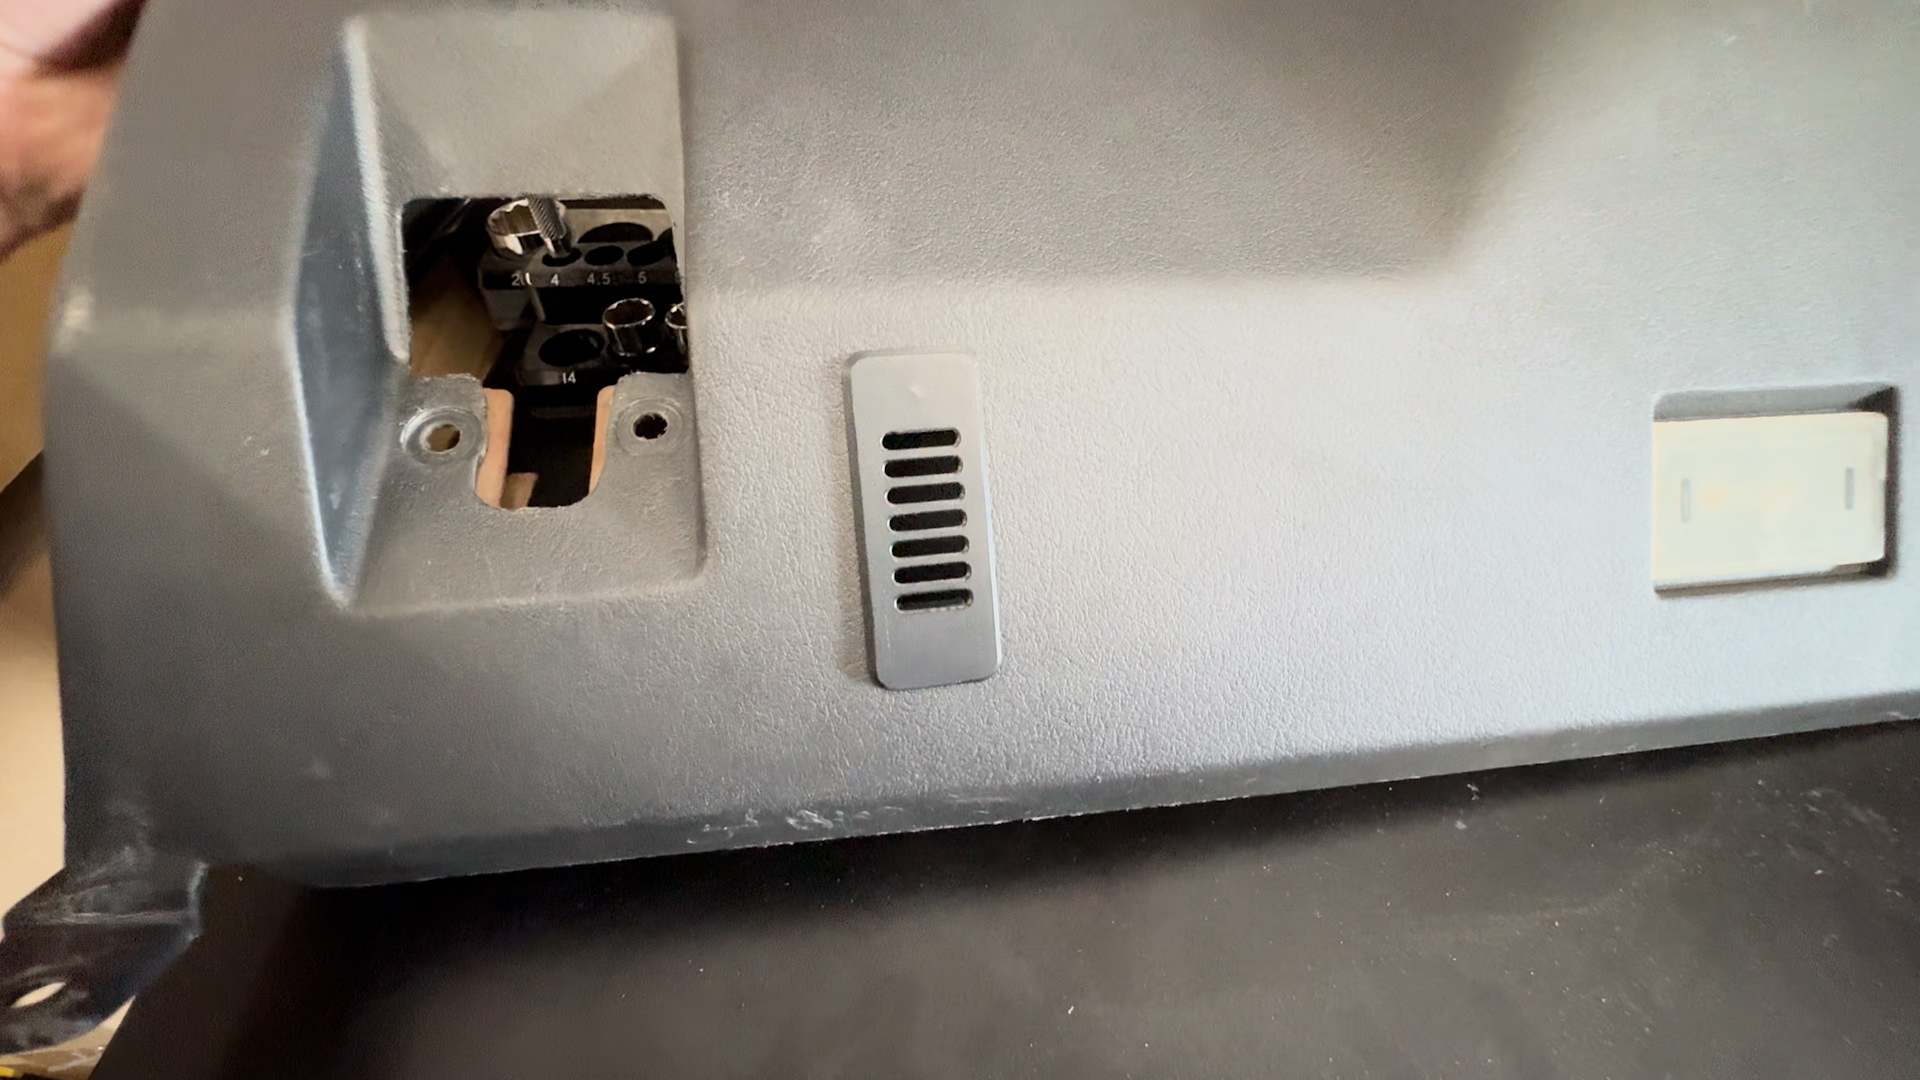
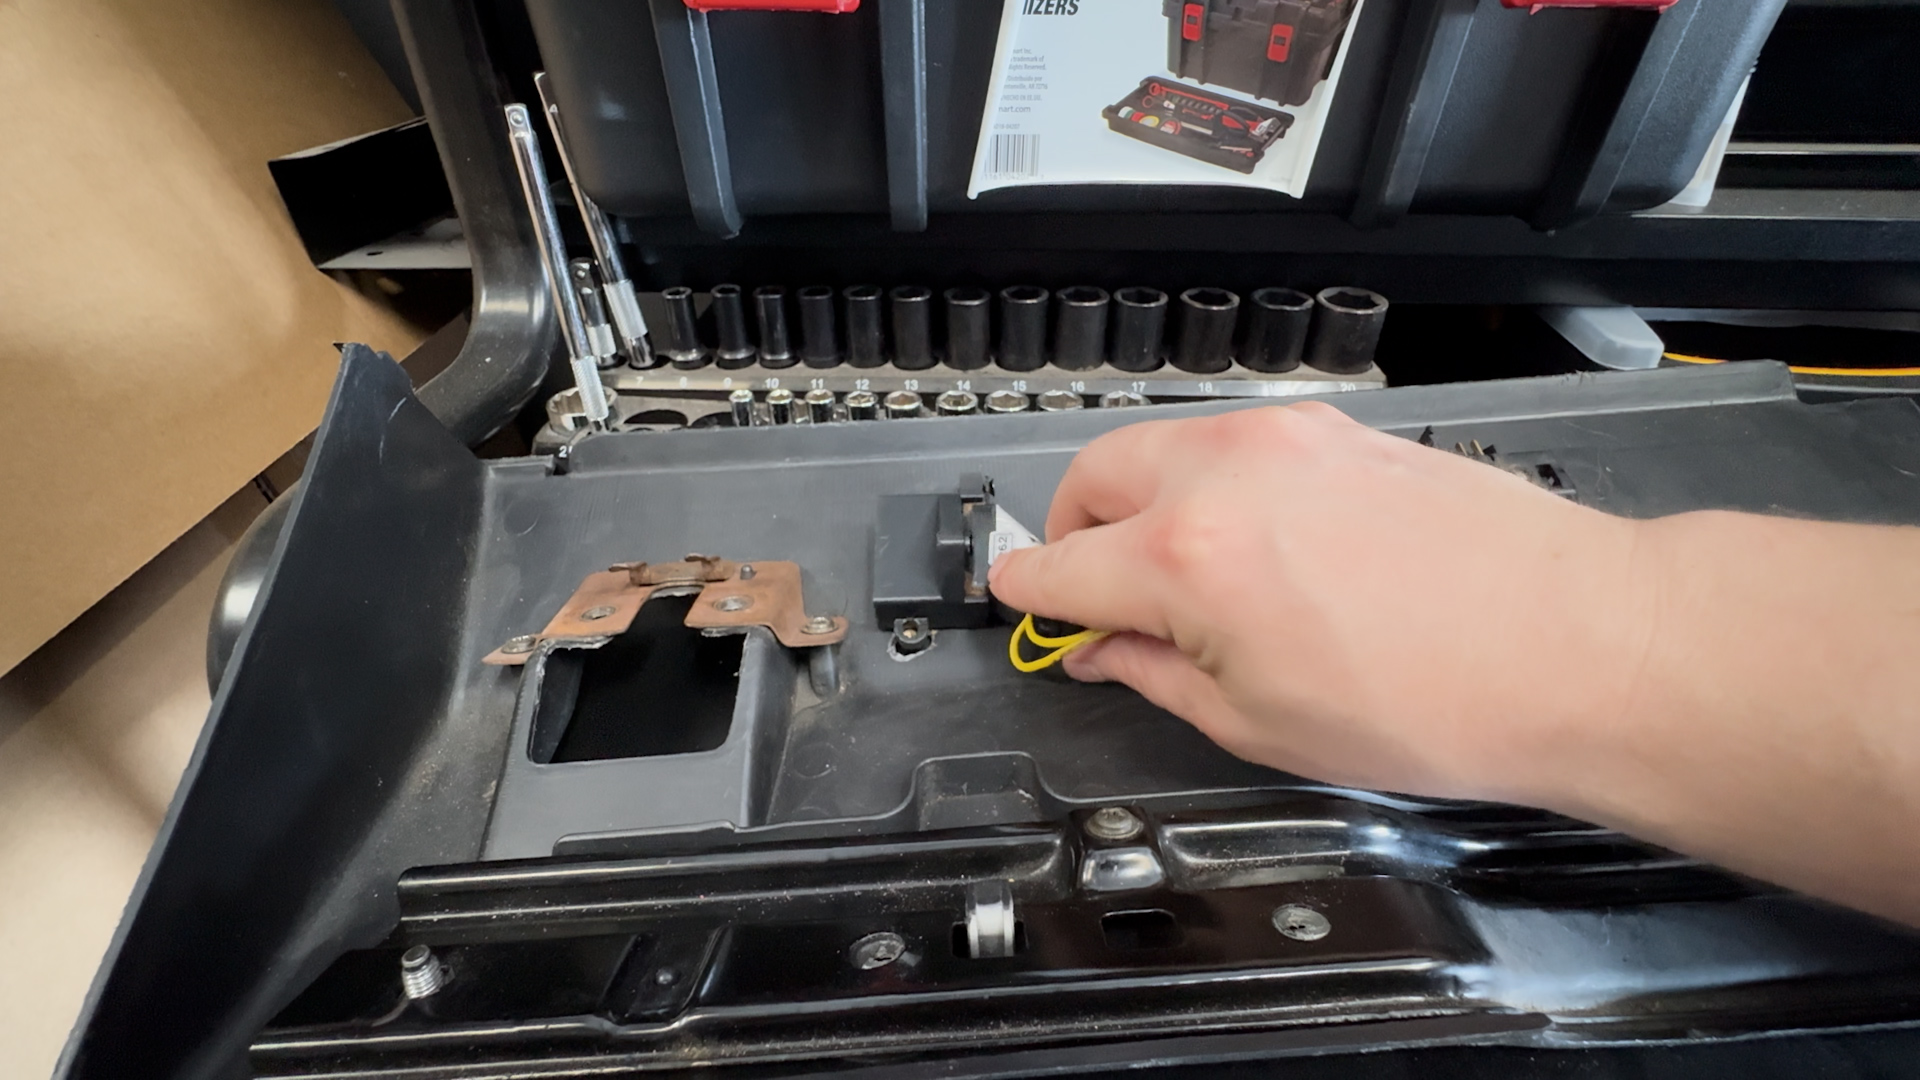
- Insert the 3D Printed Grill into the bottom. And on the opposite side, mount the Bracket. I used Thread Inserts into the grill, and put 4mm Screws in to keep it in place. The Inside Cabin Temp Sensor mounts here.
2. Blower Motor Resistor
1. Remove the Resistor
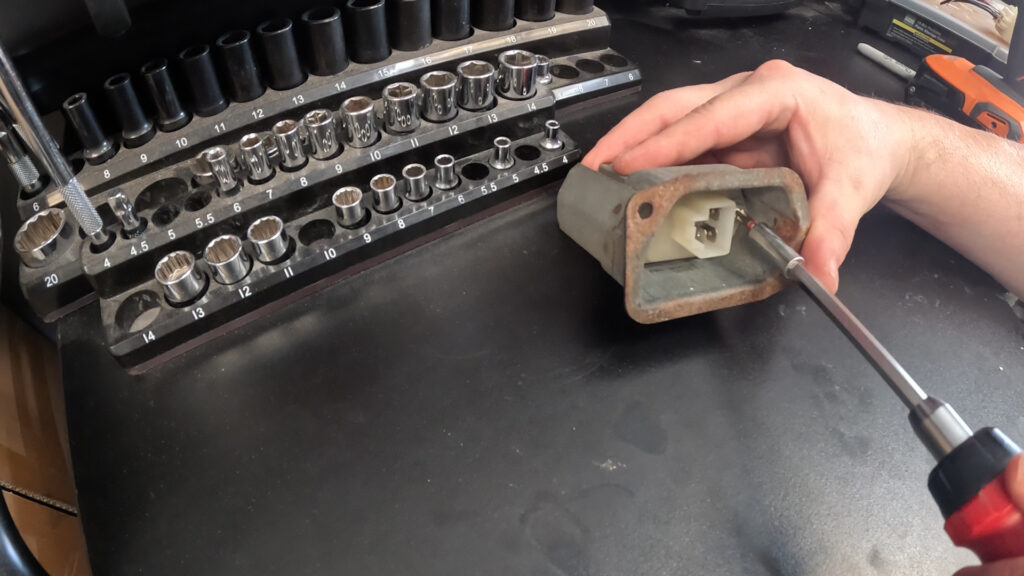
- First we need to remove the old resister from the housing, by unscrewing the two screws, and pushing the unit out from the back.
2. Install the new Q45 Blower Motor Resistor
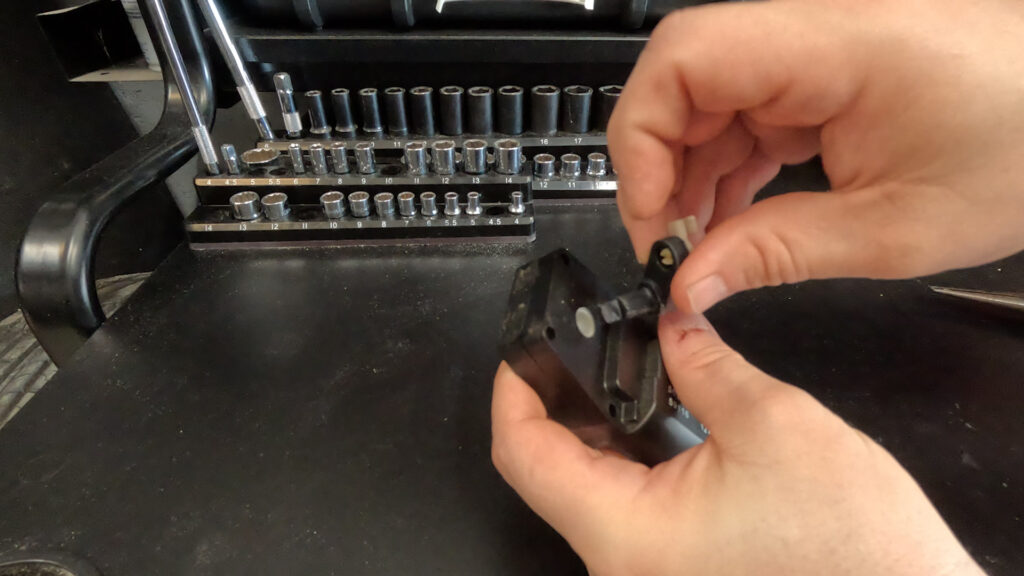
- Insert the new resistor in the opposite way you removed the old one. And screw in the two screws.
- Its important to note, that the reason for the Q45 Resistor specifically, is that it has a notch cut out of one of the fins. This prevents the metal from grounding out the resistor inside the metal of the box. If you are using a resistor, and it does touch the metal in the box, it will cause your fan to be set on high. So just make sure its not hitting anything.
3. Forester Blend Door Motor Preparation
1. Remove the arm
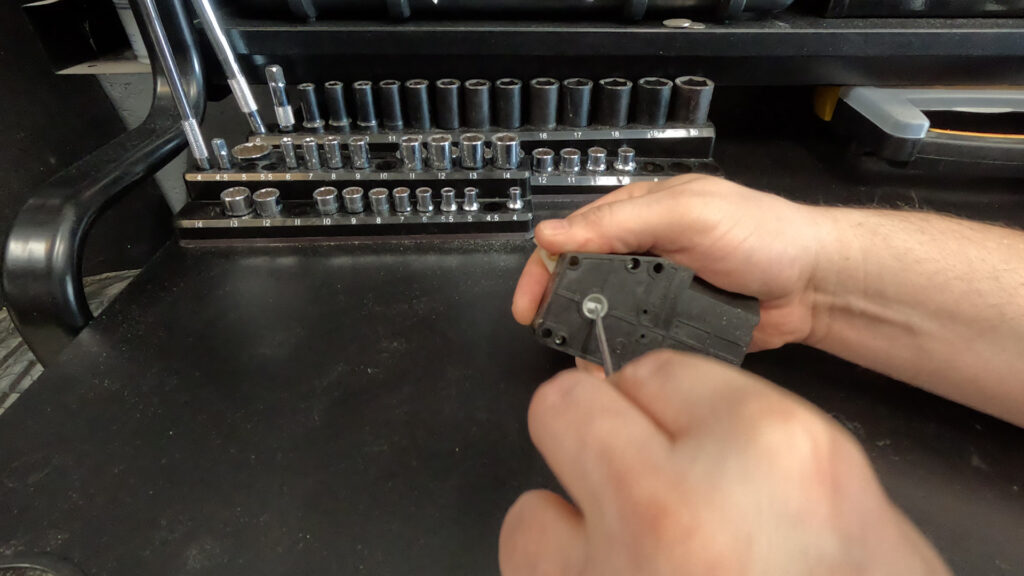
- First we need to remove the actuator arm. The length of the arm is too long when compared to the bracket, and doesn’t work properly. So you’ll replace it with a 3D printed one. You can do remove the original by looking at the bottom, and seeing a flat line. Take a screwdriver, and push the tab back, and then press down, and the whole arm should come out.
- We then have to change the arm, but before that, you want to steal the clip from the existing arm.
2. Replace the arm with #D printed one.
- Insert the clip from the original arm into the 3D printed one. Then press the arm into the hole in the motor. It should only go in one way.
3. Install Motor into Bracket
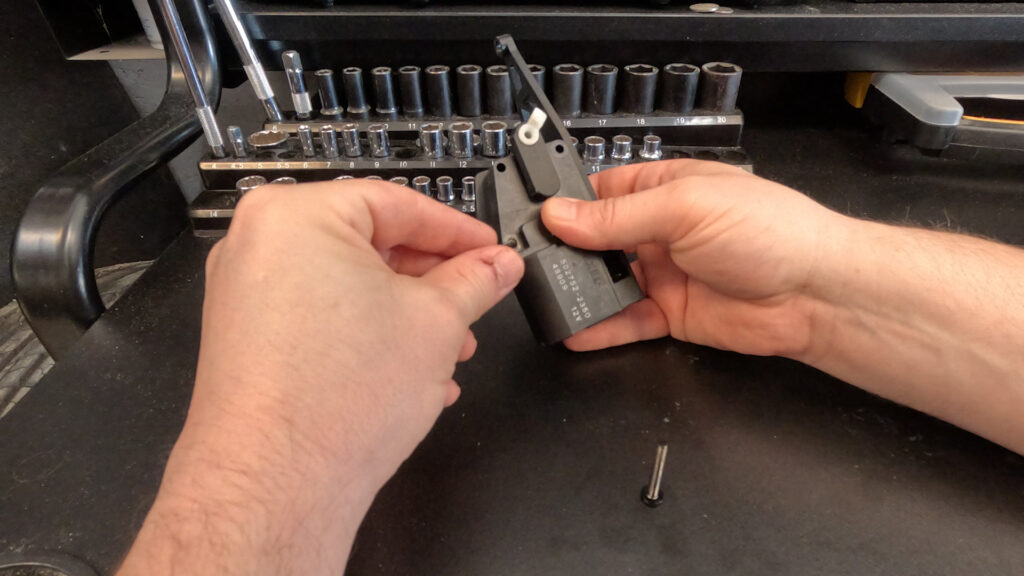
- Insert the Locating pin from the 3D Print file into the lower hole. It should be covered and locked into place by the Motor being secured to the bracket.
- Attach the motor to the bracket. You can use threaded inserts with long screws, or just take a long bolt and put a nut on the other side if you want. Just make sure you don’t block the arm with a bolt head in the upper left corner. (if holding the motor up with the fatter end down, looking at the arm side, like in the photo. )
4. Make the Rod arm
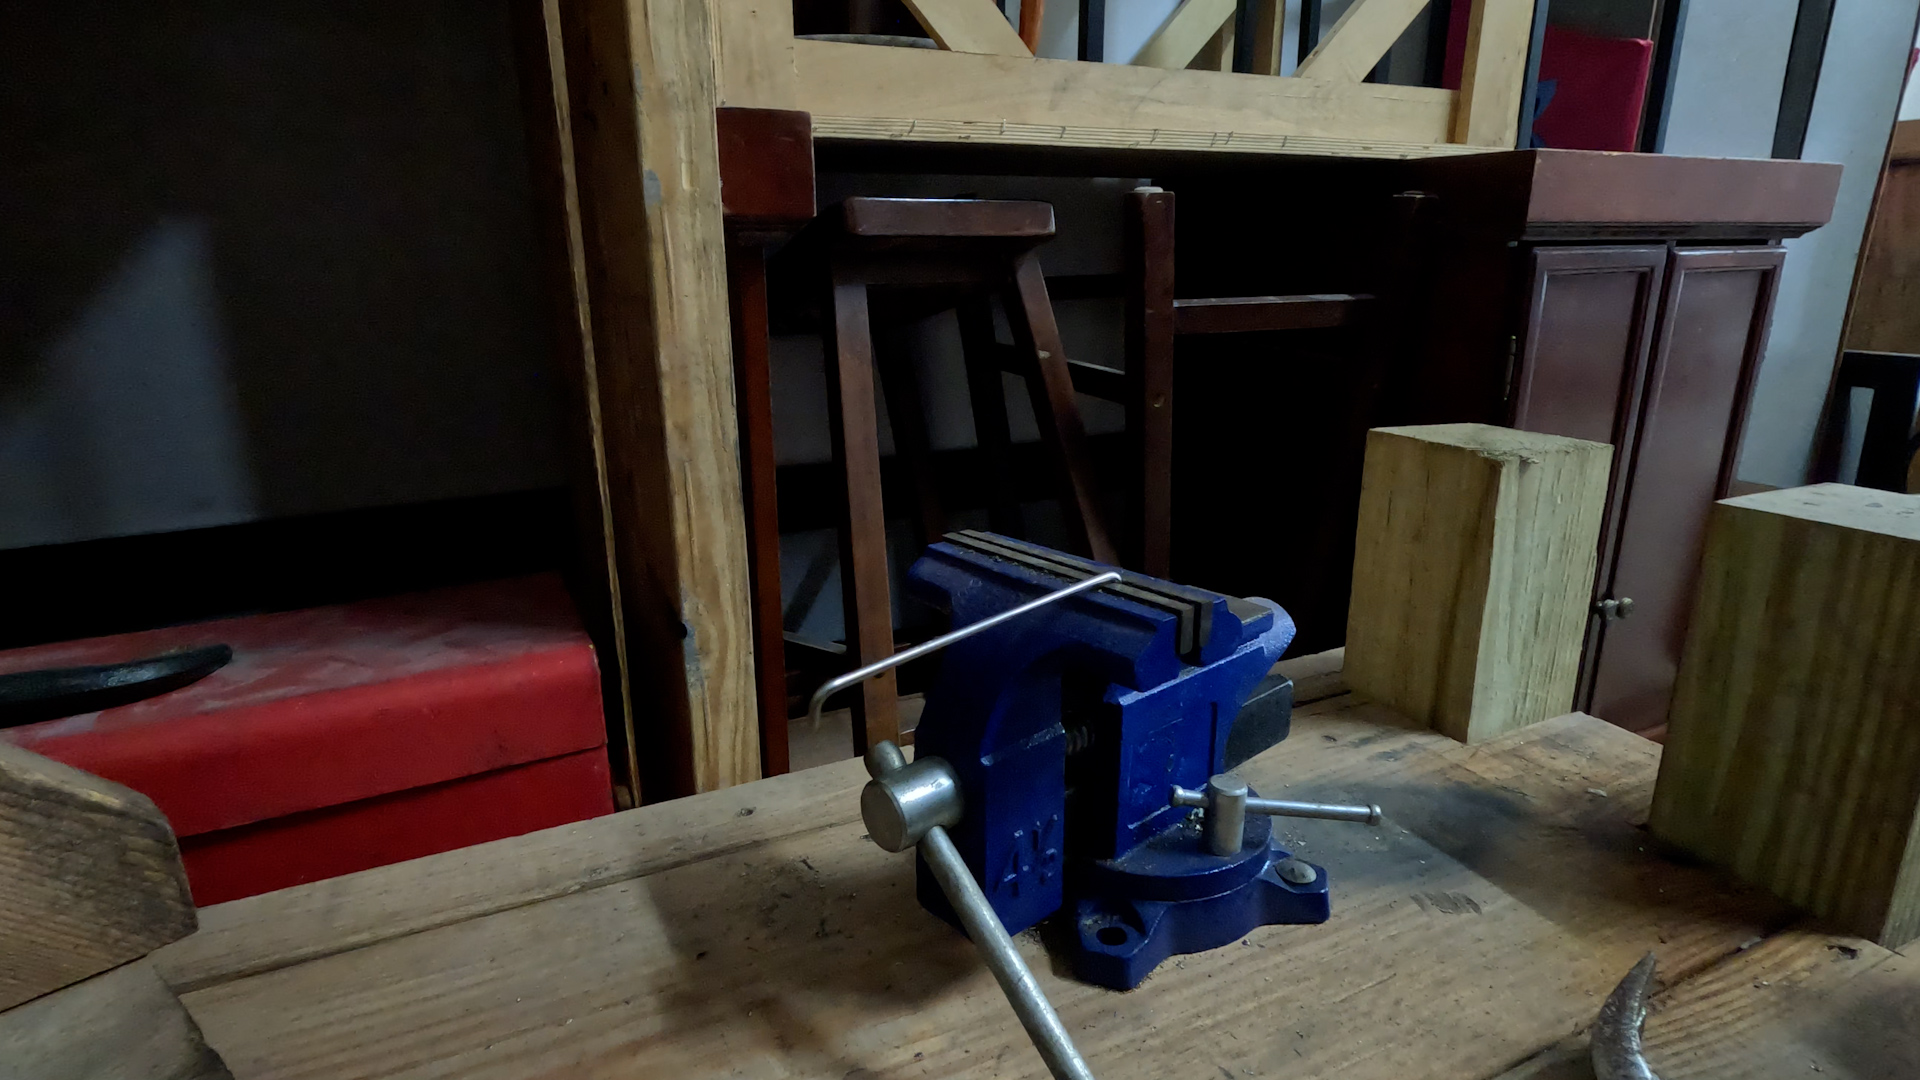
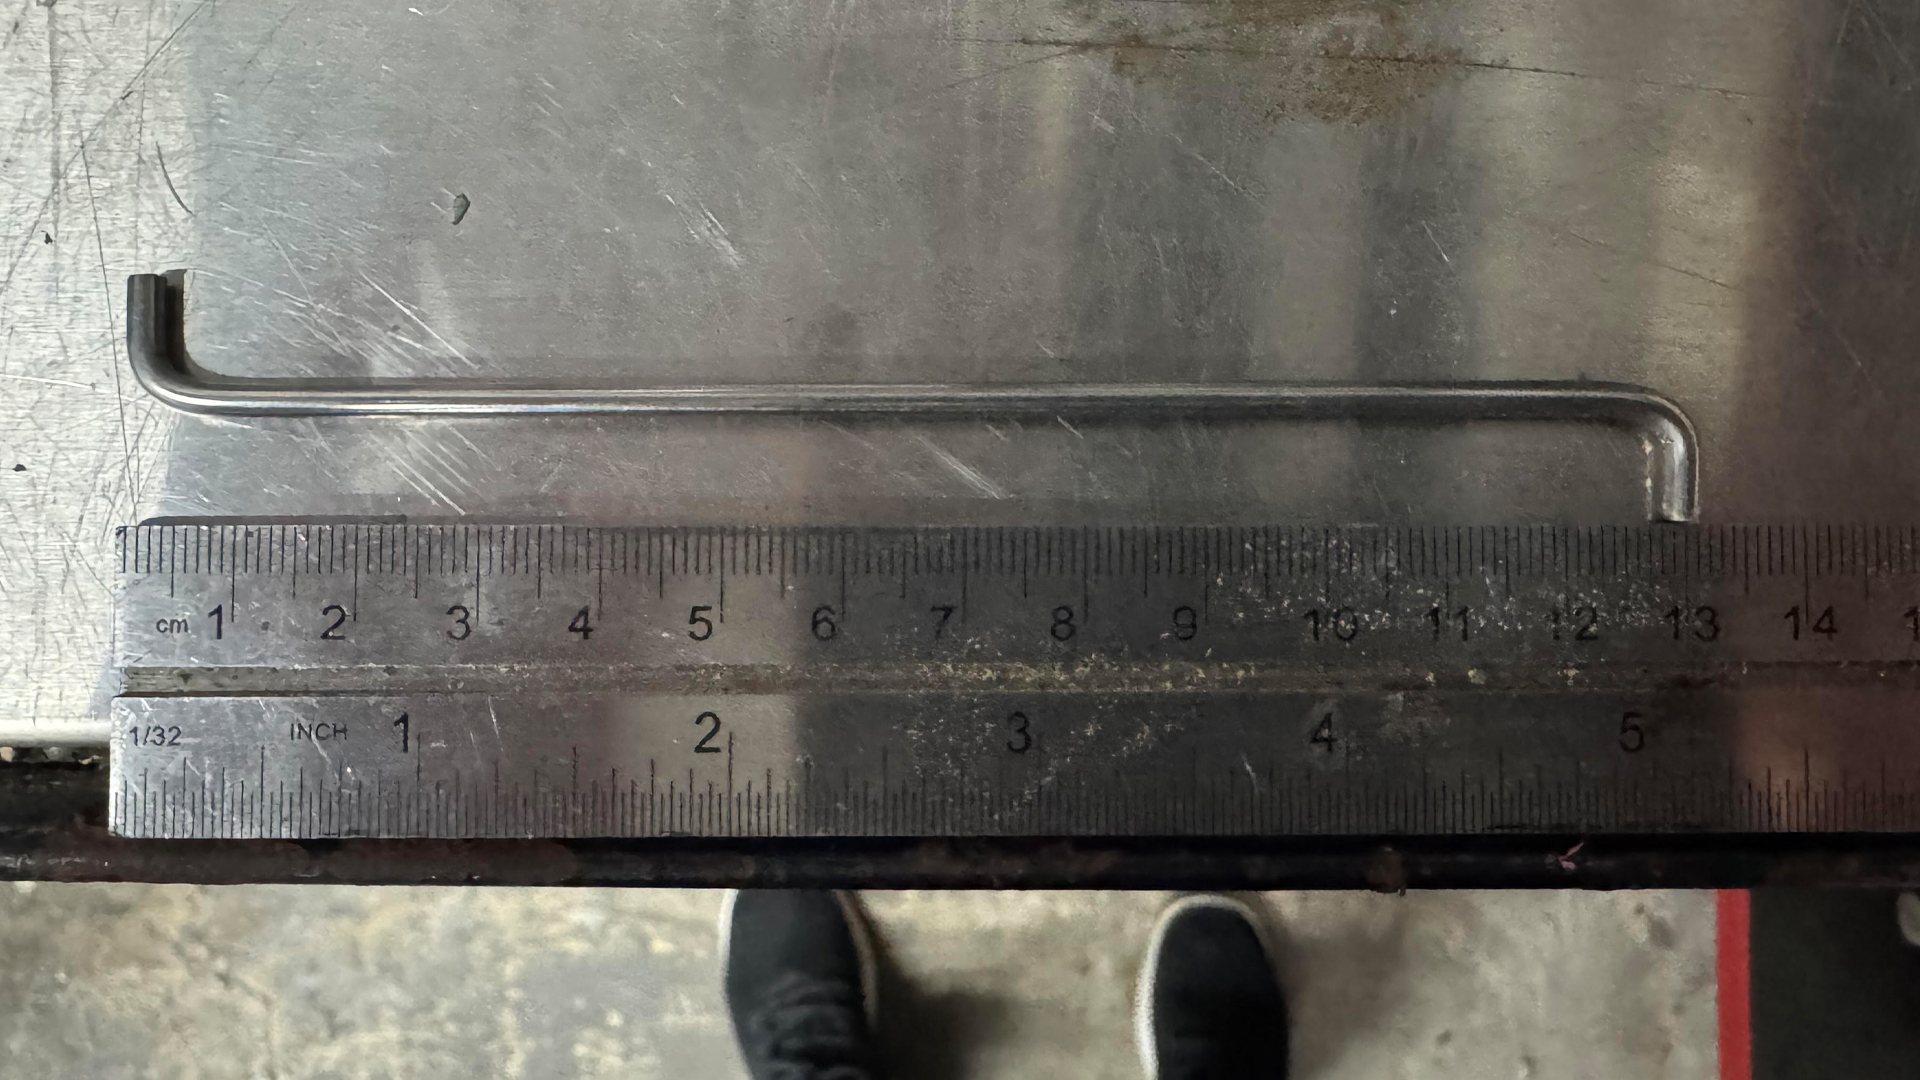
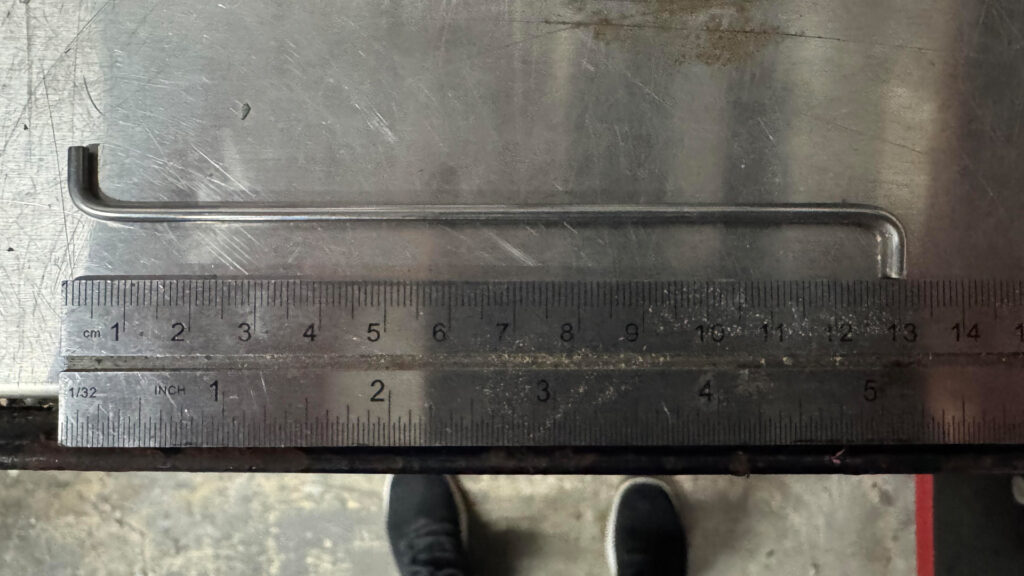
- Grab your Rod arm (3mmx300mm) And put half an inch into a vice. Then use a hammer to bend it to a 90 Degree angle. The length, from bend to bend should be around 13cm. You may have to try a few times to get it just right. Bend the other side in the opposite direction, and cut off the excess. You want to make sure that when this is inserted into the Arm, the rod doesn’t touch the main body of the motor.
- Do not insert the rod yet.
5. Make/Purchase the Bracket for the Door
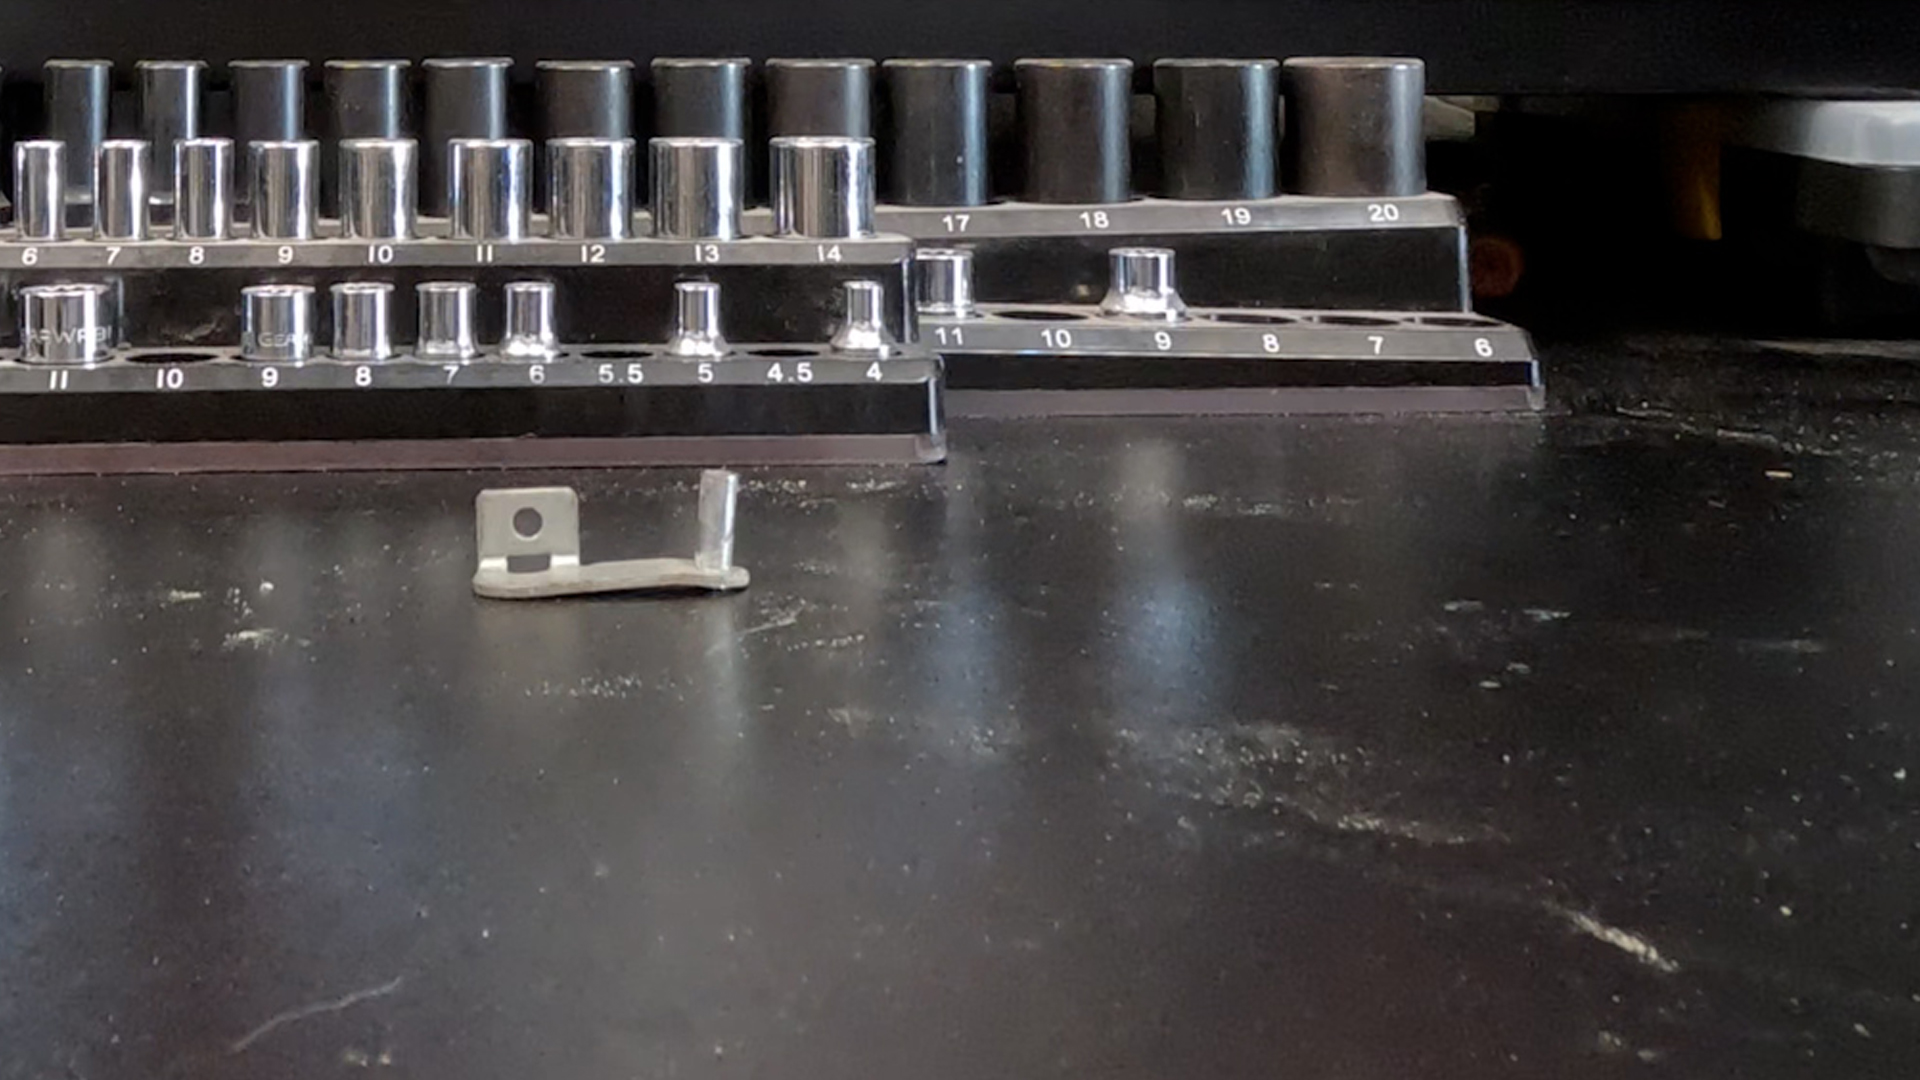
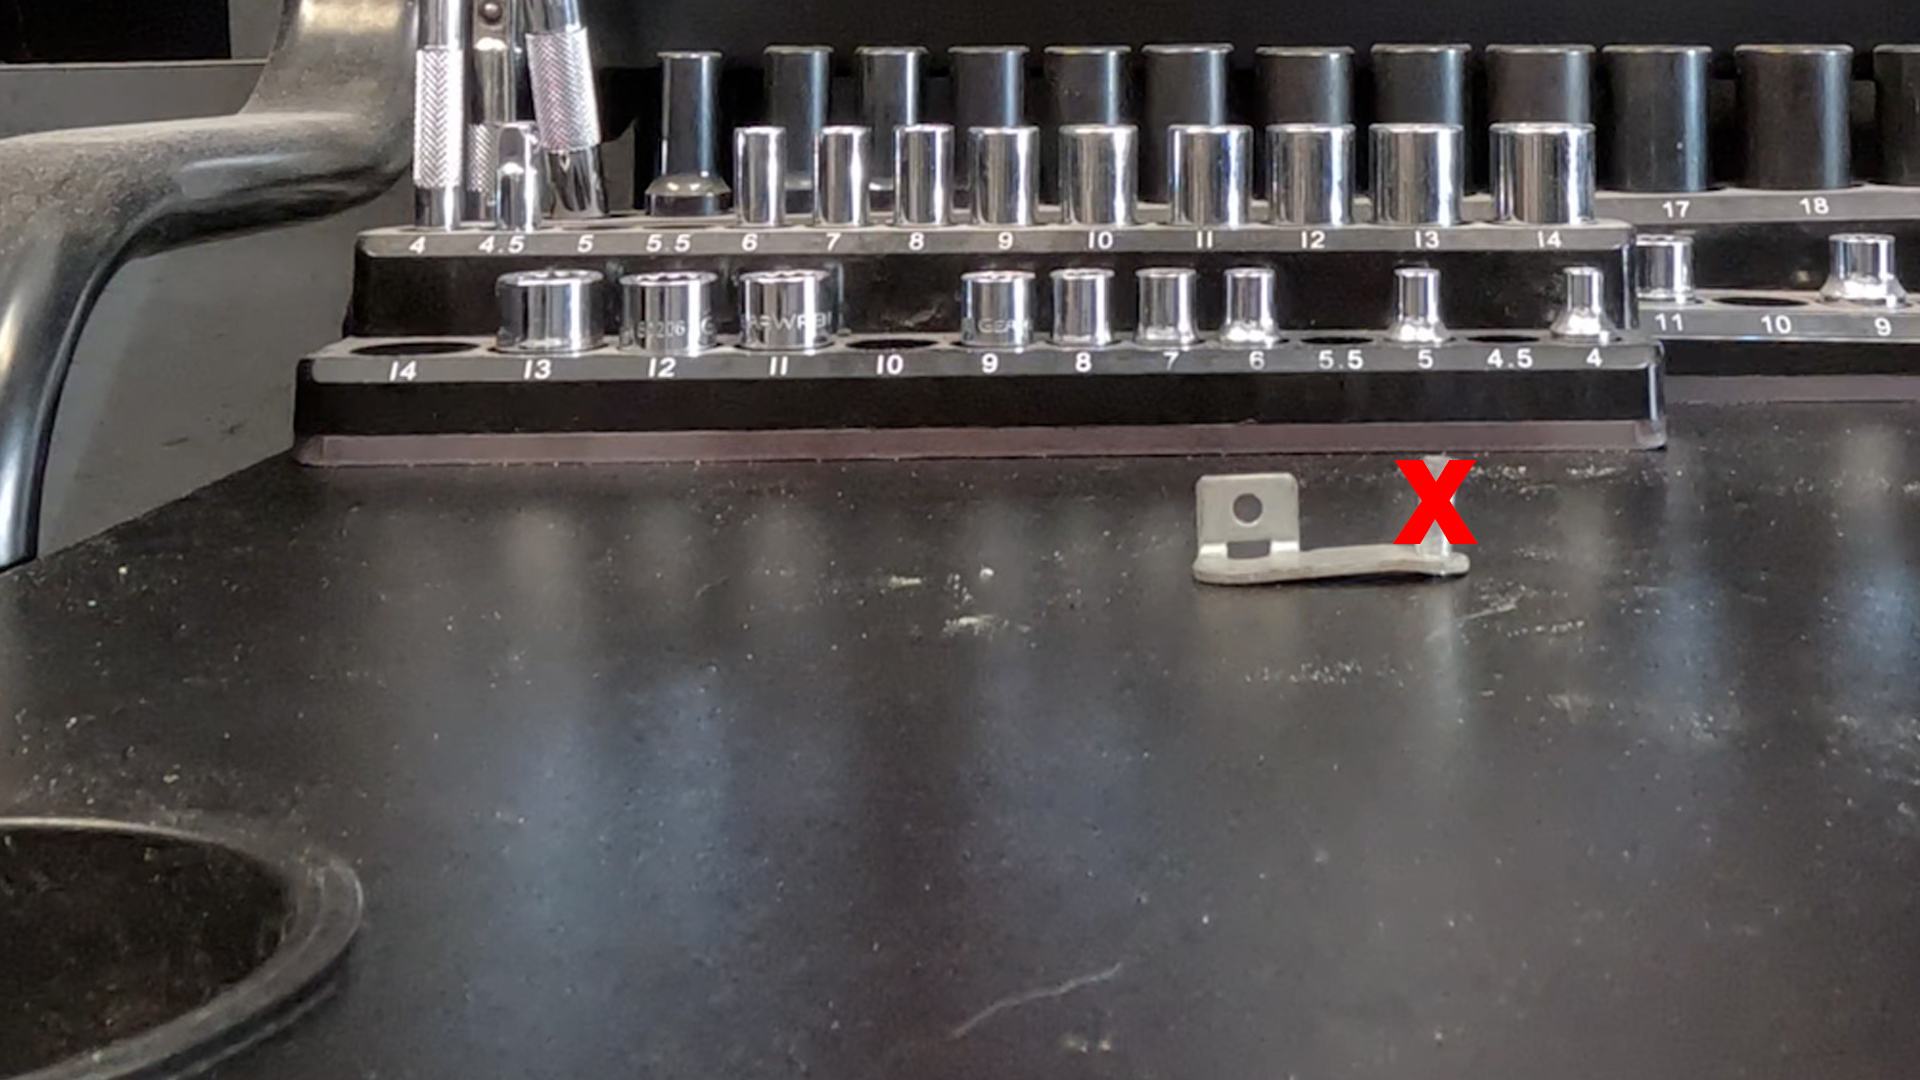
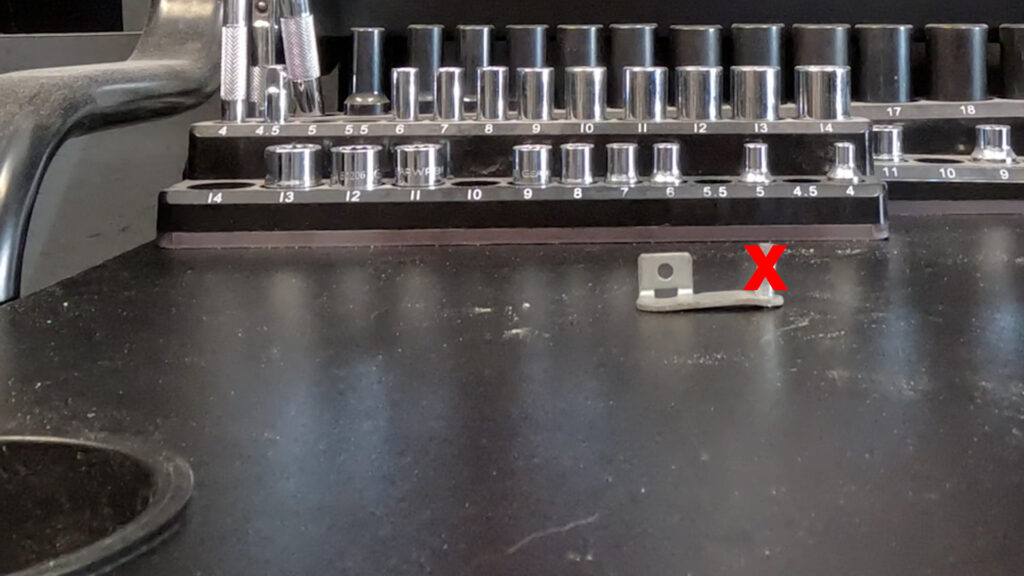
- You have two options here. You can modify your bracket, by cutting off the metal rod at the end. And drilling a hole with the 15/64″ drill bit. However I have not tested this, so the arm length may have to change possibly. Otherwise Just purchase the bracket listed above in the materials section, and skip this step.
3.5 Maxima Blend Door Motor Preparation
1. Drill Hole into the arm
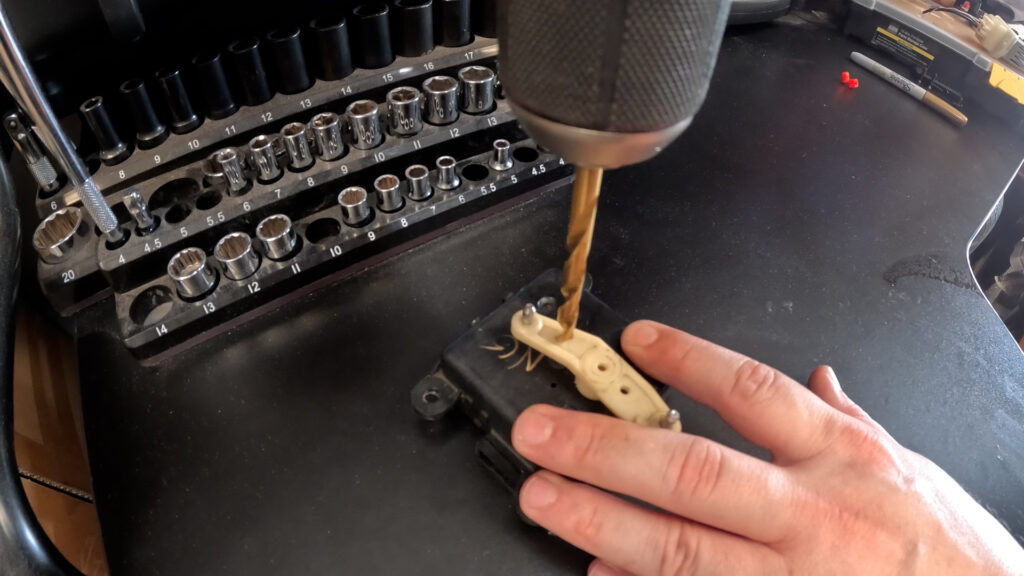
- So, you want to drill a hole in the arm using a 15/64″ Size Drill bit. And you want to go about 6.5mm from the plastic indent at the end of the arm. Be careful to not drill into the housing.
- Important note: I’m using a broken motor, so the arm is not where it should be. Just keep that in mind.
2. Shave the ridges of the arm
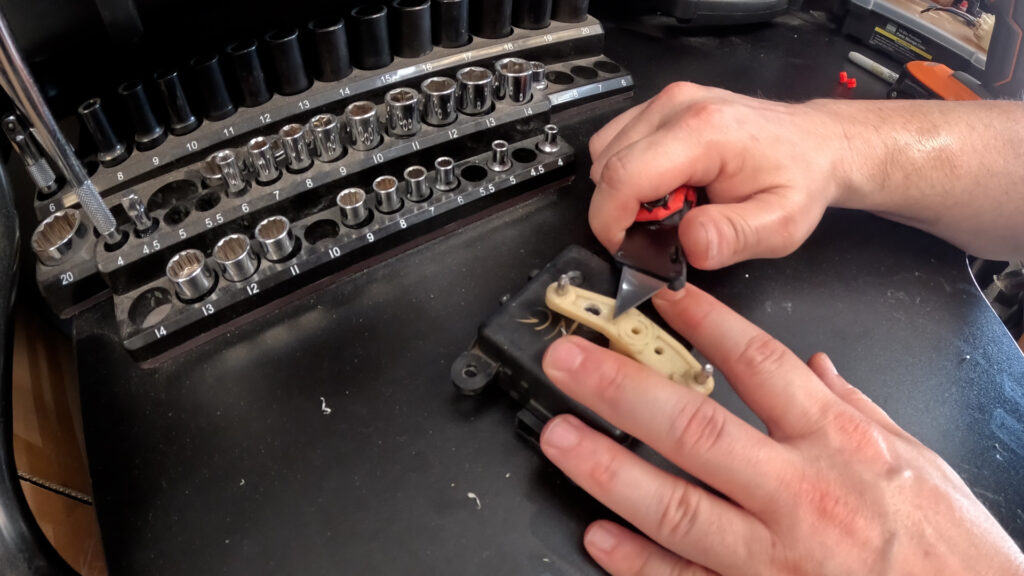
- Now you’ll want to shave the ridges on the arm. On either side of the hole you drilled. This will allow the red Rod Clip to sit flush, and spin freely.
3. Install Motor into Bracket
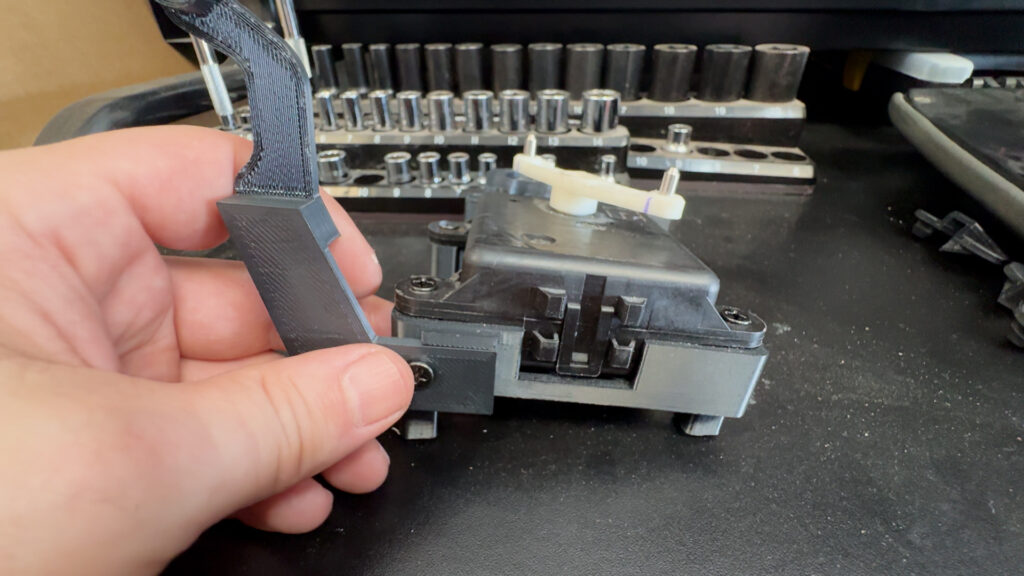
- Next you’ll want to install the motor into the 3D printed Bracket. It is held in place by four screws that go into Threaded Inserts in the mount, if you decided to go that path.
- You want to make sure the Plug connector is Facing to the right, in relation to the View of this picture.
4. Make the Rod arm
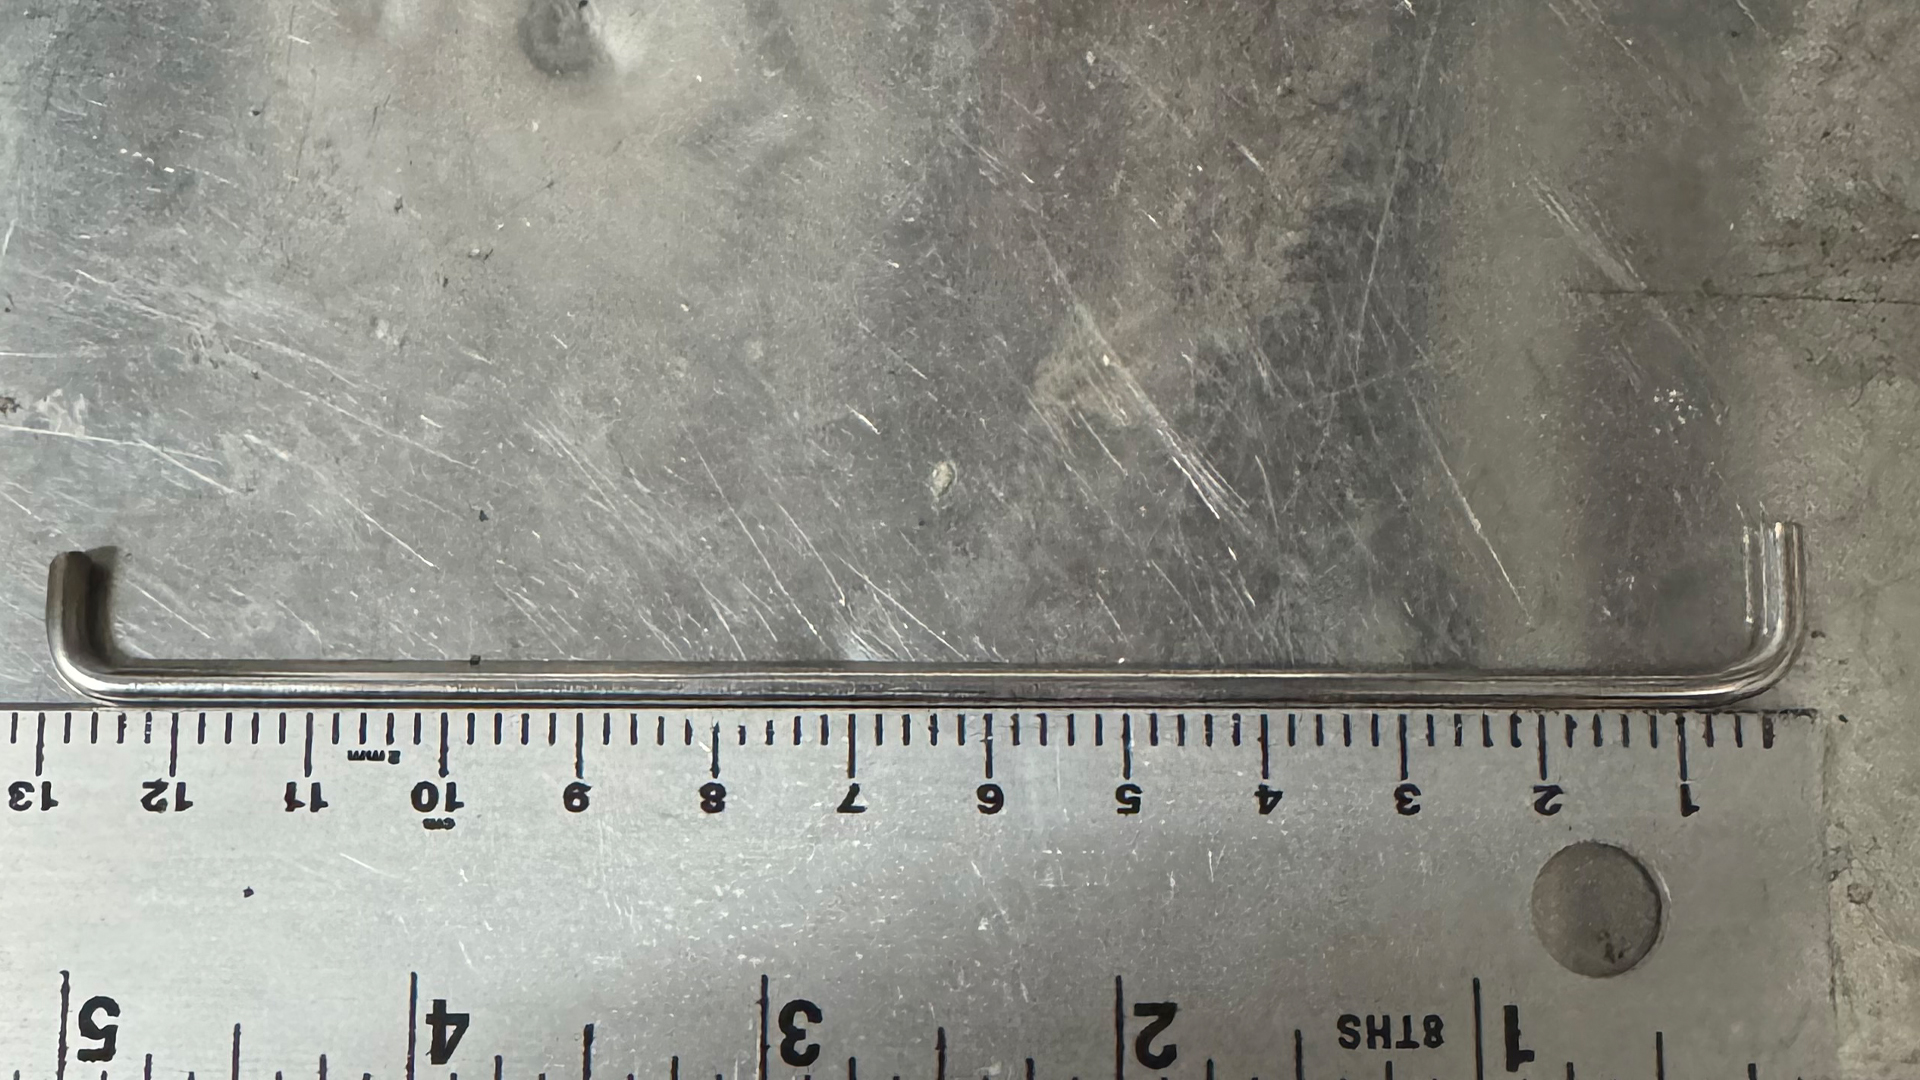
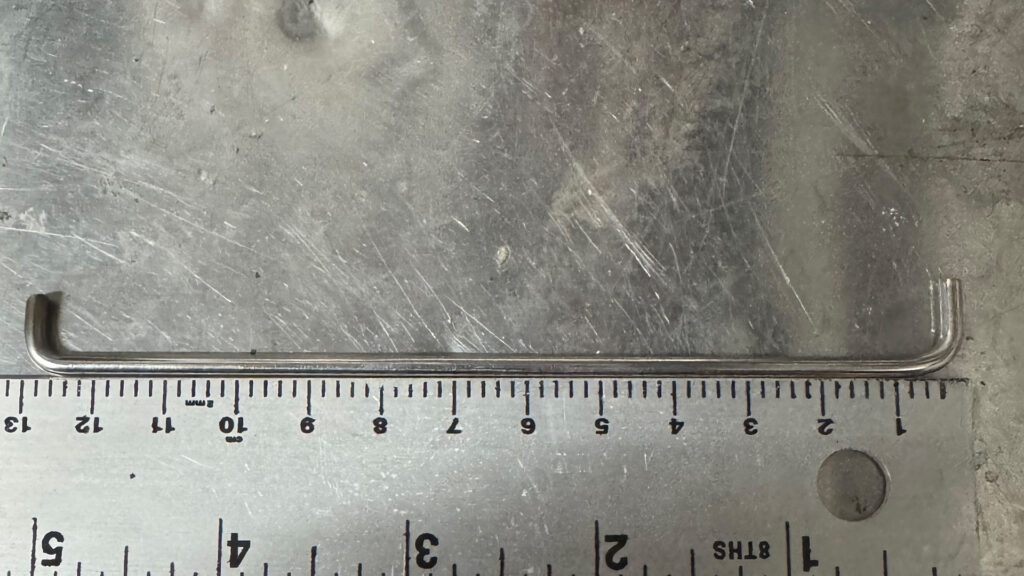
- Grab your Rod arm (3mmx300mm) And put half an inch into a vice. Then use a hammer to bend it to a 90 Degree angle. The length, from bend to bend should be 13cm. Bend the other side in the same direction, and cut off the excess. You want to make sure that when this is inserted into the Arm, the rod doesn’t touch the main body of the motor.
- Do not insert the rod yet.
5. Make/Purchase the Bracket for the Door
- You have two options here. You can modify your bracket, by cutting off the metal rod at the end. And drilling a hole with the 15/64″ drill bit. However I have not tested this, so the arm length may have to change possibly. Otherwise Just purchase the bracket listed above in the materials section, and skip this step.
4. Sunload Sensor Grill
1. Drill Hole into the Defrost Vent
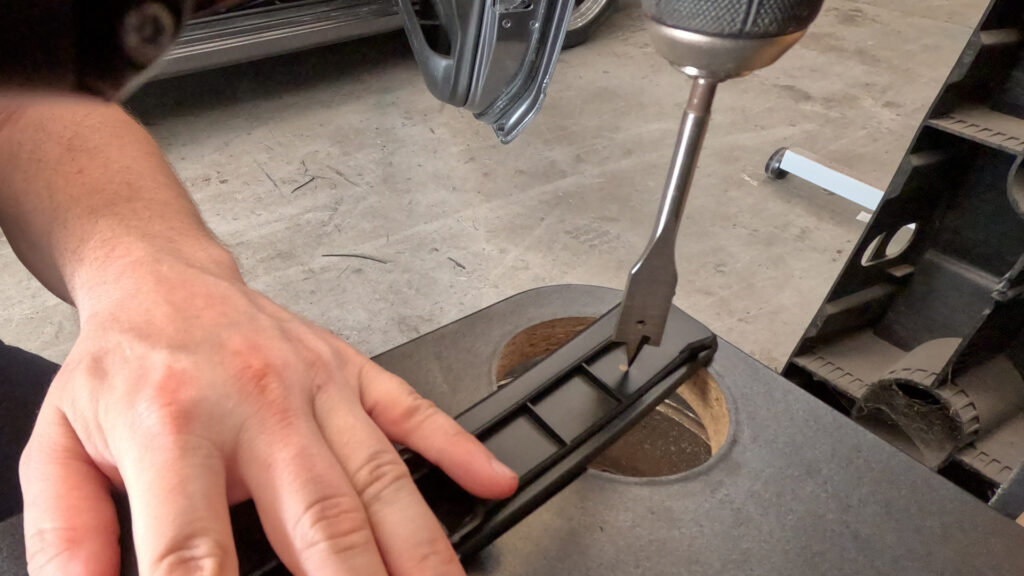
- This is the Right Side, or Passenger Side vent. Be careful…your vent is likely to just explode when you remove it. So…just be mindful.
- There are two sizes of Sunload Sensors. The smaller one uses the 5/8″ bit. I haven’t measured out the larger one, which comes from the later Nissans, but just measure and pick the appropriate spade bit.
- So, you want to drill a hole in the vent near the edge. Notice the location in the image, I’m drilling from the underside. The Spade bit is 5/8″, but is juuuust too small. So once you make the hole, angle the bit to widen it as neccesary to fit the Sunload Sensor. Just refer to the size of the sensor, and be cautious not to make the hole too big.
2. Insert the Sunload Sensor into the Grill
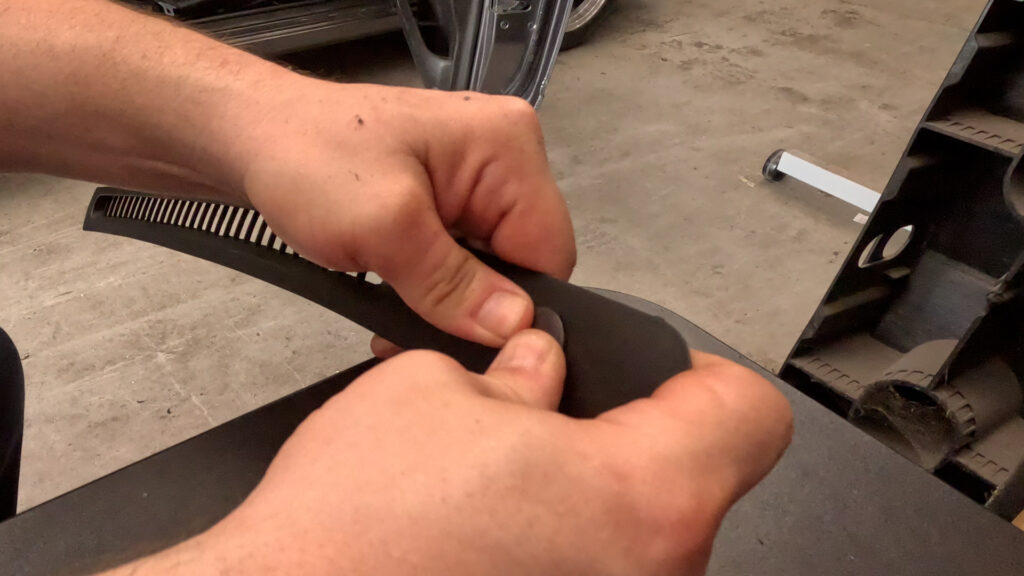
- Just press the sunload sensor through the hole you made, and it should kind of pop into place.
5. INSTALLATION
1. Reinstall the HVAC Box
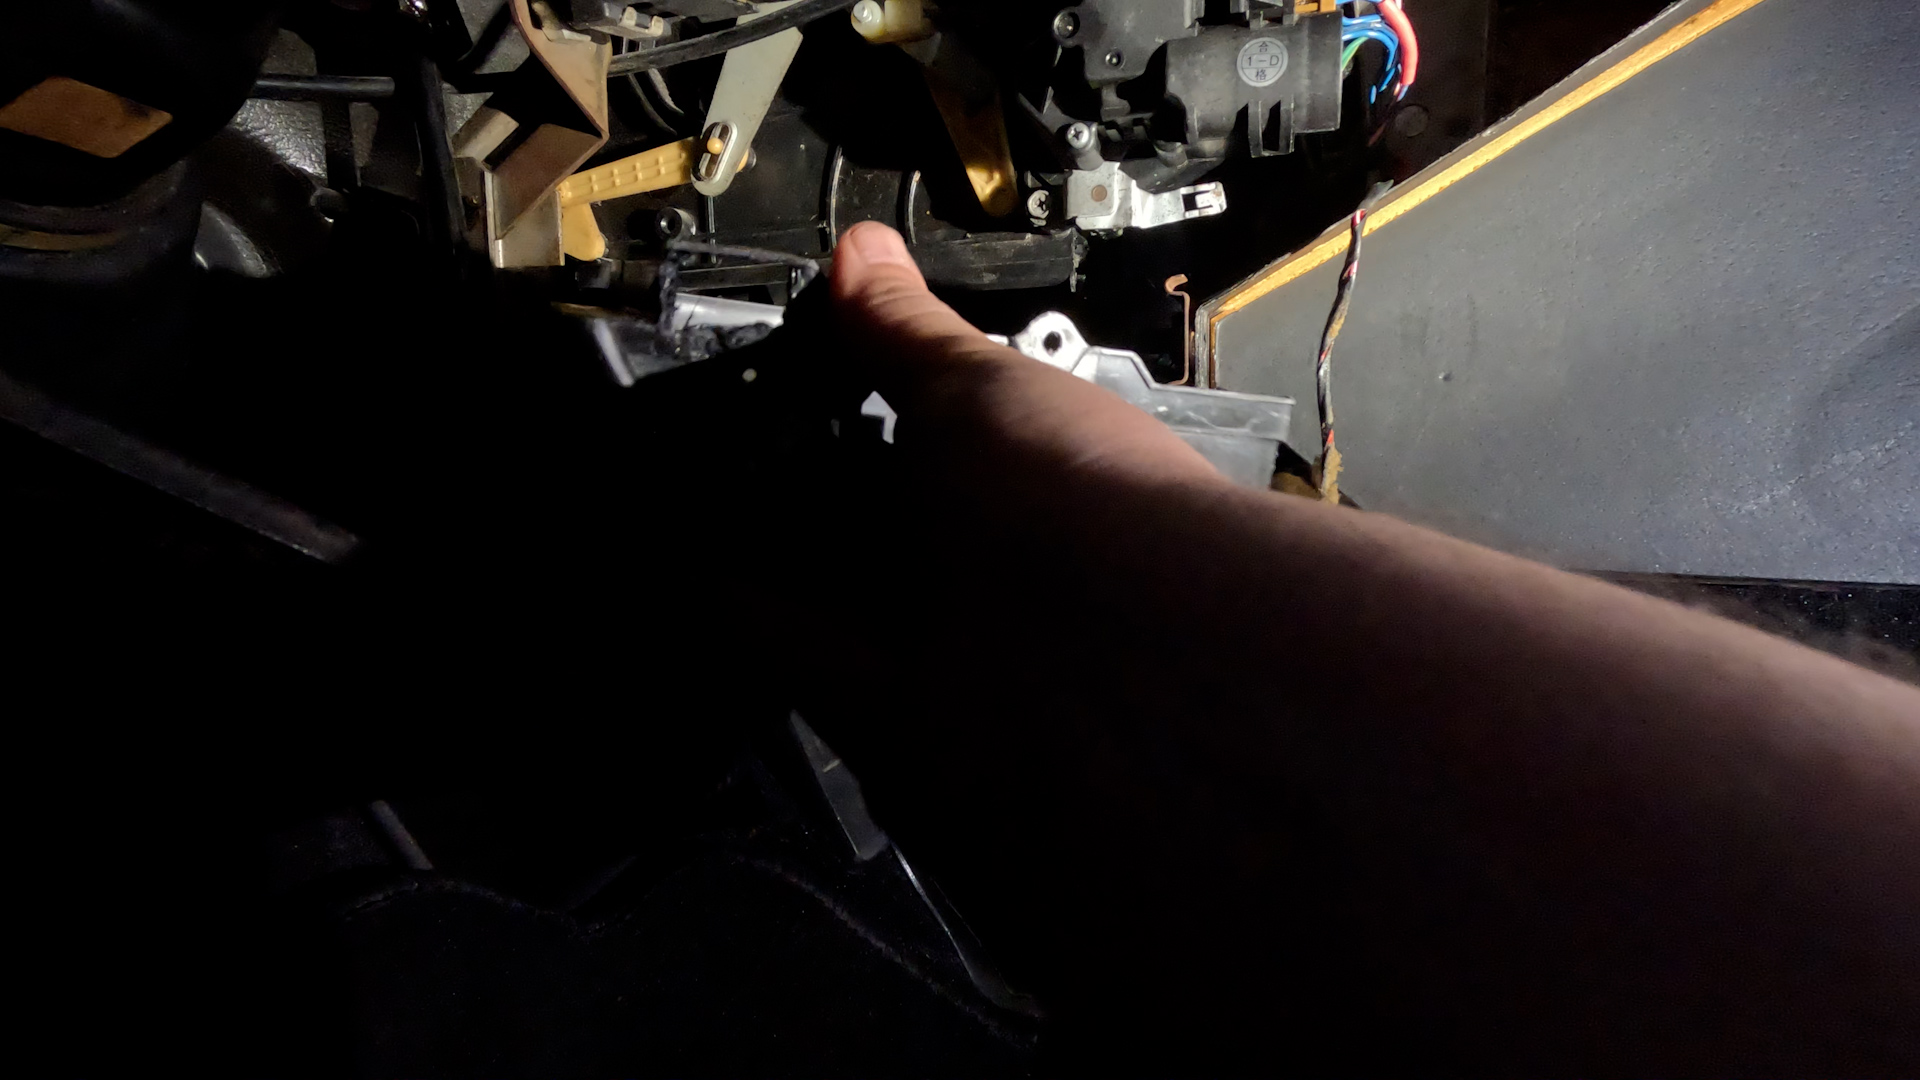
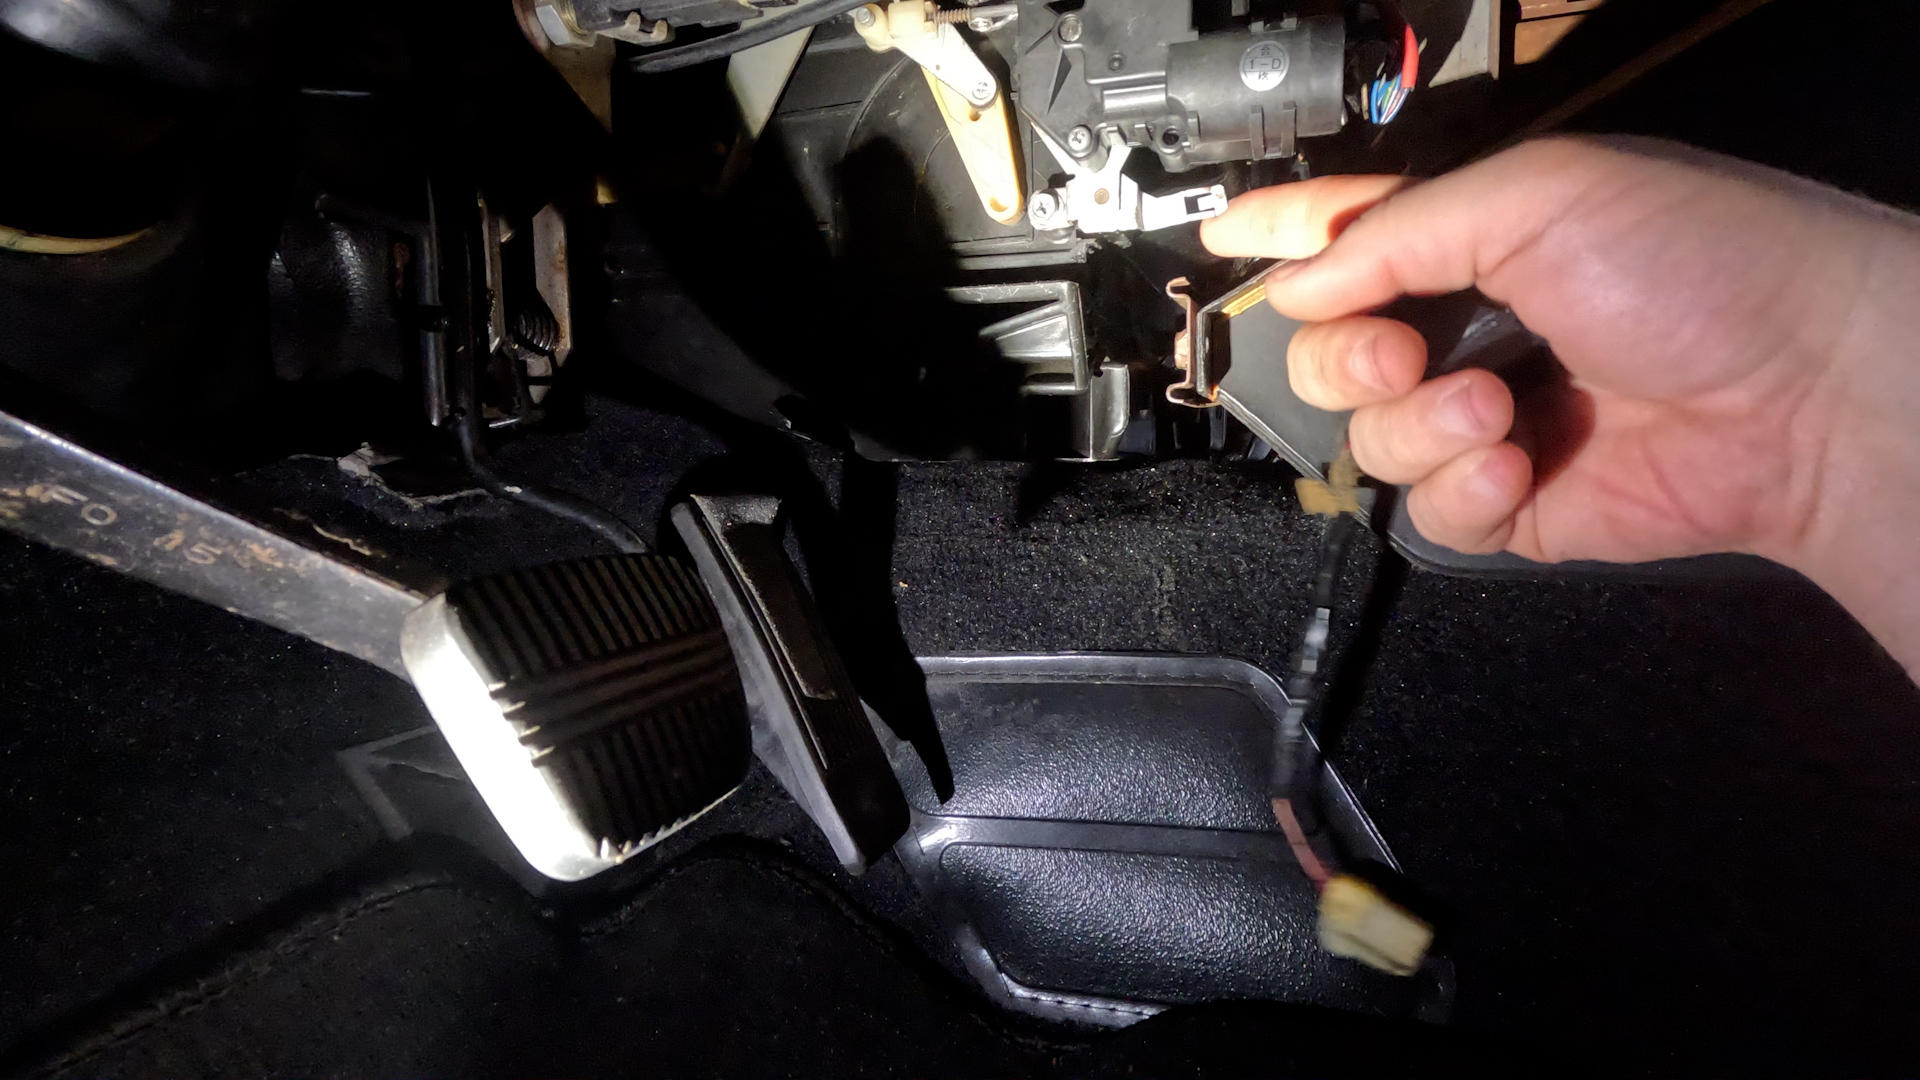

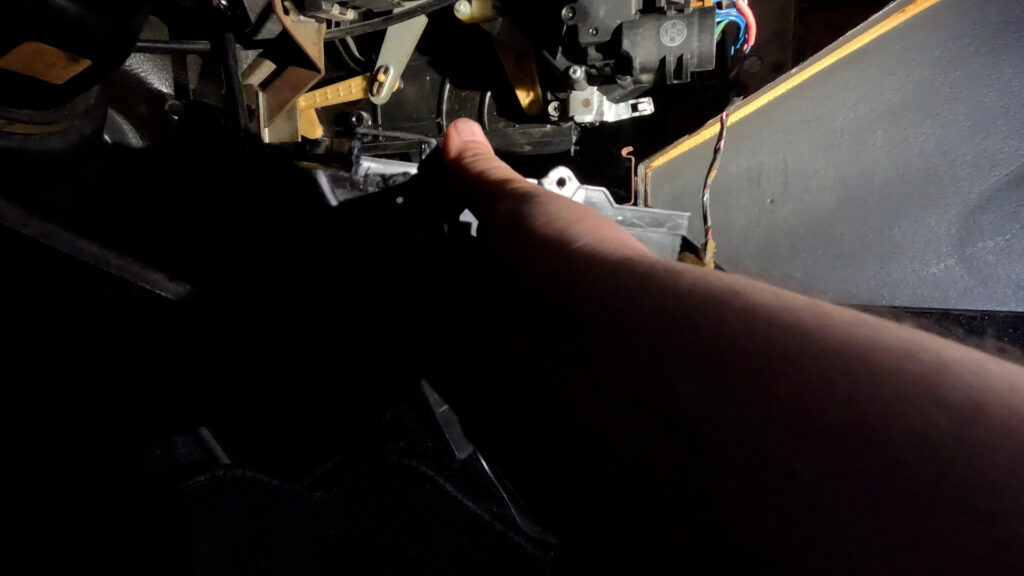
- Install Lower HVAC, goes in the same way you took it out.
- Its been a while since I originally did this. There is a little metal tab that is part of the Door Mode Actuator. You may need to bend it out of the way slightly to get the Aspirator in.
- Screw in the HVAC box in the cetner through the console.
2. Install Forester Motor and Bracket
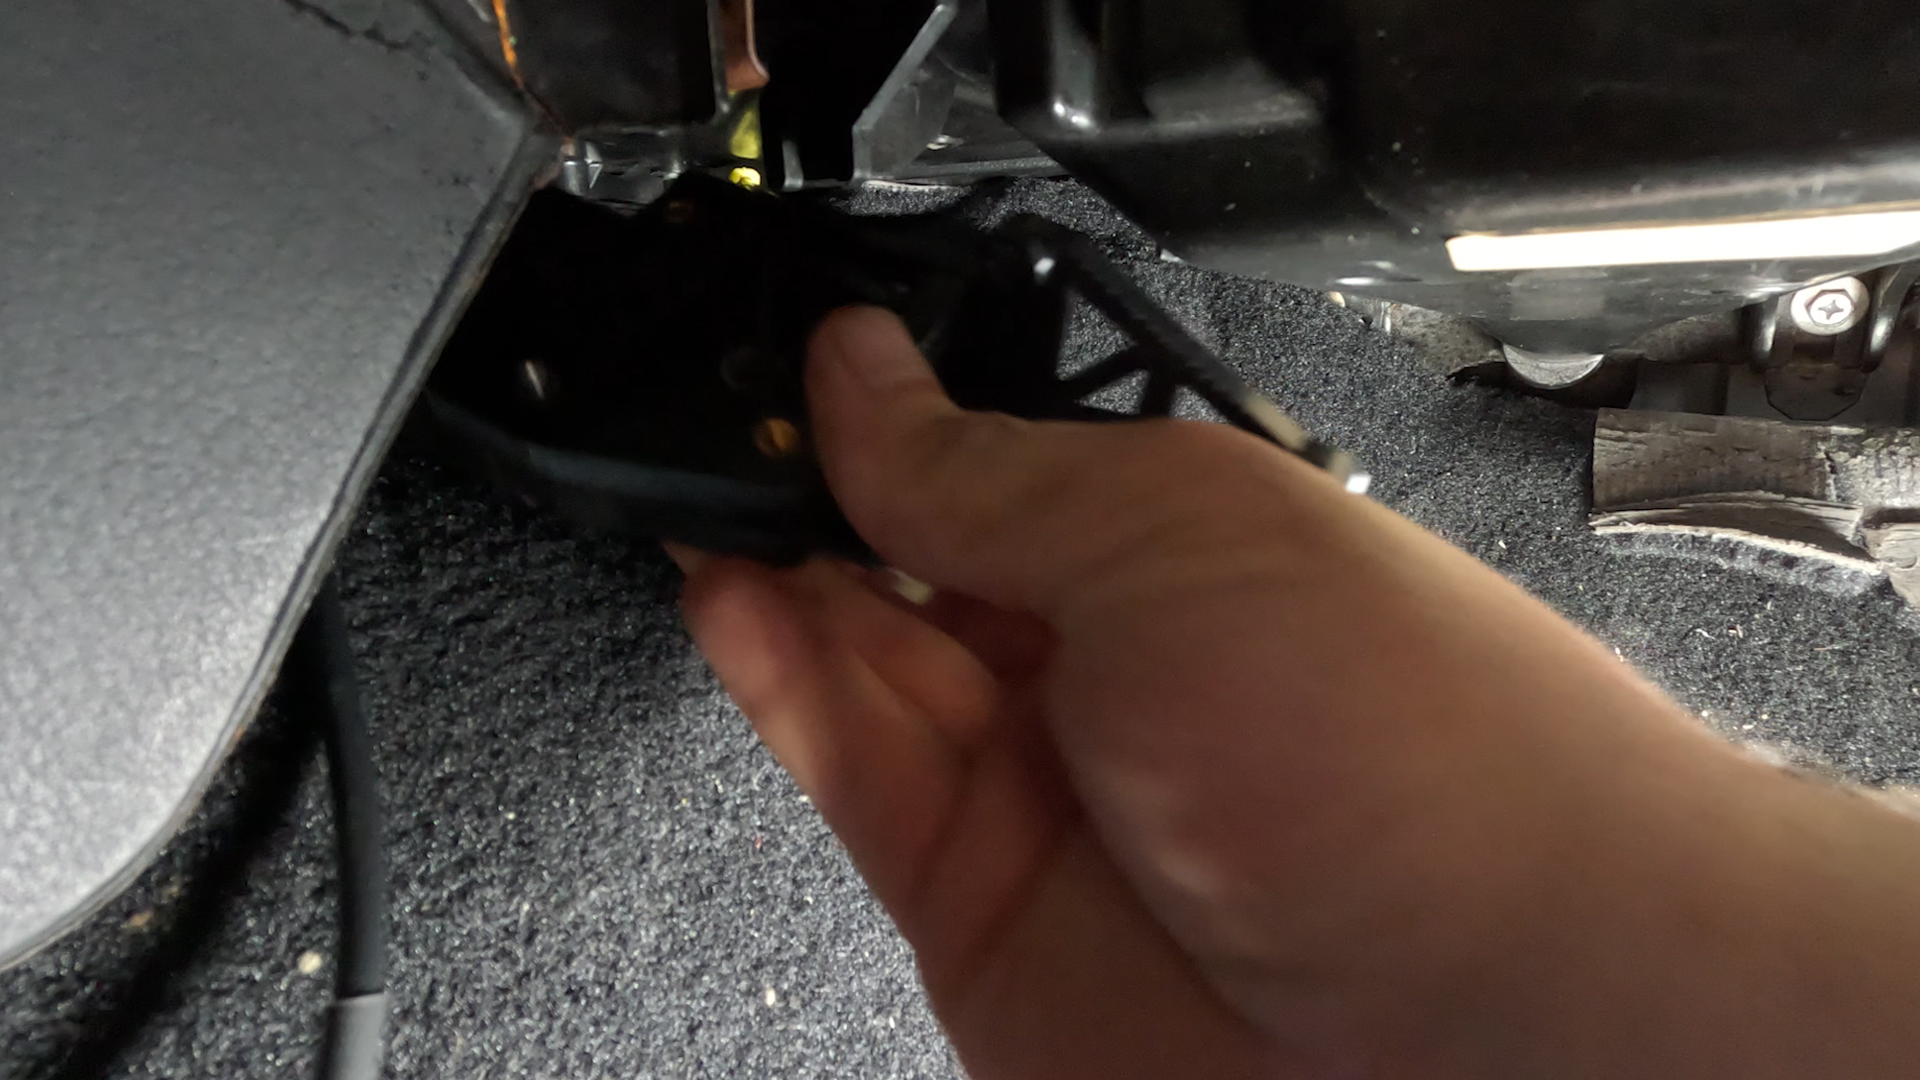
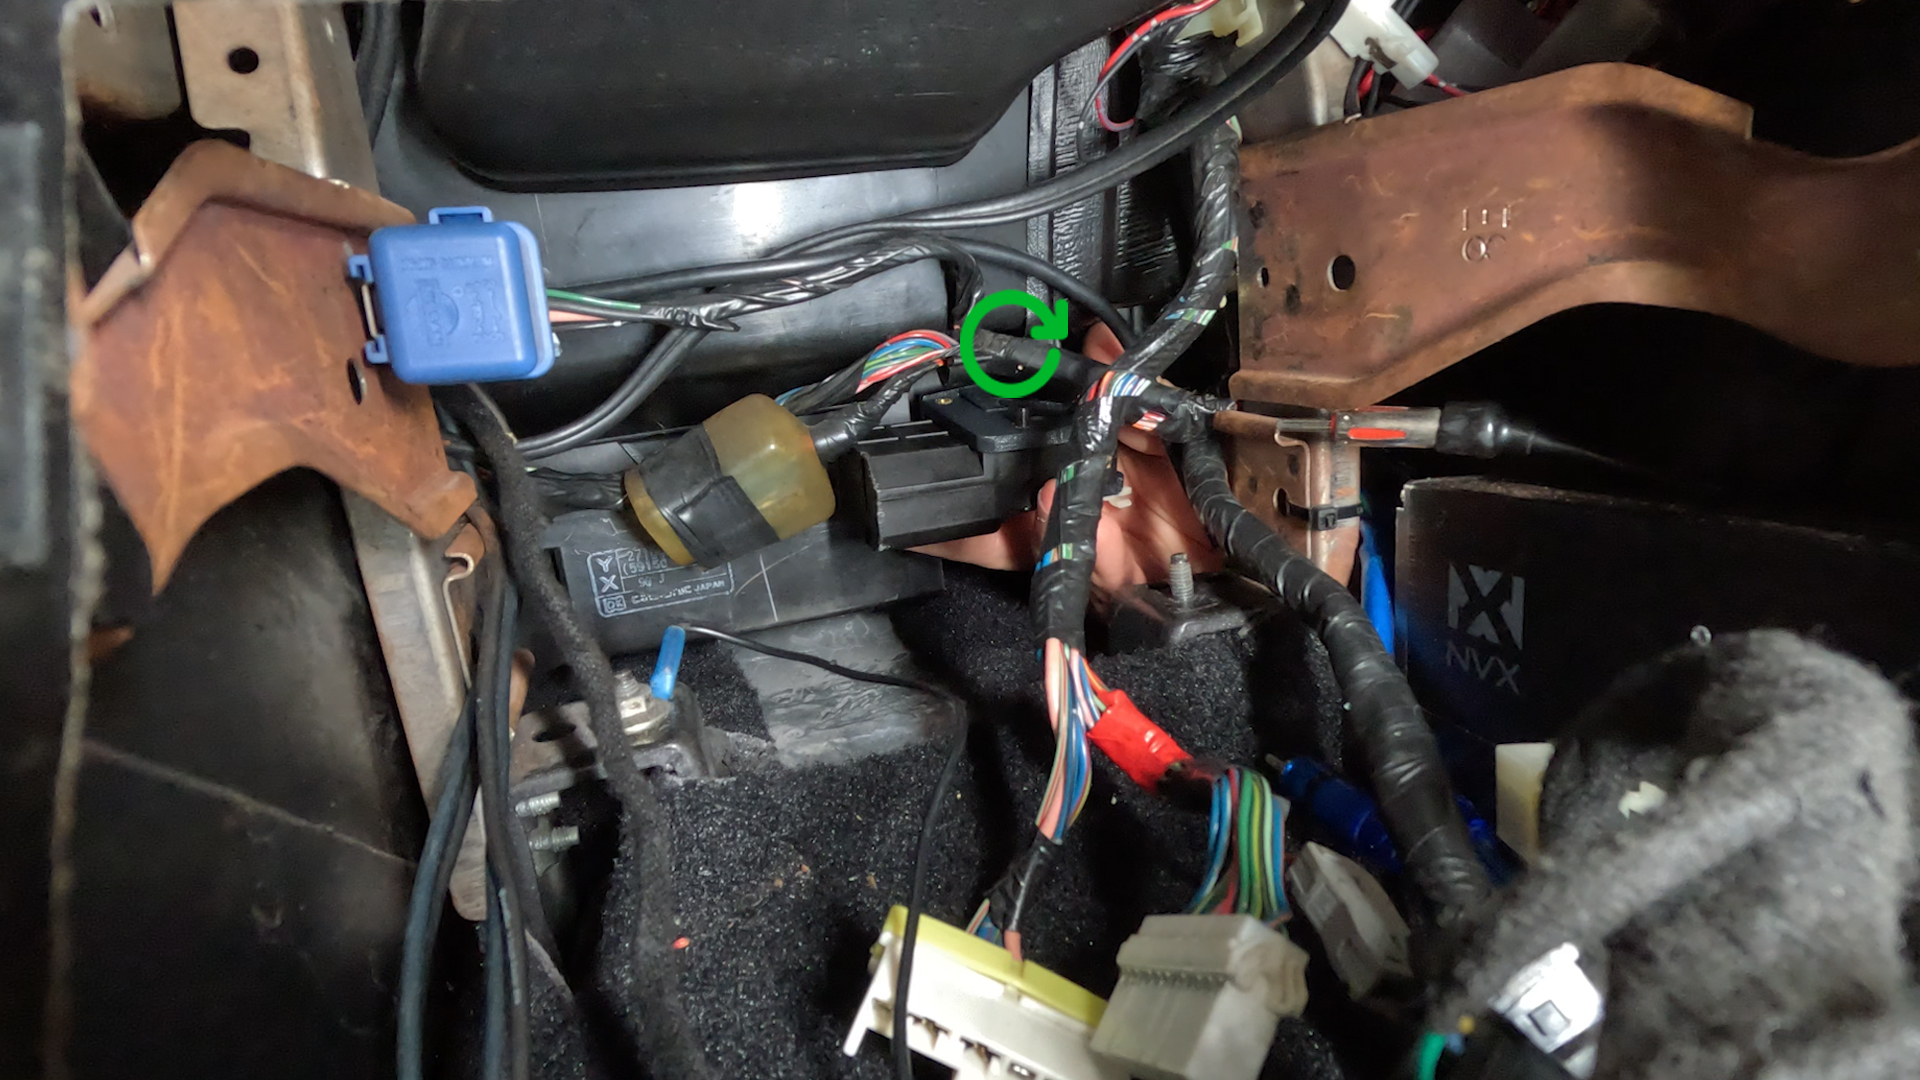
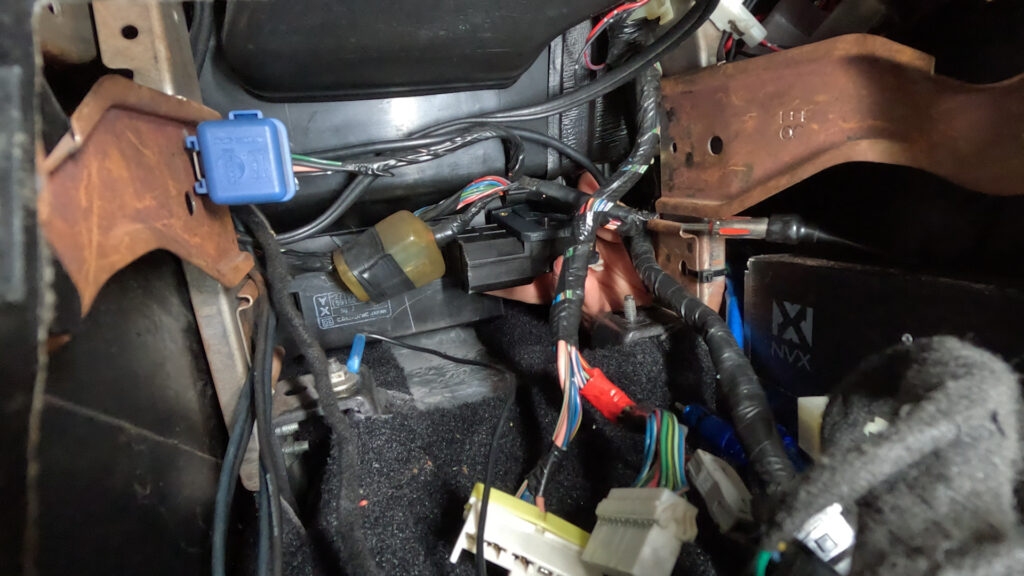
- Place the Motor and bracket into the cavity through the passenger footwell.
- Line up the locating pin to the hole on the left, and then screw in the bracket in the top middle, then the right.
2.5 Install Maxima Blend Motor and Bracket If thats what you chose.
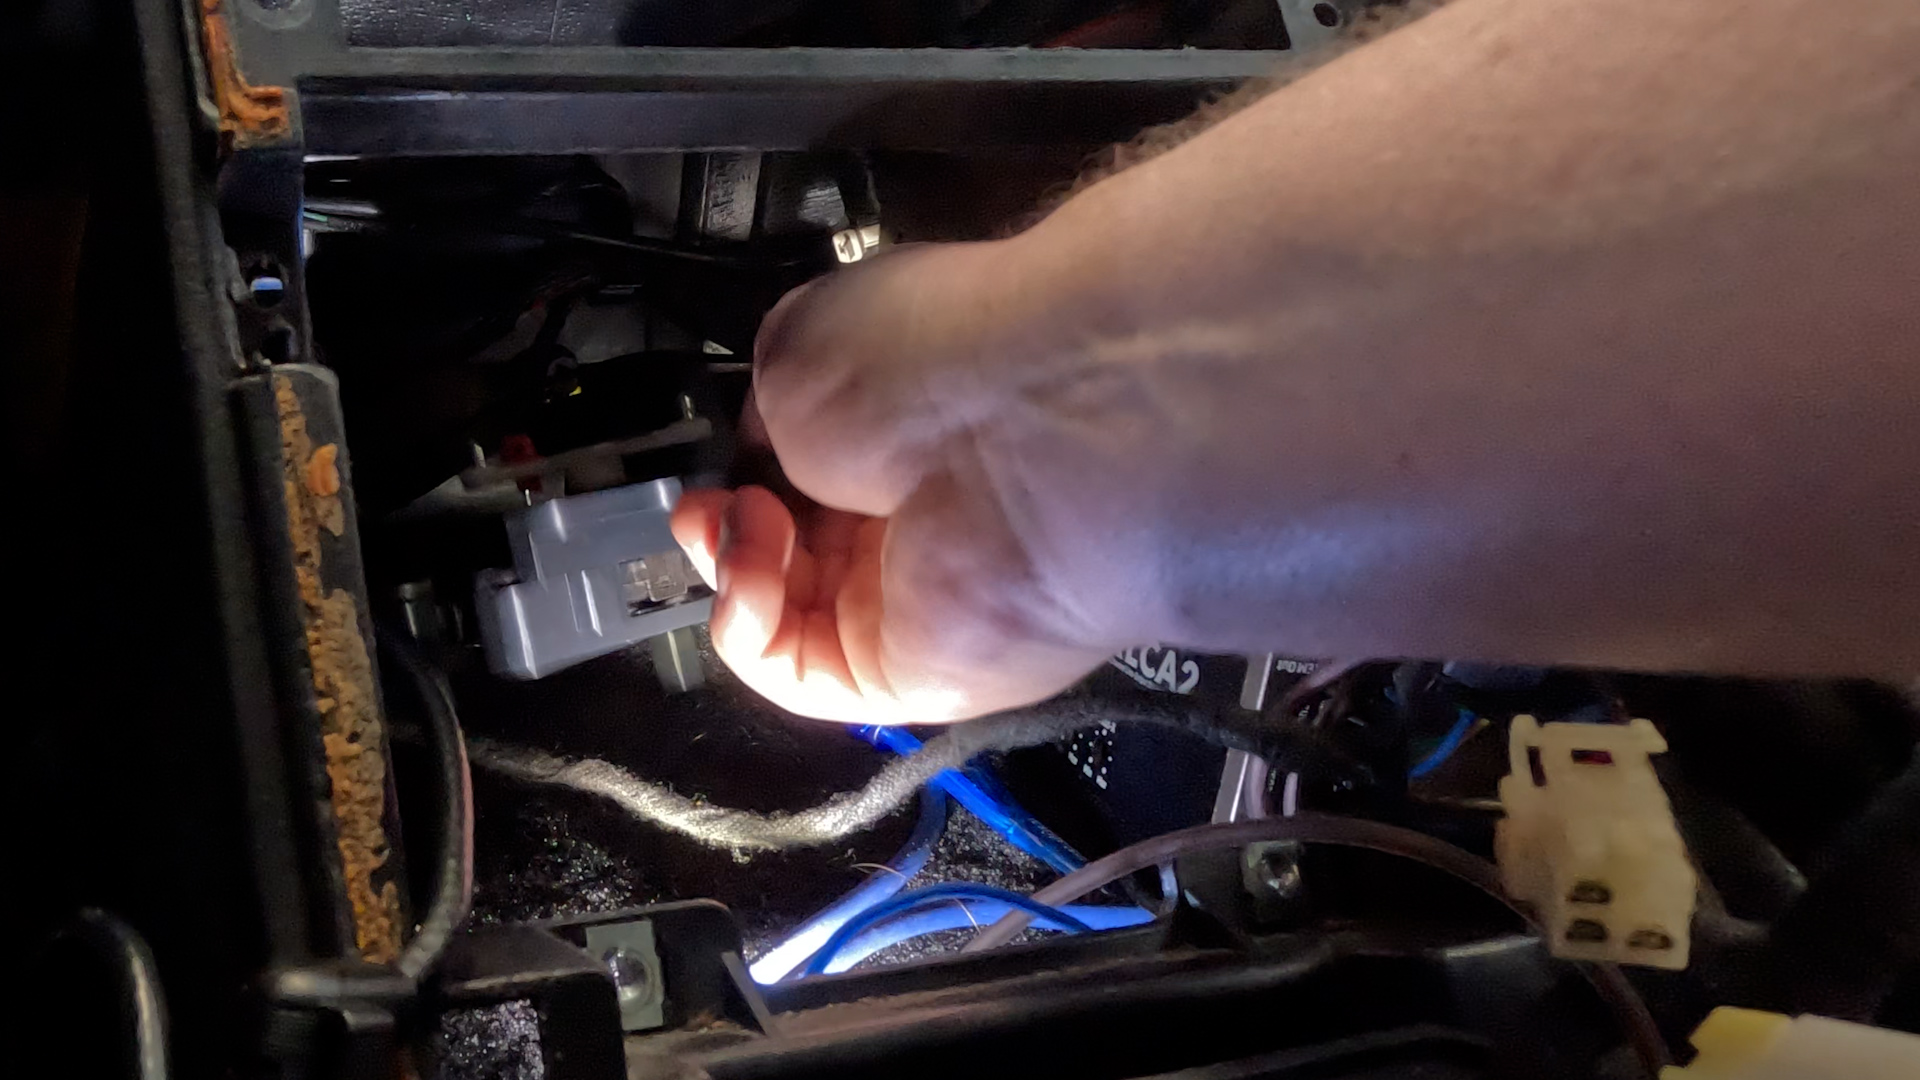
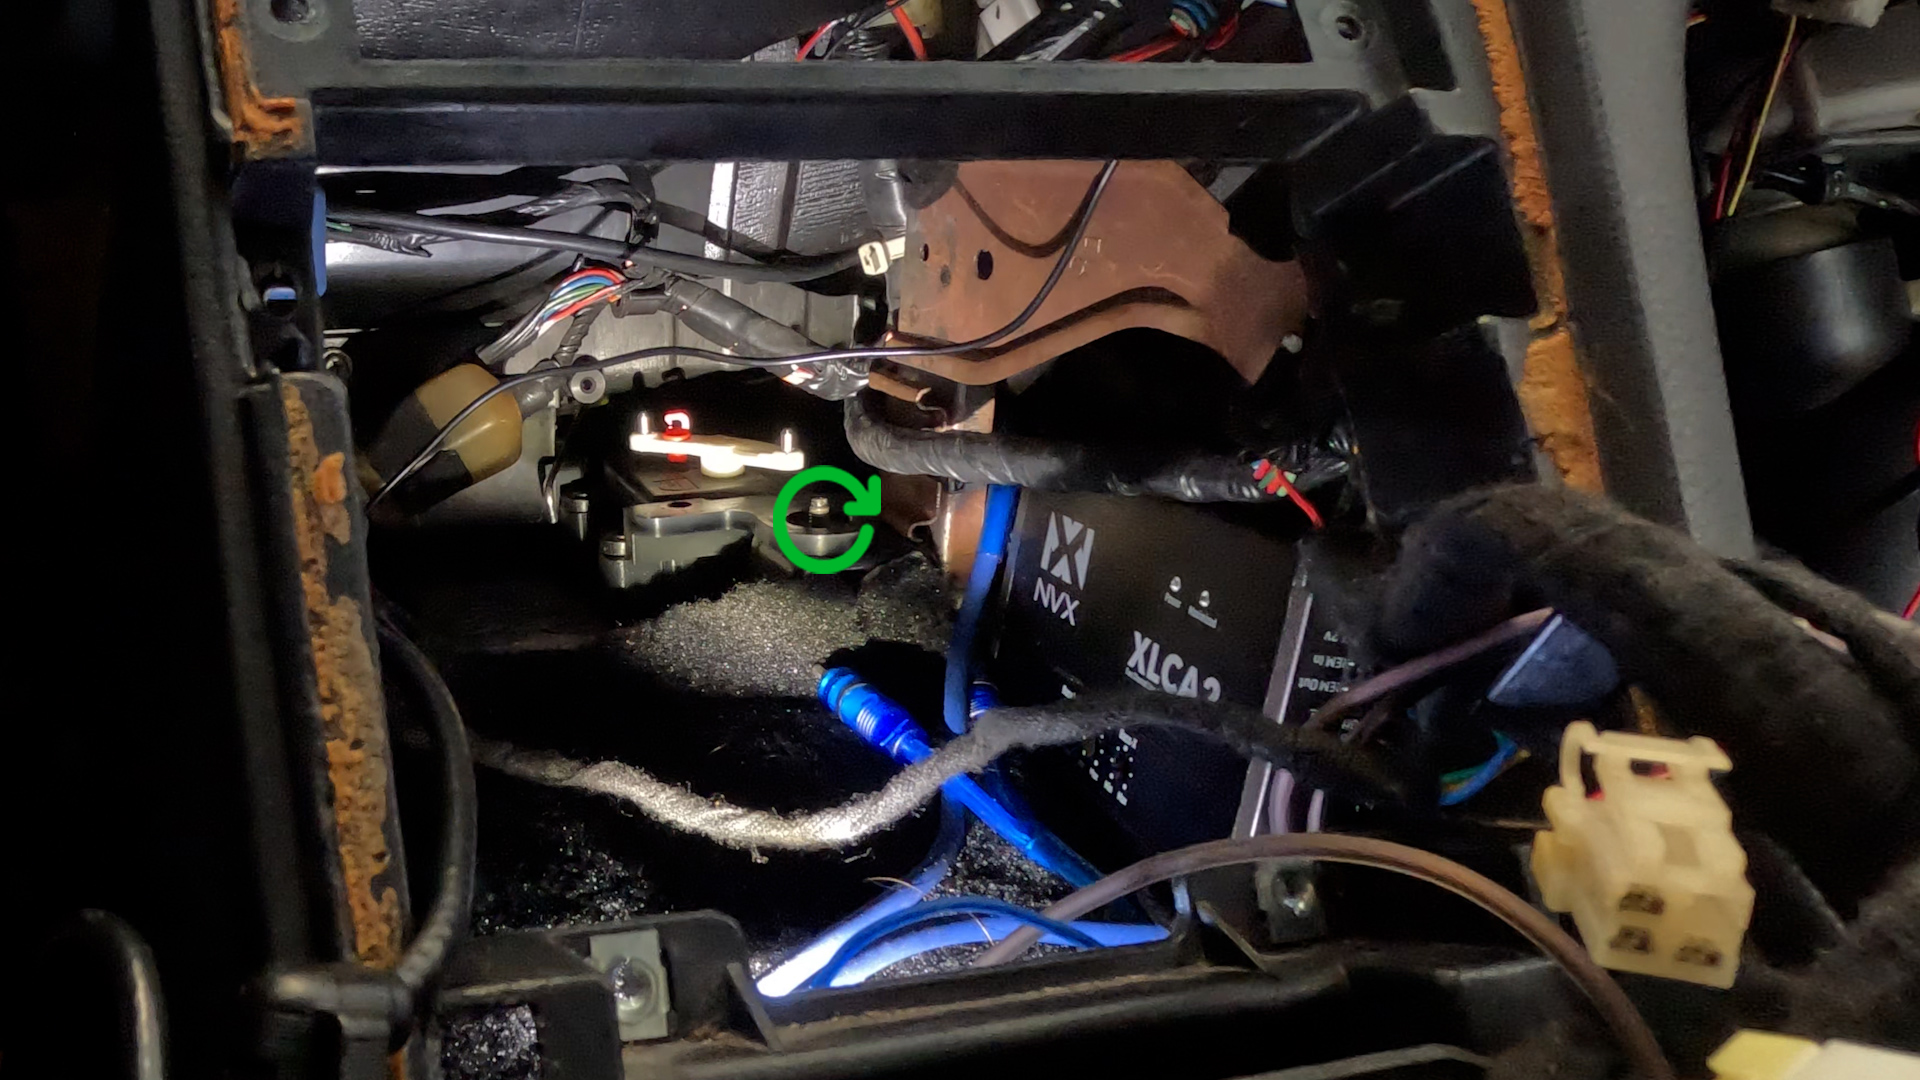
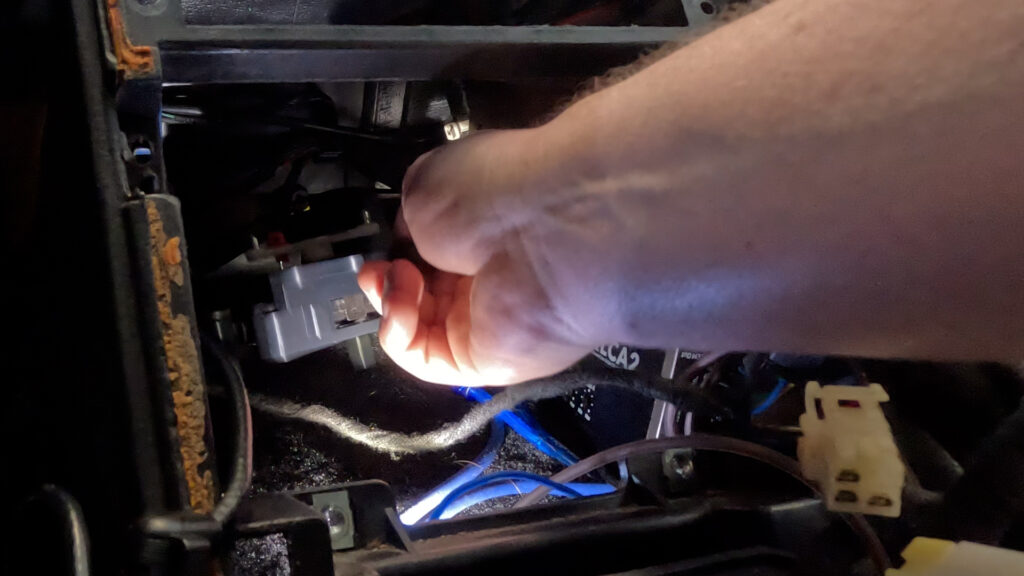
- Weasle the Bracket Assembly for the Blend Door Motor all the way back. It will go past the bracket, and the Stud on the right side fits through the whole on the back of the bracket.
- Then Use the Flange Nut you removed earlier to secure the bracket into place.
3. Install Blend Door Bracket
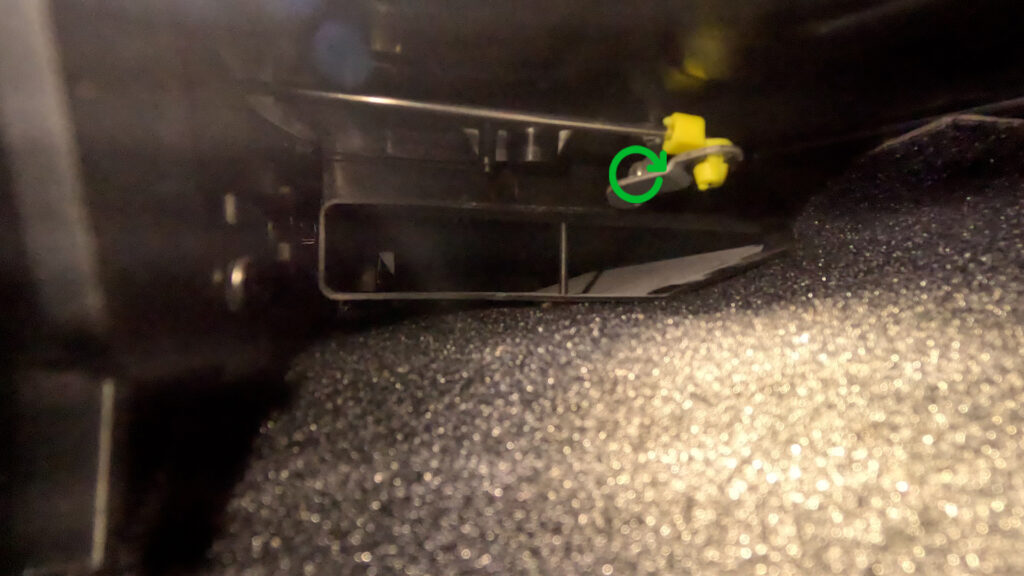
- View is from Passenger Footwell. Take the Blend Door Bracket, and screw it into the metal rod that rotates the blend door with the same Philips screw that held in the original. It should look like it does in the picture. Once that is secured. You’ll place your clip into the hole, ensuring it fits snugly and pops in. Then take your Rod, and insert it down into the hole, and rotate the clip to lock it in place.
4. Reinstall Passenger Foot Vent
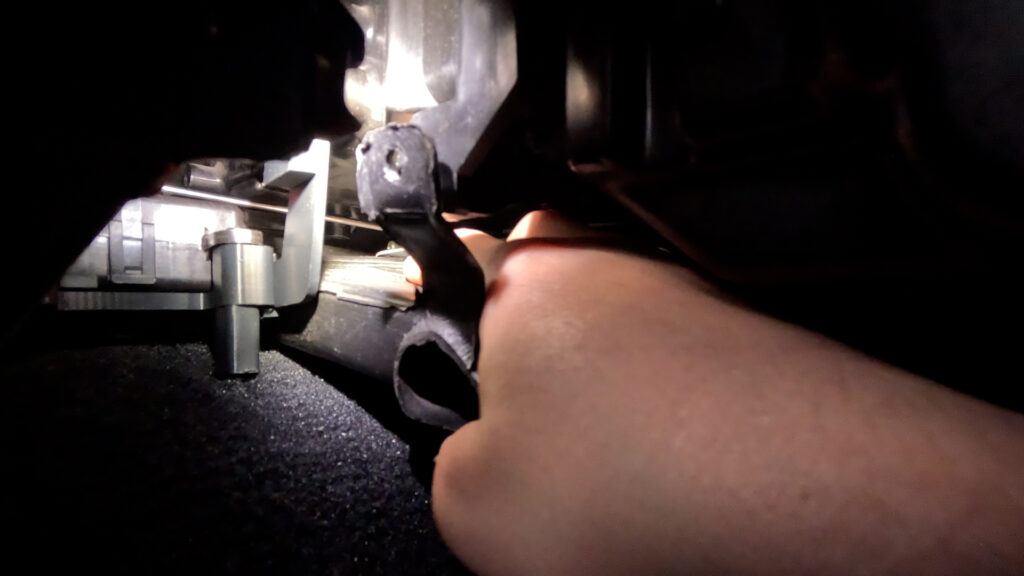
- Its a bit tricky, but you have to push the vent down against the carpet, and push it in. It should pop into place, and the screw hole should align with the box where it was originally. If its not aligned, its not in properly.
5. Screw in Vent
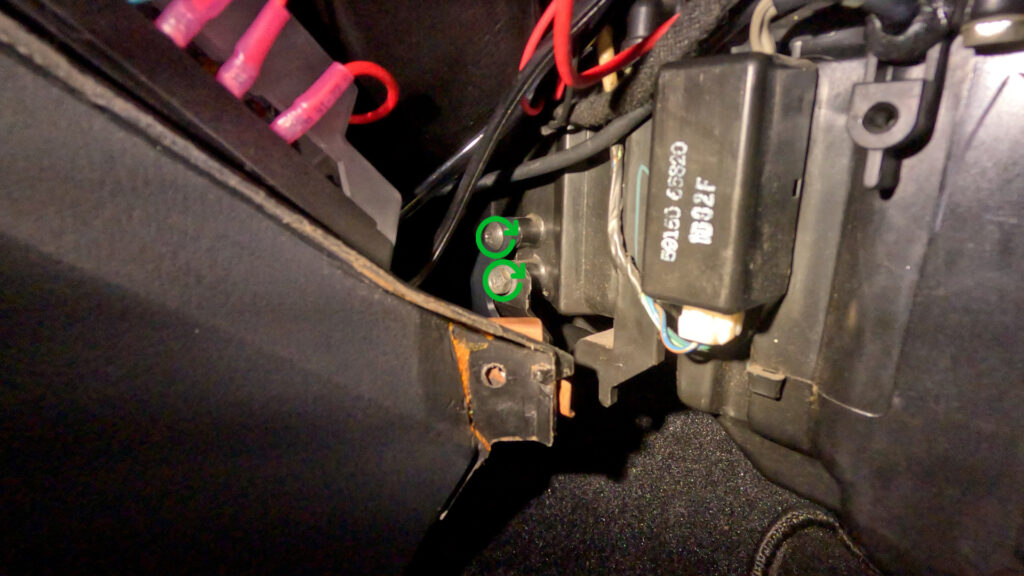
- Screw in the Foot Vent with the screw that was originally there.
6. Install Rod to Arm of Motor
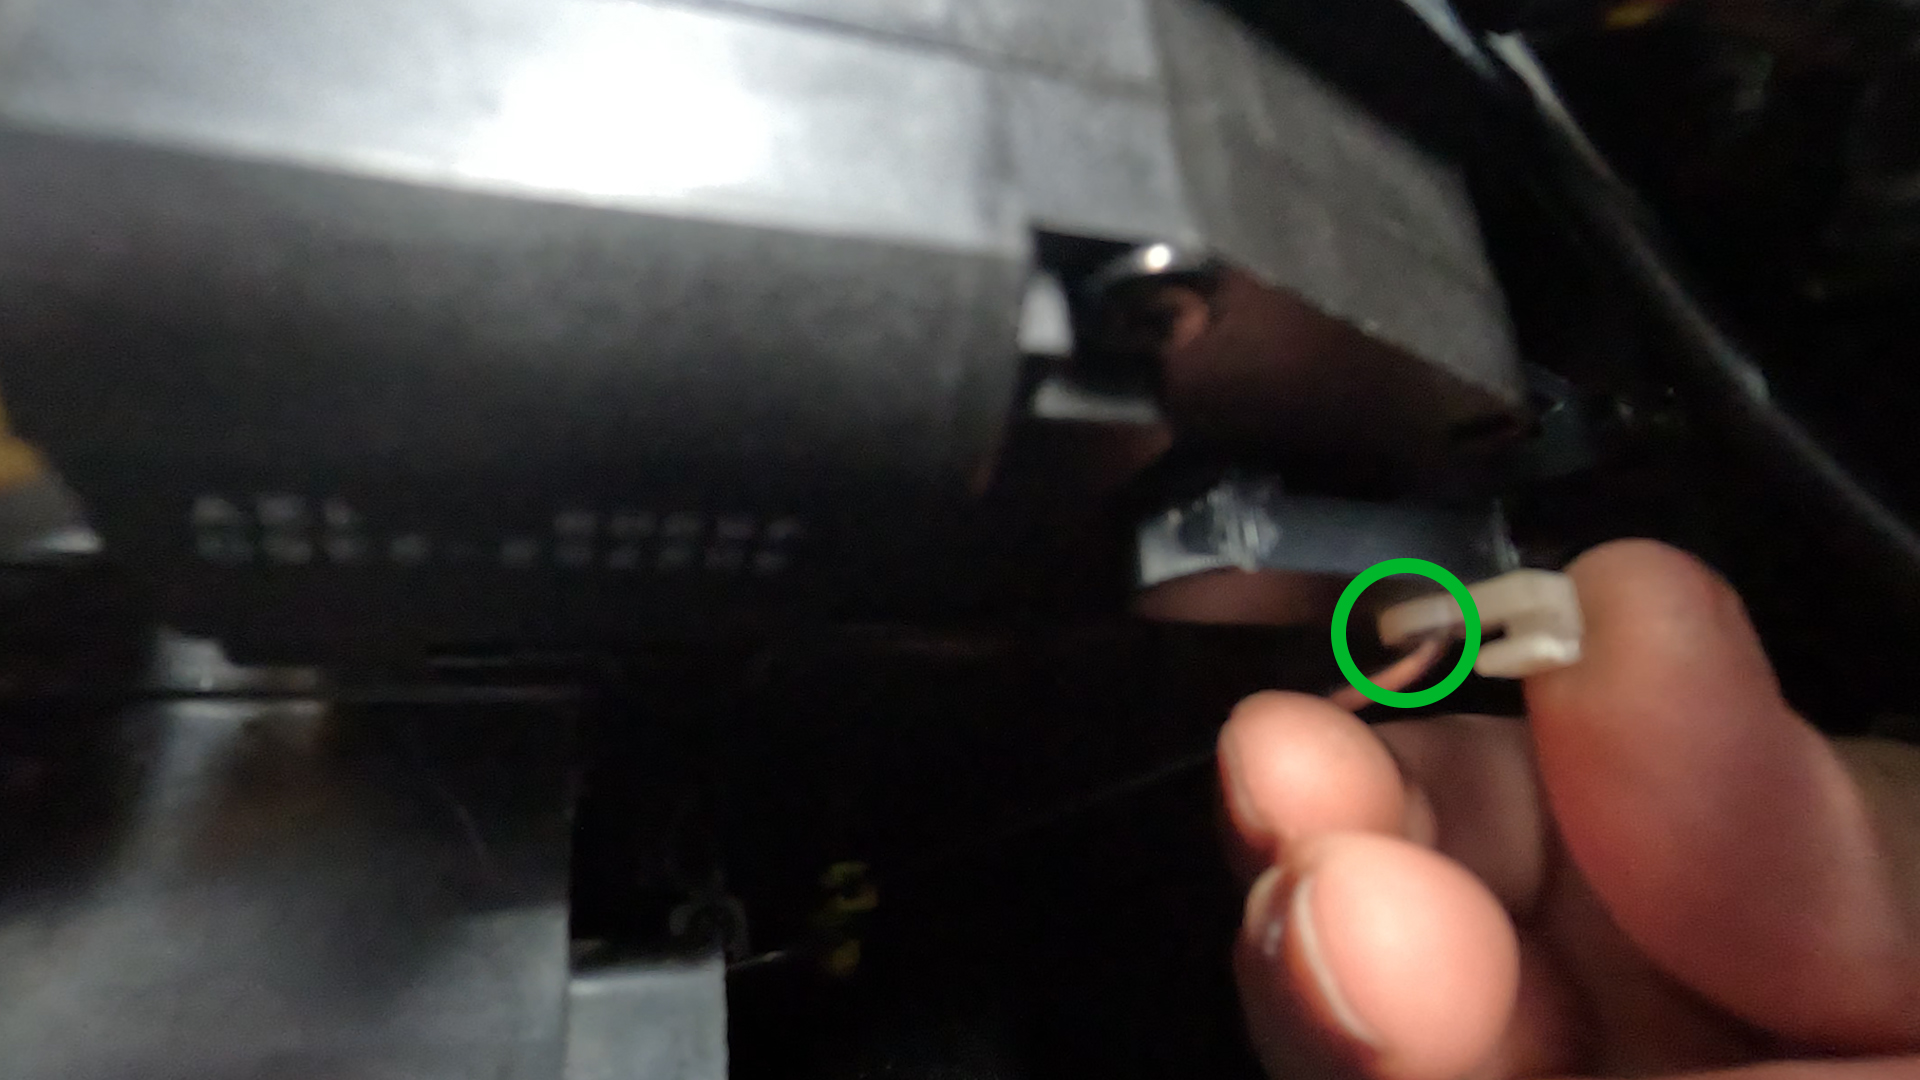
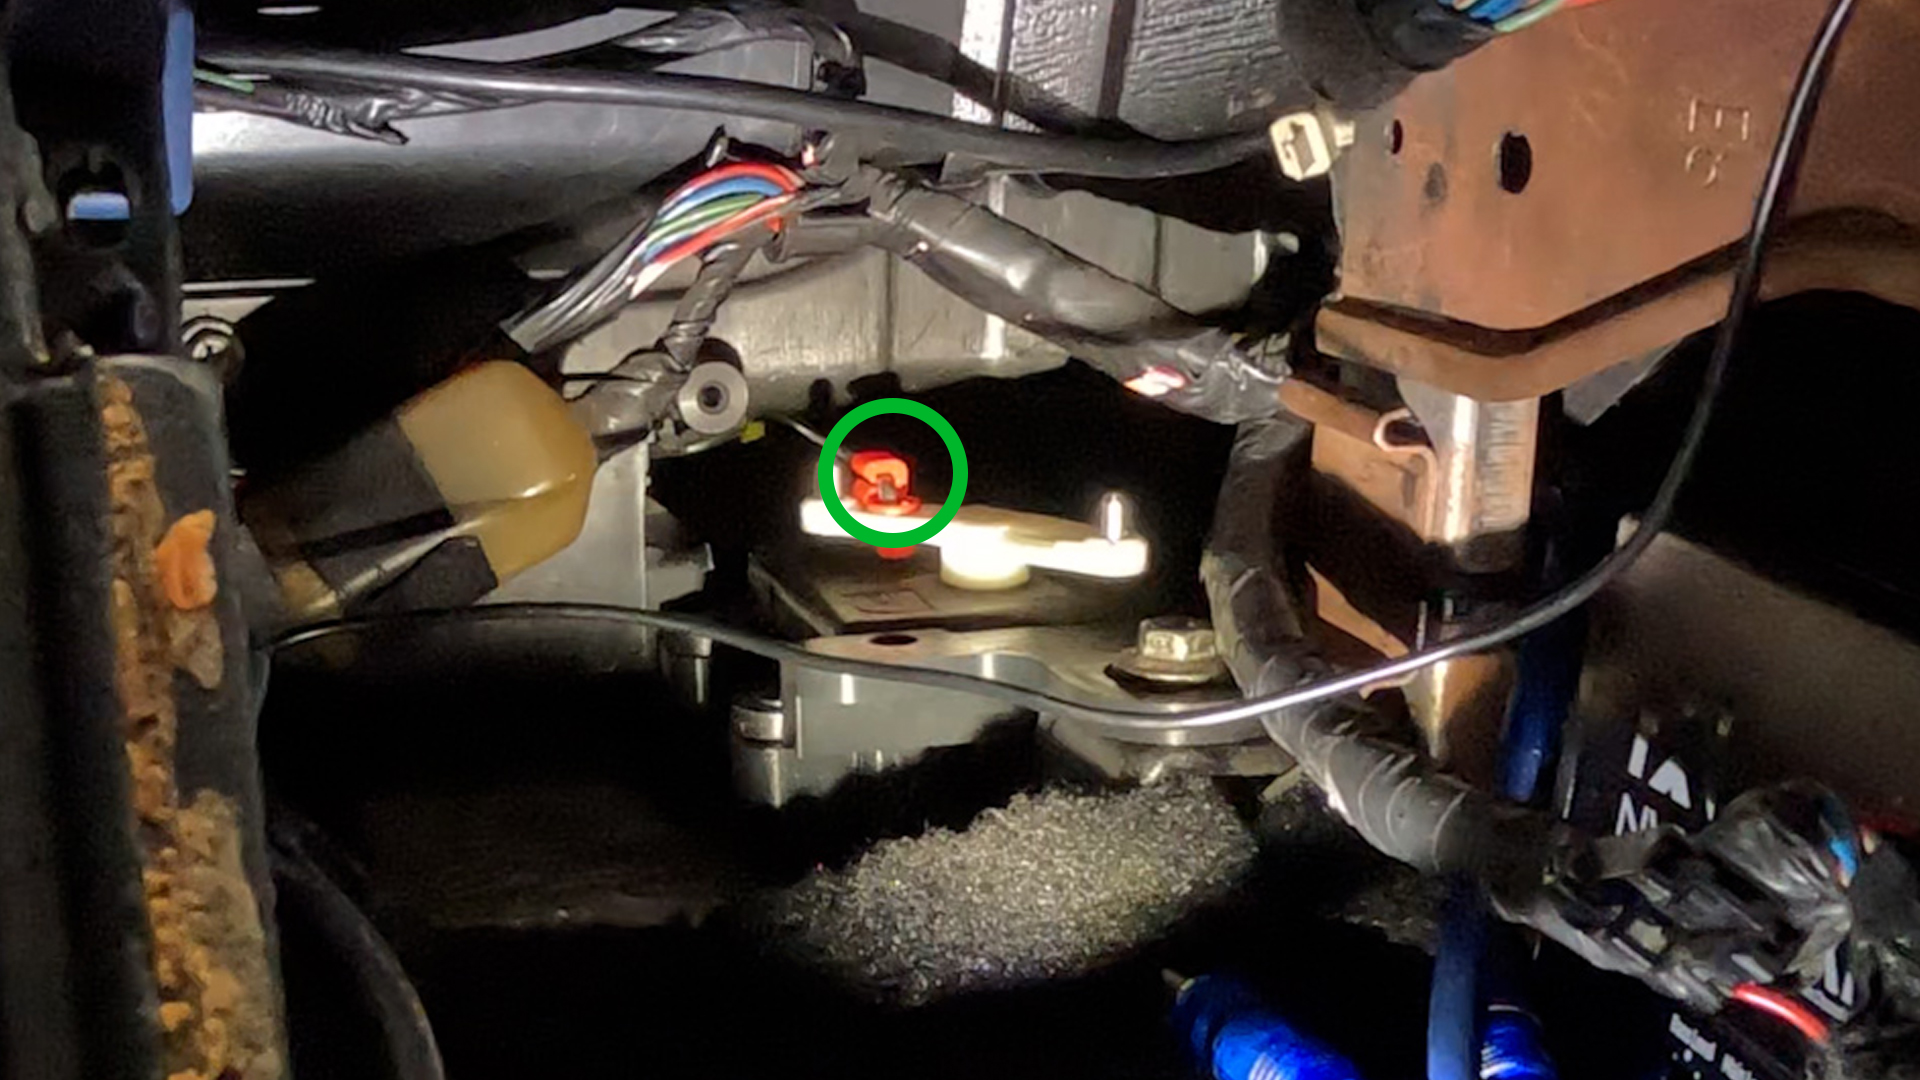
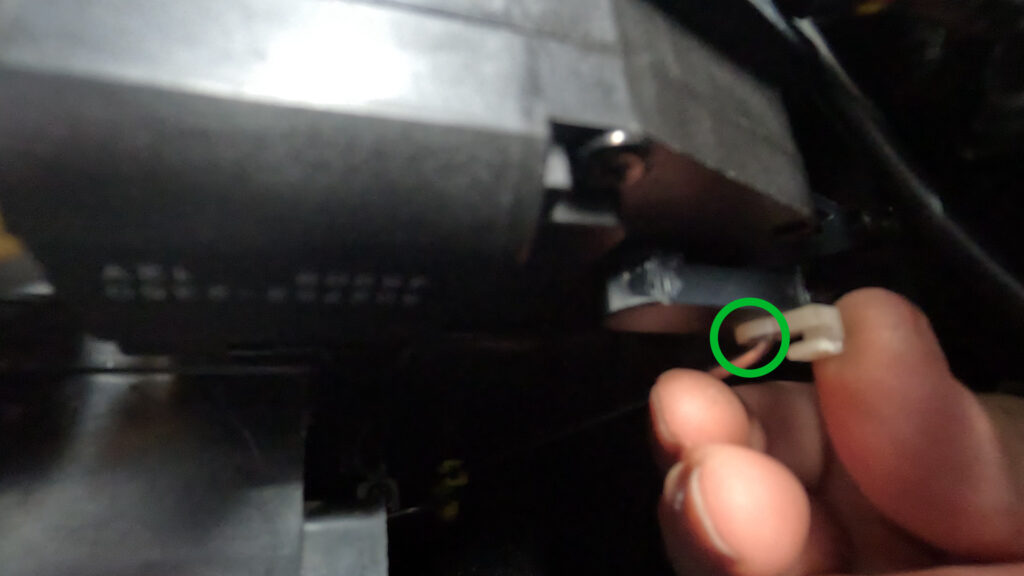
- Now you can slide the other end of the rod into the hole of the clip. Then rotate the clip to snap onto the rod. Now your Blend Door Motor is installed.
7. Install Q45 Blower Motor Resistor
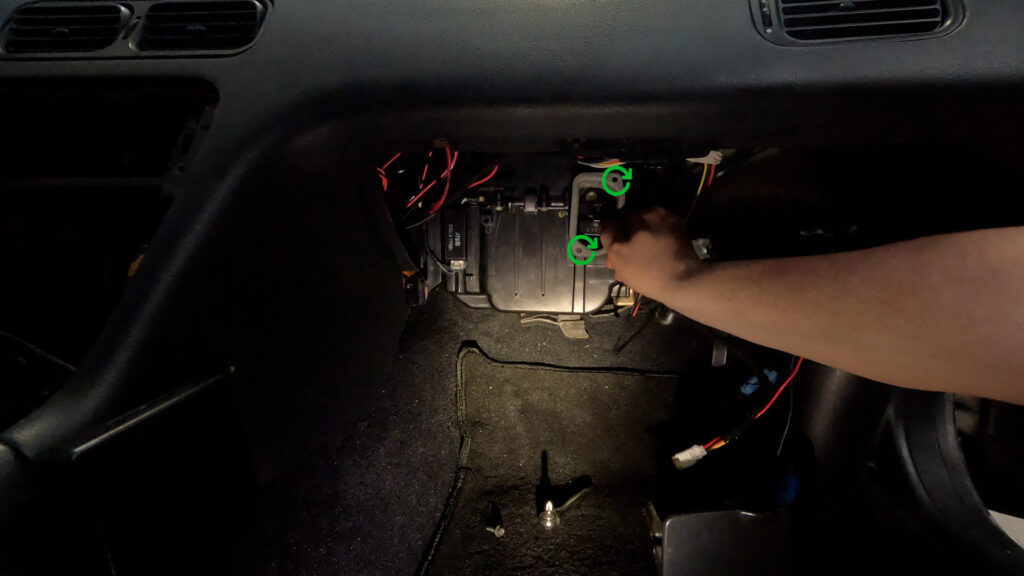
- Install the Q45 Blower Motor Resistor with the Two screws that go into the plastic box. Then plug in the USDM harness. You don’t need to do anything else here!
8. Install Aspirator
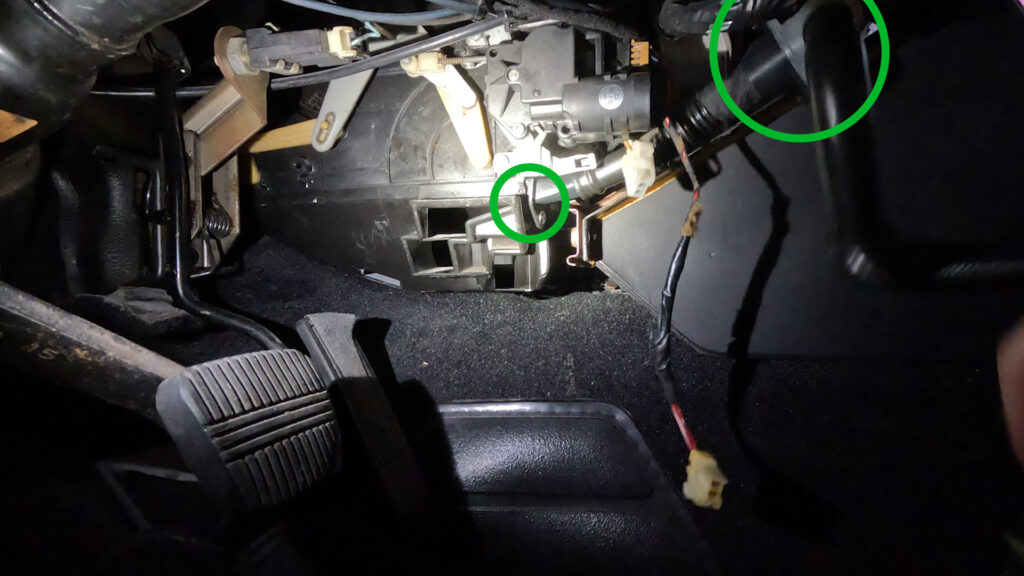
- Install the aspirator tubes. So the end of the aspirator goes into the hole you cut. And having about 4 inches of hose going to the secondary aspirator.
- Take your tiny flathead and use a small self tapping screw to secure the aspirator to the HVAC box.
- Tuck the hose up, and rest the secondary aspirator, in the larger green circle up into the space there.
- And have a hose long enough to reach over where the sensor is secured to the lower dash panel.
9. Connect Aspirator to Sensor via hose
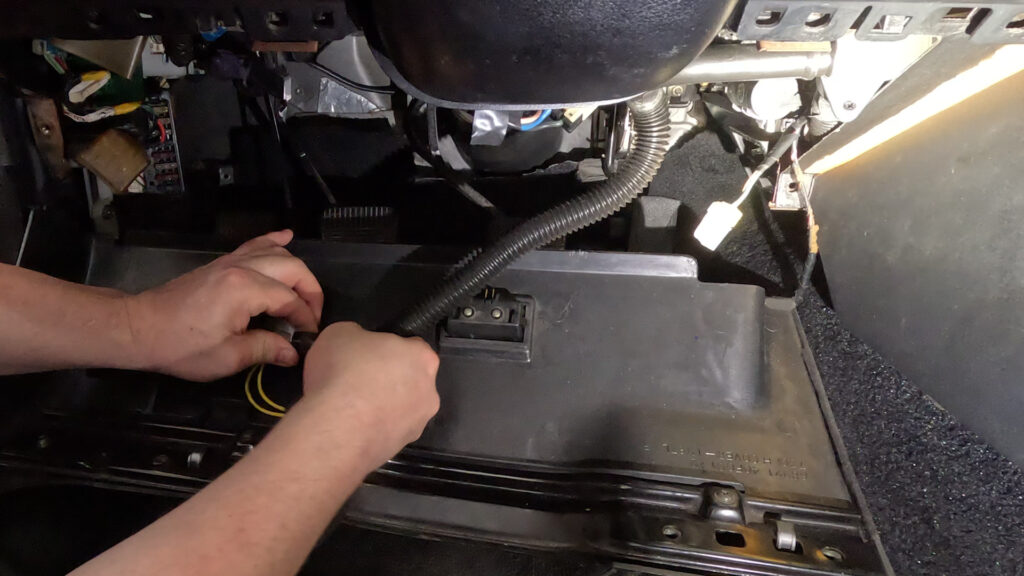
- Connect the hose to the sensor, as shown.
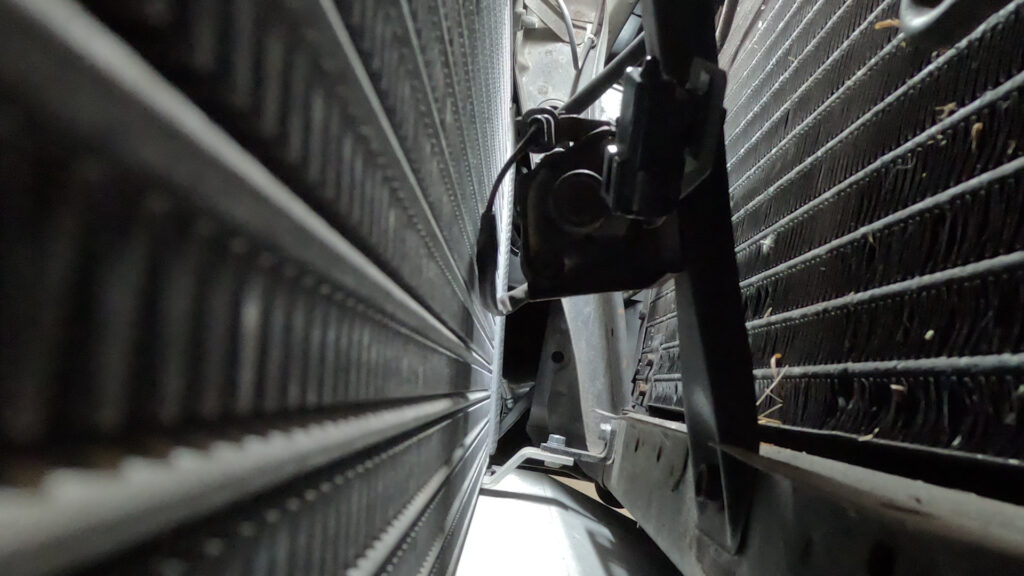
10. Outside Temperature Sensor
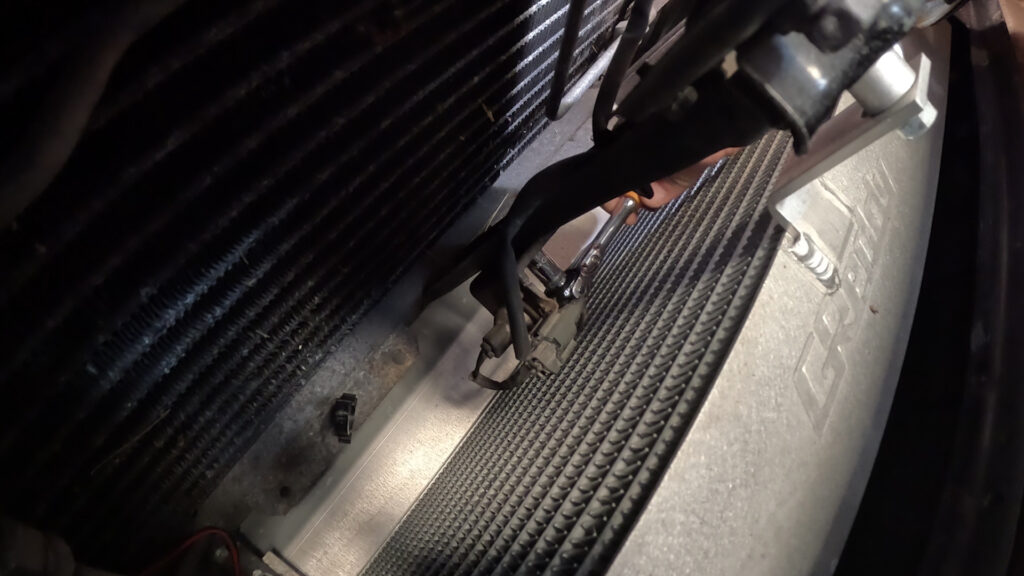
- Go to the front of your car, and look down infront of the core support. There should be a center beam that your hood latch is attached to. Look down and you’ll see a bracket and some wires. Remove the 10mm bolt from the bracket on the center beam that is right infront of the Condenser. Keep the bracket there, but take the bolt out.
11. Outside Temperature Sensor Bracket
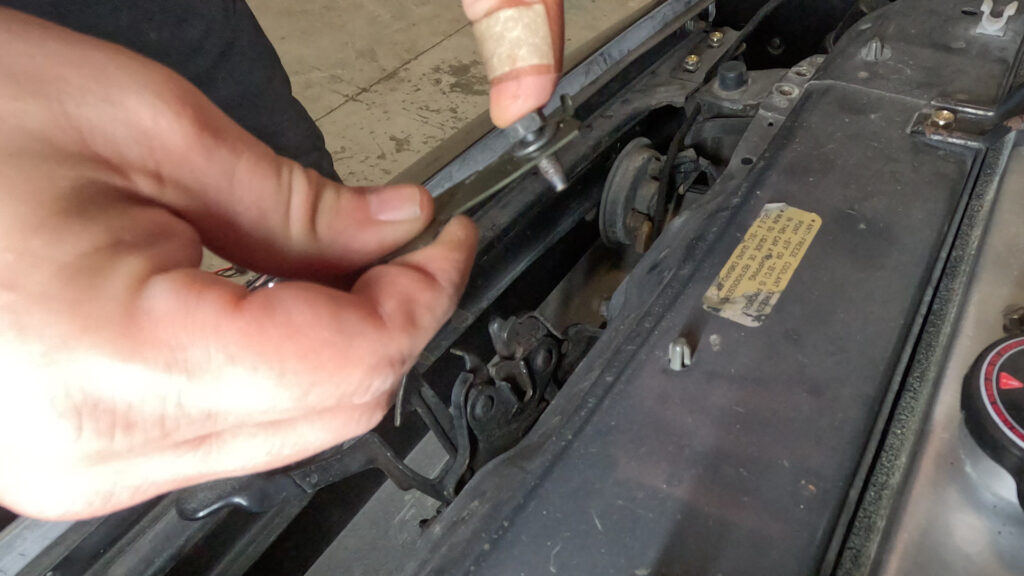
- Take the bracket that the Temp Sensor connect to. And turn it with the notch facing towards you. Using the same bolt, place the bracket down, bolting in the original hole you used. This results in the bracket sticking up and to the right.
12. Install Outside Temp Sensor
- Install the Sensor, by pressing the clip into the square, with the end with the little nipple facing up. Then take your wiring harness for the outside temperature sensor, which should be 12 feet long. And connect it.
13. Route the Wires
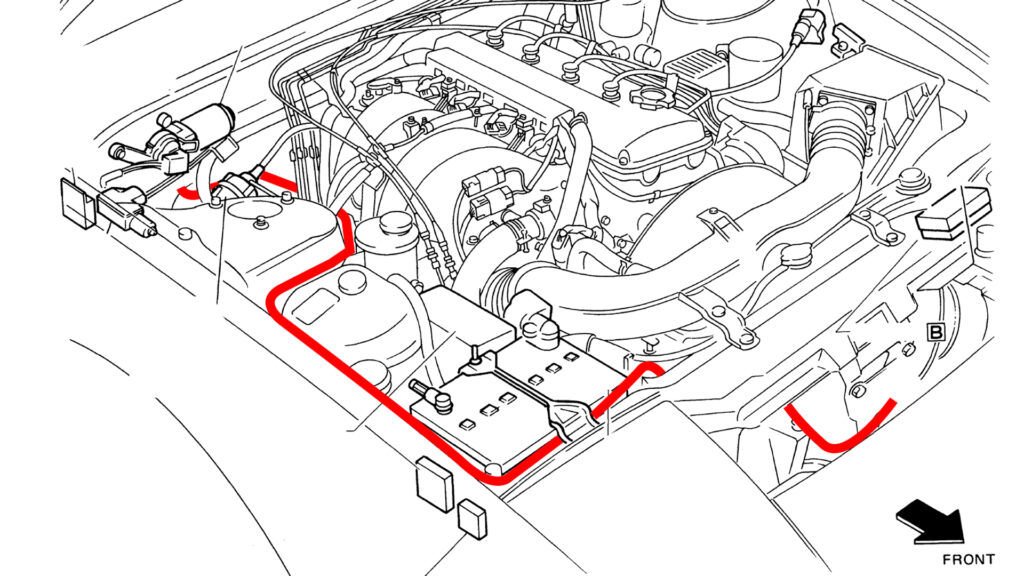
- It helps to use a ziptie, and tape it to the end of the wires that go to the accessory harness in the cabin of the car. And then you want to route the wires similarly to the red line in the diagram shown. Use your best judgement, and get the end to the grommet in the firewall.
- Once there, you may have to cut a hole in the grommet, and push the zip tie through as far as you can.
14. Route the Wires Continued
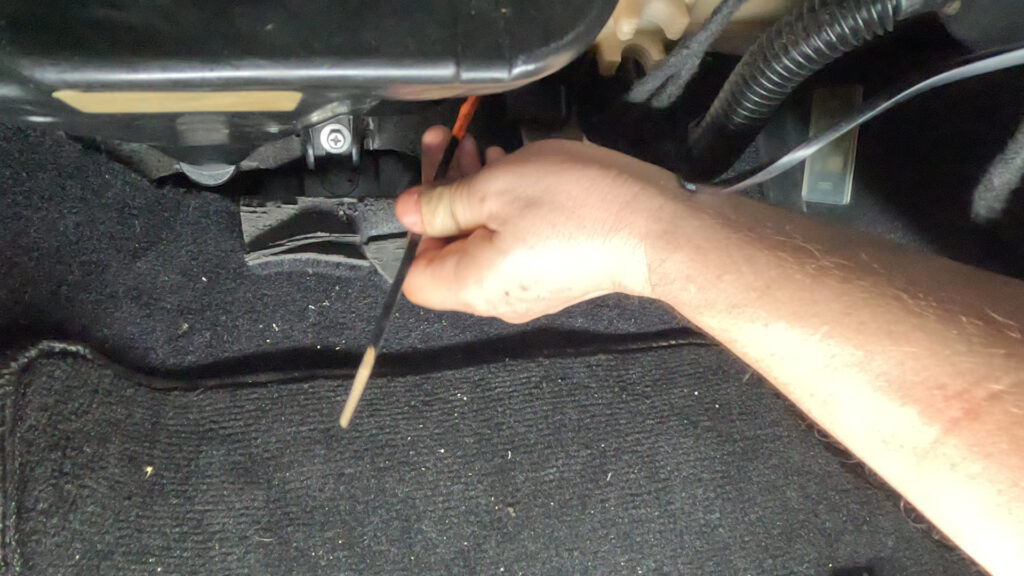
- Once you have the wire routed. Go into the cabin, in the passenger footwell, and reach your hand up in the back, and try to locate the end of the ziptie. It can be hard to reach it, but its doable. Once you have it, pull the rest of the wire through.
- Tuck the wire along a path that makes sense to you, as you don’t want it just dangling down. But once everything is where you want it, take the wire, and push it into the center cavity.
15. Install accessory harness
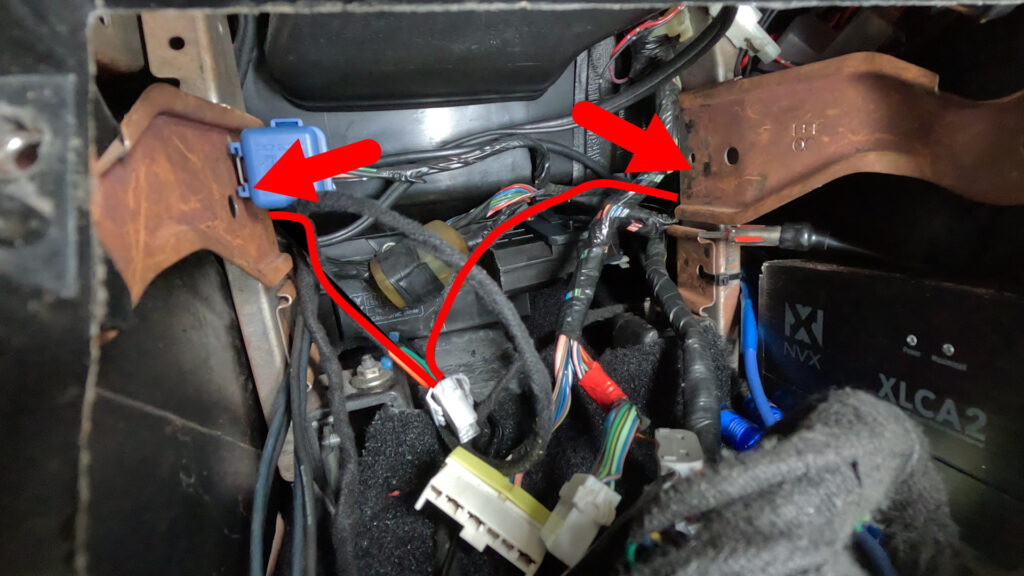
- Install the Accessory harness. Take the Sunload connecter, and put it out to the right side, along where you have routed in the outside temp sensor.
- Take the Inside Temperature Sensor, and route it to the left. And pull both the wires so that the plug sits a little bit back in the cavity.
16. Connect Outside Temp to Accessory
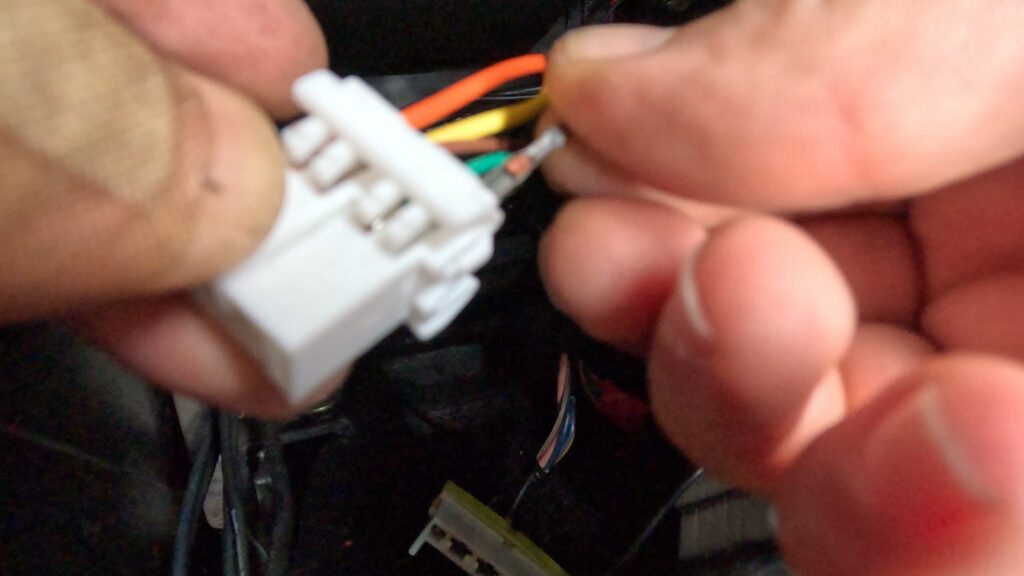
- Using the wiring diagram to determine which wire goes were, connect the outside temp sensor to the plug. And close the plug locking mechanism. You now have your sensors wired in. The next step is to route wires and connect them.
17. Connect Inside Temp Sensor
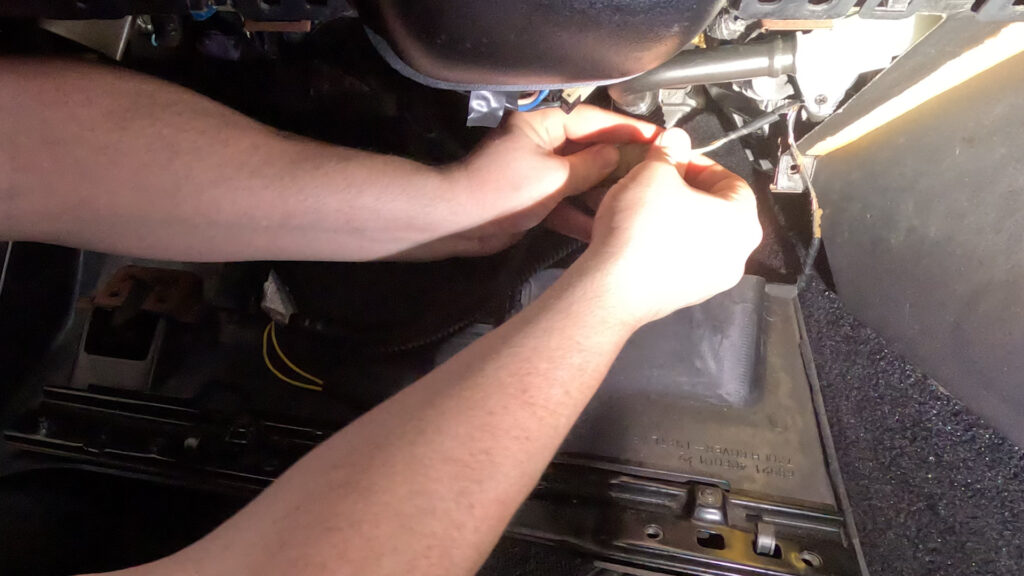
- Connect the wire harness to the inside temperature sensor.
- Note the image here I’m using the OEM JDM inside temp sensor. Which has a longer pigtail. You should be using the Murano Temp sensor, which doesn’t have a pigtail. So the wire will cross over to it.
17. Route Sunload Connector
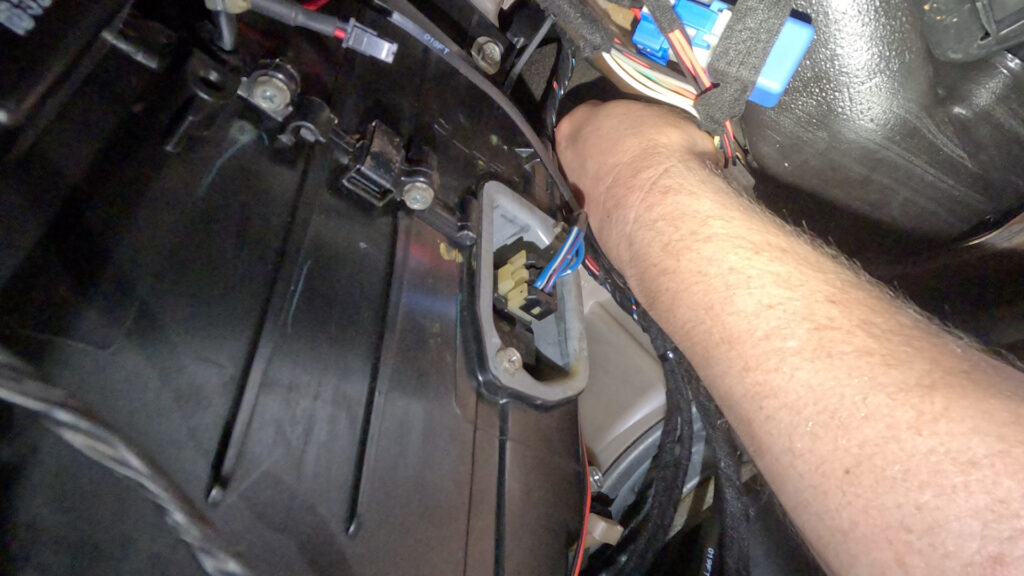
- Now take the Sunload connector and tape a zip tie to the end. You’re going to pull that wire as far as you can, and then using the zip tie, push it up under the dash.
- There is a bar here, and the goal is to push the zip tie between the bar, and the plastic vent there. Its a tight fit, and you should be able to see light through the gap so you know where to go.
18. Connect Sunload Sensor
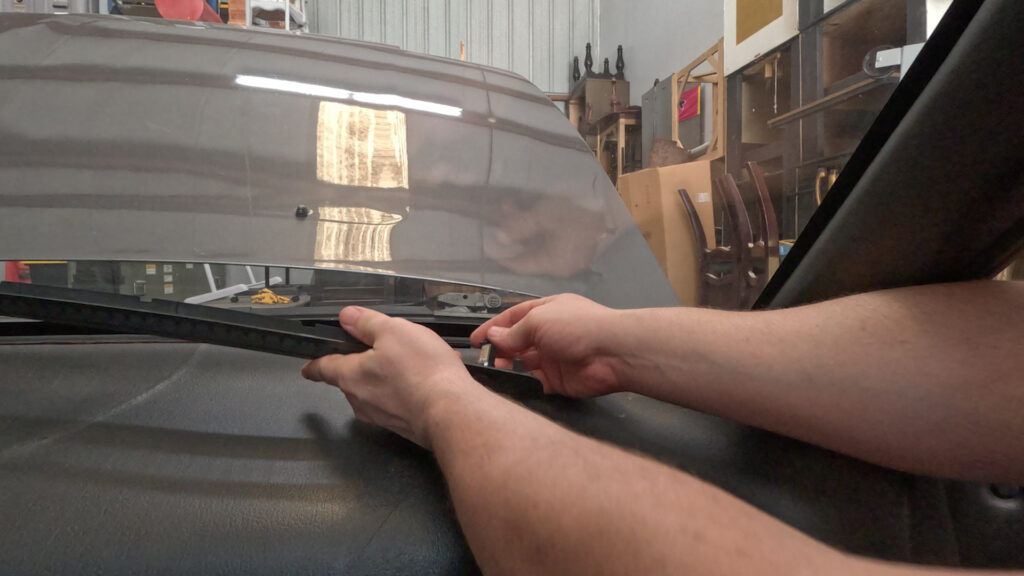
- Once you have the wire routed, remove the zip tie and connect the sunload sensor, and then install the defrost vent.
19. Install the Harness
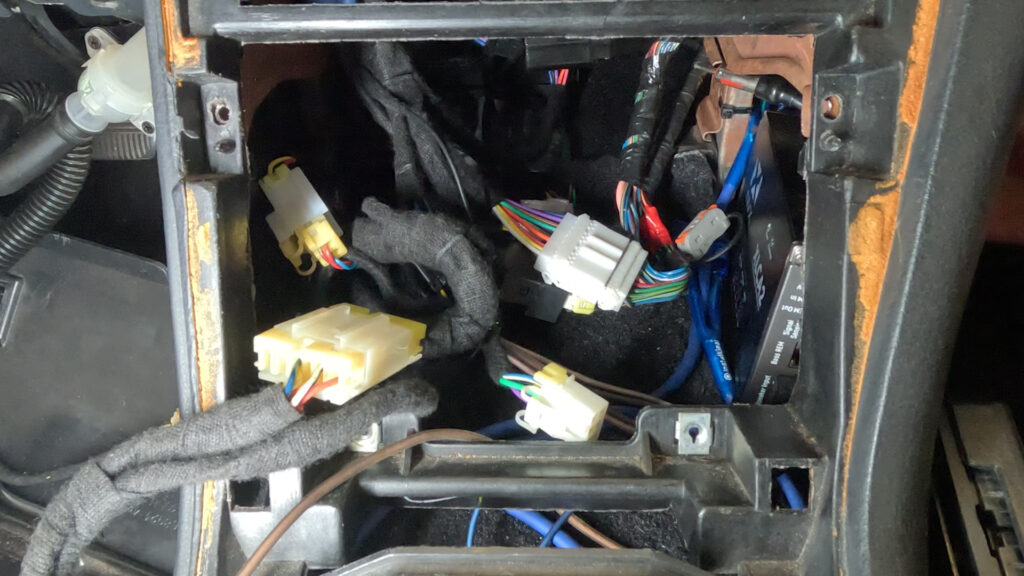
- So now we need to install the rest of the harness. This should be pretty simple, as it can really only plug in one way.
- Connect the 16 pin dash interface harness. (White)
- Connect the 6 pin Fan Harness (Black 3D printed)
- Connect the 6 pin Accessory Harness. (White)
- Connect the 4 pin Power harness to the Radio harness. (White with Yellow Back)
- Connect the Blend door plug to the Blend door motor. (Black)
20. Connect the Ground
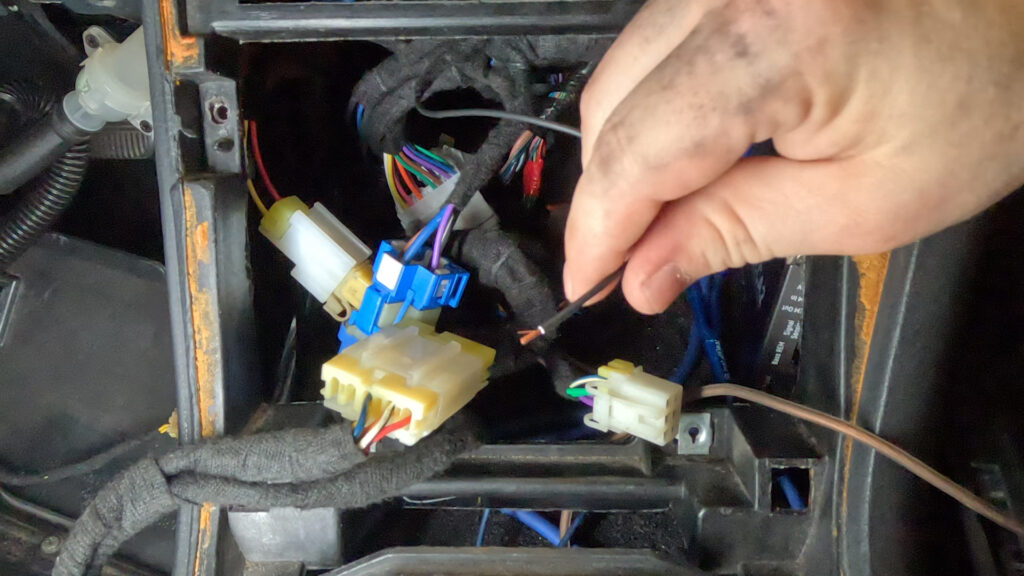
- Connect the ground wire to the Chassis. You can do this by adding an Eylete, and connecting it to the Stud in the back left or right. Or really however you fancy.
- This is the only wire that doesn’t have a plug to connect into in this harness. As I couldn’t find a ground that I trusted within the original harness that I liked.
- Once thats connected the harness for your Digital Climate Control is installed.
21. Install Digital Climate Control Unit
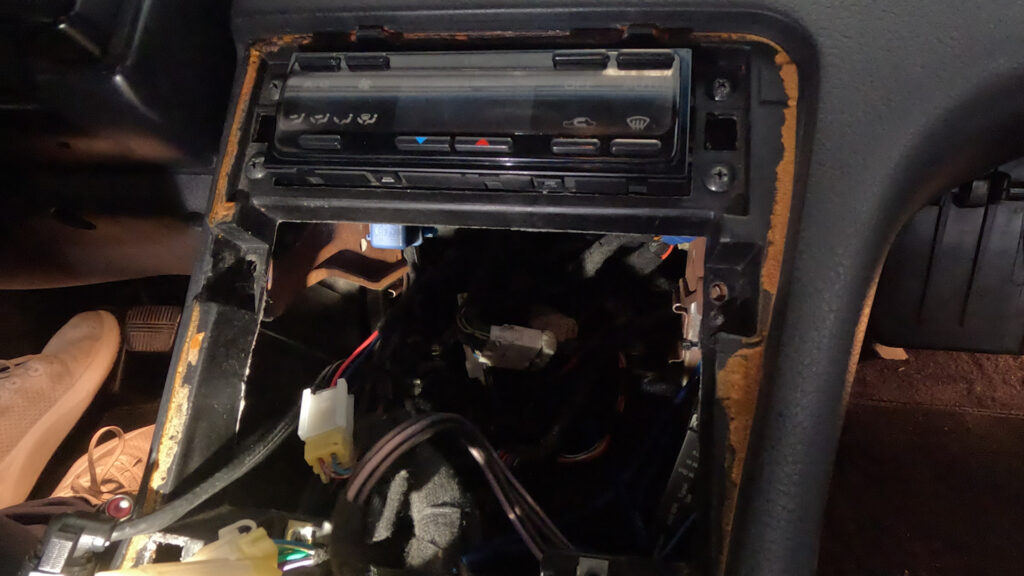
- Now you just need to connect the two connectors from the harness into the back of your Digital Climate Control unit.
- Once the connectors are secured, you’ll need to push the wires far into the back of the cavity, taking care not to interfere with the Blend Door Motor’s actuating arm.
- Push the Unit in through the larger cavity below, like how you removed the Manual HVAC unit, and guide it into position from behind.
- Attach the unit to the dashboard with the four screws.
6. TESTING
Great! Everything is installed! But now we need to make sure we didn’t mess anything up along the way. Thankfully Nissan built in a self-diagnostic test you can run. Below details exactly how to do that!
- Turn the Key to Accessory On position. Within 10 seconds of turning the key, press and hold ‘OFF’ button on the Faceplate for 5-10 seconds until all segments on the display light up.
- Test 1 – Display Test. This just lights everything up so you can see if you have any bulbs burnt out. If you do, refer to the last section of this guide!
- Press the red UP arrow to get to Test 2.
- Test 2 – Sensor Check. Checks the Input signals from each sensor. Its 90’s tech so its a little slow, give it a second.
- 20=all ok
- 21=ambient
- 22=in-vehicle,
- 24=intake,
- 25=sunload (test in sunlight to prevent error, or Hold a decent flashlight up to the top of the sensor. It should clear. to prevent this error. Also note this error doesn’t prevent anything from working.)
- 26=PBR.
- Press the red UP arrow to get to Test 3 or Blue Down Arrow to go back to Test 1.
- Test 3 – Door Mode Motor Checks. This test takes a little bit.
- 30 = all modes ok
- 31 = vent, 32=B/L
- 33 = B/L
- 34 = Foot/Def 1
- 35 = Foot/Def 2
- 36 = Def
- Press the red UP arrow to get to Test 4 or Blue Down Arrow to go back to Test 3.
- Test 4 – Actuators Test Pattern. Press the defrost button to cycle through modes. (Something to note here. When it gets to DEF, it makes a really horrible noise up in the right side of the Dashboard. Something is Grinding. Quickly change test when you hear this. I am not smart enough to know why it does this, but it hasn’t effected how anything actually works. So….. I ignore it!)
- 41 = Recirculation / Full Cold / Vent
- 42 = Recirculation / Full Cold / Vent
- 43 = Recirculation / Full Cold / Vent & Foot
- 44 = 20%free / Full Hot / Vent & Foot (this shouldn’t be wired up?)
- 45 = Outside Air / Full Hot / Foot
- 46 = Outside Air / Full Hot / Defroster & Foot
- 47 = Outside Air / Full Hot / Defrost
- Press the red UP arrow to get to Test 5 or Blue Down Arrow to go back to Test 4.
- Test 5 – Temperature Readings. Press defrost button to toggle through sensors (ambient, in-vehicle, intake; in that order).
- If the temp reads -22, then that sensor is not working. The temperature can also be adjusted to compensate for differences between temp setting and the temp felt by driver. It can be adjusted 6 degrees up or down. To do this while in Test 5, press the fan switch and then the temp adjustment can be made using the Up/Down arrows.
- Hit the Auto button or turn car off to exit self-diagnostic.
TROUBLESHOOTING
- Problem: Error code in test 2
- Check: Double check to make sure Related sensor is plugged in. If it is, you may need to swap the wires going to the sensor. If that doesn’t work, check the continuity between the sensor pigtail, and the DCC harness.
- Problem: No movement of Hot / Cold Mix Door when raising and lowering temp settings on the control unit.
- Check: If you get an error in the second test, that must be adressed first. If you have no errors, save for 25, on test two, then check the pigtail to ensure continuity between the blend door and the DCC unit.
- Problem: Test 3 Error
- Check: Check your Door mode Actuator. Ensure you have ground which should be the Pink Wire. And then test 7 & 8 for a +12v signal. These should be the Green, and G/Yellow wires.
- Secondarily, This test can give you an error when your vent mode motor is old. It just takes too long to get to the next vent position, and the dcc recognizes that as a failure. You may need to purchase a new one, which is very expensive. Or you can try replacing the motor, which is cheap, but you’ll need to know how to solder.
- Problem: Fan runs on full no matter what settings selected.
- Check: The Q45 Resistor may be touching and grounding out against a copper A/C metal line inside the cold air box. Remove the resistor, look inside air box and gently bend the line in a bit OR grind down the fins so it does not touch.
7. REASSEMBLE
You’ve troubled your shoot! And everything is working fine! Hell yeah Brother! Now its time to reinstall everything and get the car looking back to stock-ish, so you can Flex your JDM DCC out on all your friends.
You’re just going to kind of go in reverse order of how you took everything apart. I’m not going to show photos of this process, because its pretty self explanatory. If you absolutely need further clarification, check out the video tutorial above.
- Reinstall the Glove Box Mounting Plate. Use the two locating pins on the bottom to get it into position, and then bolt the plate in with the four bolts.
- Reinstall Glove box. Line up the two locator pins with the bracket on the bottom, And close the Glovebox til it clicks into place. Then remount with the two screws underneath.
- Remount the Hood Release handle with the two 10mm Bolts.
- Plug in the Footwell light, which is the 2-pin connector.
- Press the lower Dashboard Cover into place, and mount with the 7 10mm Bolts. 5 of them should be longer and go along the underside to the Cluster Bezel, and two shorter ones should go at the bottom of the panel.
- Install Drivers Side Kick panel. 1 Phillips screw at the bottom. One bolt/screw in the back above the dead pedal. And a clip for the Door sill Side.
- Install Plastic Kick Plate by lining up the holes, and pushing the clips down into place.
- Install Radio by reconnecting connector and Radio Antenna. Then make sure the wires are tucked away neatly, and place radio in, and mount with the four screws. You should not have to push hard and squish the wires. There should be enough room for the Radio to seat fully.
- Install shifter bezel by pushing the clips back into place. Hopefully you didn’t destroy them in the removal process.
- Install shift knob by rotating clockwise.
- And thats it. It should look super sleek, and everything is done!
8. LIGHTS
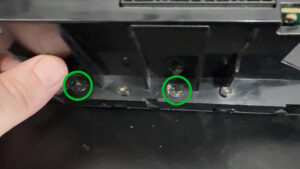
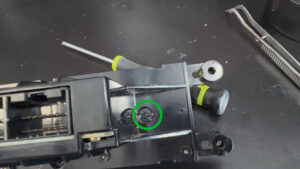
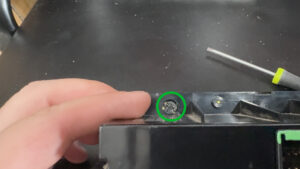
This stuff is old. And chances are the light bulbs in the DCC you purchased are old, and burnt out. So you’ll want to replace them, and depending on how neurotic you are, there are many many ways to solve this issue. But mostly, you’ll want to look for T3 Neo Wedge lights. They have an 8mm Base. There are four of these lights. 1 for the left side, 1 for arrow buttons, and two for the right side. They just unscrew with a flathead, and you have to kind of pull them out with tweezers, and then put the new ones in and screw them.
1. You can purchase brand new LED lights that just replace the existing ones. And it works just fine. But they are quite bright, however you can get them in whatever color you want, which is pretty neat. I found WLHJ 10x White T3 Neo Wedge 3030’s on Amazon that worked just fine. Be mindful of Polarity with LED’s. So you may have to take them out, and turn them 180 degrees.
2. You want to keep it looking factory. You can purchase Warm White Halogen bulbs. They make things very orange, so the solution is to take the blue rubber condoms that should be on the lights that you take out of the DCC, and peel them off, and place them over these. HOWEVER. Something I’ve noticed is that the ‘white’ created by these condoms, is different than most of the factory ‘white’ in say the stock radio unit. Which can be distracting. The solution for this, is to go to a junkyard, and find USDM Nissans from the 90’s. And steal the blue condoms off those, and use them instead. That creates the correct white balance with a factory Radio head unit. I know this, because I’m insane, and was bothered by it, and kind of stumbled on to it by mistake.
10. CONSIDERATIONS
Acknowledgements.
Again, I could not have done any of this without the help of those who have come before me. I want to give a special shout out to NismoLK and KoukiMonster on NicoClub who really helped me find my way through. If for whatever reason either of you are reading this, and don’t want me using information you’ve provided, specifically the trouble shooting portion, let me know. So at the end of the day I’m maybe contributing like 15% new information.
Tips & Tricks
You can probably complete this installation for quite a bit cheaper. If you go to the junkyard, and grab the sensors from those cars, you can also take the pigtails, and just splice wires into them to make your harness, saving you some of the cost, of both the sensor, and the connector.
Issues?
If you run into any issues with the guide, such as the website has incorrect information, or something you’ve tried that isn’t covered in the guide, please reach out to me using the contact us page. Again, my goal is to have the best information available to those who are coming to this website for guidance.